In the last post we saw how to animate a transition using code. As I said, I don’t think that is the best solution, because we must use code behind, something not easy to maintain. We could refactor code, creating a new class for the animation and use it. That would bring a little more separation, but we would have to still use code behind.
In this second part, we will use a different approach: third party components. We can use several components, like Kevin Bag-O-Tricks (https://github.com/thinkpixellab/bot), FluidKit (http://fluidkit.com), Silverlight Toolkit (http://silverlight.codeplex.com – only for Silverlight), or Transitionals (http://transitionals.codeplex.com).
We will use here Transitionals, for WPF. If we want to do animations for Silverlight, we should choose another component. Its use is very simple: after downloading the component and adding a reference in the project to the Transitionals.dll assembly, we must add a TransitionElement component in the place where we want the animation, configure the animation and add a content to the component. When the content is changed, the transition is activated.
Let’s create our transition project. Create a new WPF project and add a reference to Transitionals.dll. Then, add a TransitionElement to the main grid:
<Grid>
    <Grid.RowDefinitions>
        <RowDefinition Height="*" />
        <RowDefinition Height="40" />
    </Grid.RowDefinitions>
    <transc:TransitionElement x:Name="TransitionBox">
    <transc:TransitionElement.Transition>
    <transt:TranslateTransition  StartPoint="1,0" EndPoint="0,0" Duration="0:0:1"/>
    </transc:TransitionElement.Transition>
    </transc:TransitionElement>
    <Button Width="65" Grid.Row="1" Content="Hide" Margin="5" Click="Button_Click" />
</Grid>
We must declare the namespaces for the TransitionElement and for the TranslateTransition in the main window:
<Window x:Class="WpfApplication2.MainWindow"
        xmlns="http://schemas.microsoft.com/winfx/2006/xaml/presentation"
        xmlns:x="http://schemas.microsoft.com/winfx/2006/xaml"
        xmlns:transc="clr-namespace:Transitionals.Controls;assembly=Transitionals"
        xmlns:transt="clr-namespace:Transitionals.Transitions;assembly=Transitionals"
        Title="MainWindow" Height="350" Width="525">
The next step is to add content to the TransitionElement:
<transc:TransitionElement x:Name="TransitionBox">
    <transc:TransitionElement.Transition>
        <transt:TranslateTransition  StartPoint="1,0" EndPoint="0,0" Duration="0:0:1"/>
    </transc:TransitionElement.Transition>
    <Grid Background="Red" />
</transc:TransitionElement>
The button click event handler changes the content of the TransitionElement and activates the transition:
private void Button_Click(object sender, RoutedEventArgs e)
{
    TransitionBox.Content = new Grid() {Background = Brushes.Blue};
}
That way, the code is simpler, we just need to change the content of the element. Besides that, the Transitionals component has a lot of transition types, and we can set them in many ways. For example, the TranslateTransition has the properties StartPoint and EndPoint, saying where the transition starts and ends. To do it from left to right, StartPoint should be –1,0 and EndPoint, 0,0. From top to bottom, StartPoint should be 0,-1 and EndPoint, 0, 0. We can even do a diagonal transition using 1,1 and 0,0.
Eliminating Code Behind
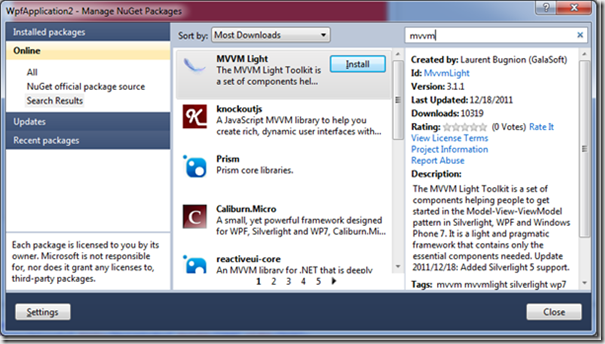
One thing that can be improved here is the elimination of code behind, using the MVVM pattern. We will use the MVVM Light framework, that you can get at http://galasoft.ch or by installing it directly using NuGet, an add-in to Visual Studio to ease download and installation of libraries and tools in Visual Studio. If you still don’t have NuGet, go to http://nuget.org and download it. Once you have installled NuGet, you can click with the right button in References in the Solution Explorer and select “Manage Nuget Packages”. Fill the search box with “mvvm” and install the MVVM Light package:

This installs MVVM Light, adds the required references and creates a folder named ViewModel, with two files, MainViewModel.cs and ViewModelLocator.cs. MainViewModel.cs is the ViewModel related to the main window and ViewModelLocator is a ViewModel locator. In MainViewModel.cs you should add a property of type ViewModelBase, which will contain the ViewModel related to the View of the component content:
private ViewModelBase content;

public ViewModelBase Content
{
    get { return content; }
    set
    {
        conteudo = value;
        RaisePropertyChanged("Content");
    }
}
Next, we will create two ViewModels, related to our views. The two ViewModels are very similar and have only one property:
public class ViewModelA : ViewModelBase
{
    private string text;

    public string Text
    {
        get { return text; }
        set
        {
            text = value;
            RaisePropertyChanged("Text");
        }
    }
}

public class ViewModelB : ViewModelBase
{
    private string text;

    public string Text
    {
        get { return text; }
        set
        {
            text = value;
            RaisePropertyChanged("Text");
        }
    }
}
Then create in the Solution Explorer a folder named View and put there two UserControls, each one with a Grid and a TextBlock:
<UserControl x:Class="WpfApplication2.View.ViewA"
             xmlns="http://schemas.microsoft.com/winfx/2006/xaml/presentation"
             xmlns:x="http://schemas.microsoft.com/winfx/2006/xaml"
             xmlns:mc="http://schemas.openxmlformats.org/markup-compatibility/2006"
             xmlns:d="http://schemas.microsoft.com/expression/blend/2008"
             mc:Ignorable="d"
             d:DesignHeight="300" d:DesignWidth="300">
    <Grid Background="Red">
        <TextBlock Text="{Binding Text}" FontSize="36" />
    </Grid>
</UserControl>
To eliminate code behind, we must bind the property Content of the TransitionElement with the property Content of the ViewModel:
<transc:TransitionElement x:Name="TransitionBox" Content="{Binding Content}">
    <transc:TransitionElement.Transition>
        <transt:TranslateTransition  StartPoint="1,0" EndPoint="0,0" Duration="0:0:1"/>
    </transc:TransitionElement.Transition>
</transc:TransitionElement>
and eliminate the button click, replacing it with a Command:
<Button Width="65" Grid.Row="1" Content="Esconde" Margin="5" Command="{Binding HideCommand}" />
The HideCommandproperty is defined in MainViewModel:
private ICommand hideCommand;
public ICommand HideCommand
{
    get { return hideCommand ?? (hideCommand = new RelayCommand(ChangeContent)); }
}

private void ChangeContent()
{
    Content = content is ViewModelA ?
        (ViewModelBase)new ViewModelB() {Text = "ViewModel B"} :
        (ViewModelBase)new ViewModelA() {Text = " ViewModel A"};
}
Finally we must set the DataContext for the main View:
<Window x:Class="WpfApplication2.MainWindow"
        xmlns="http://schemas.microsoft.com/winfx/2006/xaml/presentation"
        xmlns:x="http://schemas.microsoft.com/winfx/2006/xaml"
        xmlns:transc="clr-namespace:Transitionals.Controls;assembly=Transitionals"
        xmlns:transt="clr-namespace:Transitionals.Transitions;assembly=Transitionals"
        Title="MainWindow" Height="350" Width="525"
        DataContext="{Binding Source={StaticResource Locator}, Path=Main}">
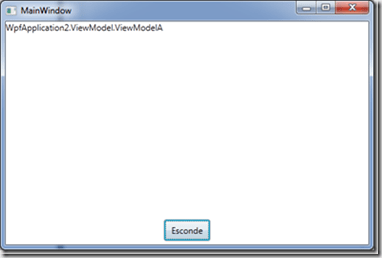
When we execute the program we have something similar to this:

The view isn’t shown, just the content’s class name. That is expected, as the property Content is of type ViewModelBase and its presentation is made by the method ToString(). We could have put the view as content, but this goes against the MVVM pattern: the ViewModel must not know about the View. A solution to show the View using the ViewModel as content is to use a resource available in WPF or in Silverlight 5: implicit Data Templates. In an implicit DataTemplate, we don’t set the Key property when declaring the Template, we only set its DataType. With that, WPF and Silverlight use this DataTemplate every time they must render some content of that type. We declare the DataTemplates in the Windows’s resources section:
<Window.Resources>
    <DataTemplate DataType="{x:Type ViewModel:ViewModelA}" >
        <View:ViewA />
    </DataTemplate>
    <DataTemplate DataType="{x:Type ViewModel:ViewModelB}" >
        <View:ViewB />
    </DataTemplate>
</Window.Resources>
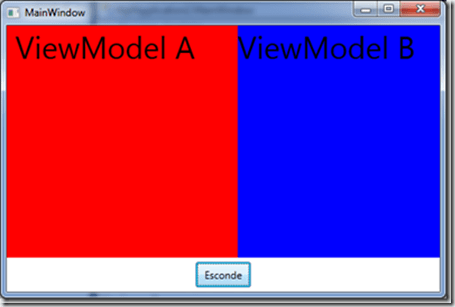
Now, when we execute the program, we have the transition between the two views, with no code behind.

Conclusion
When we use components to animate transitions, we have the possiblity to create very complex transitions in an easy way, we only have to change the content of the control. We also saw how to remove code from the code behind, adding it to a ViewModel, making it easier to maintain and allowing better testability. As a bonus, we saw how to use implicit DataTemplates and how to relate a View to a ViewModel with no need of code. This resource is only available on WPF and Silverlight 5. Although you can think it doesn’t worth the effort (we eliminated just one line of code, trading it with two ViewModels, two Views and a new MVVM component), my intent here was to show you other resources, like using MVVM instead of code behind and how to use new features, like the implicit DataTemplate. In a larger application, that requires more work, these changes are justified. These are not the only ways to do control transitions. On the next articles, we will see other ways. See you then!
