The release of ChatGPT in November 2022 introduced a revolution in the way we do things: from that date, we had an assistant that could help us in many tasks, like proofing text, writing, improving and explaining code and many other tasks. Every day we see new ways to use it and how to make it better for our needs.
Now, everybody is running to add AI features in their programs, to make them easier to use, more adapted to the end user and more user friendly.
One way to improve the programs is to add a chat feature, where the user asks a question and the program answers in a conversational mode. We can do this by leveraging the OpenAI API by allowing AI Conversations in our apps. This is a very nice feature, but has some drawbacks:
- The OpenAI API is not free, and it could cost from thousands to millions of dollars to keep the program running, depending on scale.
- The user would need to be connected to the Internet, and that could eventually also add latency to the first token generation.
- If used outside of Azure Cloud infrastructure, our data (maybe proprietary or user's information) would need to be sent to the servers out of our network, and that might not be compliant with data privacy policies and regulations.
- The AI model would have limited options for customization
To solve the above problems, the next option is to use an AI model that can run in your local machine, without sending any data to cloud servers. This AI Model could be any, including models that were trained exclusively for the app, this model would fit perfectly to the app's needs or could even be a pre-trained AI Model fine-tuned, improved for your scenarios.
In this article, we will show how to use the Semantic Kernel to develop a WinUI3 chat application that connects to a local Phi-3 model and allows the user to chat with the model.
What is Semantic Kernel
Semantic Kernel is a lightweight, open-source development kit that lets you easily build AI agents. You can write code in C#, Python, or Java and connect to models in many different platforms, like OpenAI, Azure, Google, Mistral or Hugging Face.
Until now, to leverage SLMs (Small language models) in your machine the only way possible was using a local hosted service. That means that, to use a model, you would need to have a service with an API that would be used to connect the client and the server. That posed a limitation: if you wanted to run a model locally in your machine, you would need to setup a service, like Ollama or LM Studio to load and serve the model in your machine to be available thru Semantic Kernel. Some of those services (like Ollama) even allow you to run them in a container, making it a bit easier to setup and distribute but that still isn't the ideal approach.
Recently, the Semantic Kernel team launched the Onnx Connector that leverages the latest ONNX GenAI runtime and allows you to connect to an Onnx capable SLM located in your machine (normally represented by files, without the need to setup any service or http protocol to interact with the AI Model. All you need to do is to download the model files into your machine and point to its location to use it with Semantic Kernel.
What is Phi-3 ONNX
Phi-3 is a family of Microsoft's Open Source Small Language Models (SLMs), available in many different platform catalogs in Azure AI Studio, Hugging Face that allows you to download and run in the user's machine.
Depending on the selected model, the memory requirements may be too high for the average user, but there are many options of small models that can be the right fit for a medium-sized machine. To know more about it, you can check the Phi-3 Cookbook, with plenty of information on how to set it up and run it.
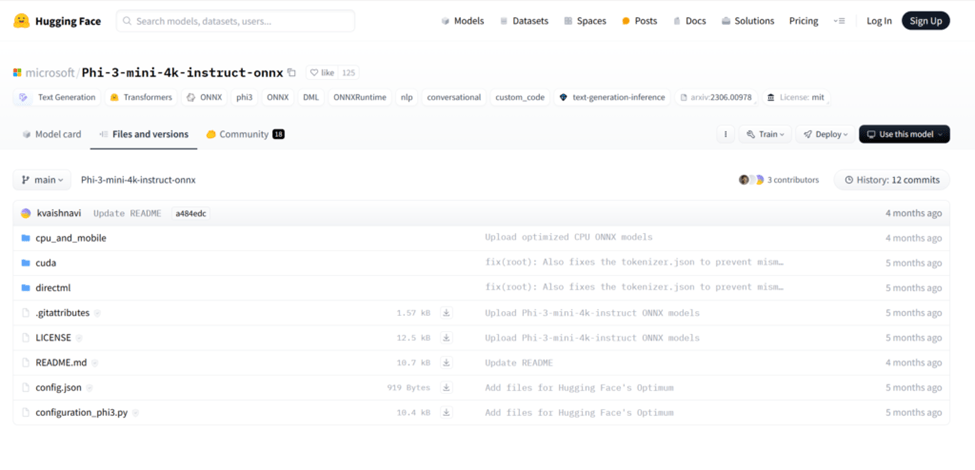
To use it, you normally download the model from a catalog like Hugging Face, hosted in a git versioning repository. Some ways include opening a terminal window, going to the location where you want to download the model and clone it with a git the command (you may need to install the git large file storage at https://git-lfs.com/):
git clone https://huggingface.co/microsoft/Phi-3-mini-4k-instruct-onnx
Once you have cloned the repository, you will notice see that there are different directories for what type of processing technology you want your model to run on (GPU, CPU):

According to the model card, the available versions are:
-
ONNXmodel for int4 DML: ONNX model for AMD, Intel, and NVIDIA GPUs on Windows, quantized to int4 using AWQ.
-
ONNXmodel for fp16 CUDA: ONNX model you can use to run for your NVIDIA GPUs.
-
ONNXmodel for int4 CUDA: ONNX model for NVIDIA GPUs using int4 quantization viaRTN.
-
ONNXmodel for int4 CPU and Mobile: ONNX model for CPU and mobile using int4quantization via RTN. There are two versions uploaded to balance latency vs.accuracy. Acc=1 is targeted at improved accuracy, while Acc=4 is for improved perf. For mobile devices, we recommend using the model with acc-level-4.
For this example, we will use the CPU version (cpu_and_mobile/cpu-int4-rtn-block-32-acc-level-4). This option will not use the GPU or the NPU in the machine, this example was chosen because it will work in most of the scenarios. The other versions may require a specific type of GPU or NPU capable machines.
Creating the project
We will create a WinUi3 project for the chat. In Visual Studio, create a new Blank App, Packaged (WinUI3 in Desktop). This app has a single button that changes the content when it's clicked.
The first step is to add the NuGet packages for the Semantic Kernel and the Onnx Connector. Right click the Dependencies node in Solution Explorer and select Manage NuGet Packages. Add the Microsoft.SemanticKernel.Core and Microsoft.SemanticKernel.Connectors.Onnx packages.
Then, we will create the code for the chat. In MainWindow.xaml.cs, add the following code:
public MainWindow()
{
    this.InitializeComponent();
    InitializeSemanticKernel();
}

#pragma warning disable SKEXP0070 // Type is for evaluation purposes only and is subject to change
                                  // or removal in future updates. Suppress this diagnostic to proceed.
private void InitializeSemanticKernel()
{
    _kernel = Kernel.CreateBuilder()
        .AddOnnxRuntimeGenAIChatCompletion("phi-3", @"C:\AIModels\Phi-3-mini-4k-instruct-onnx\cpu_and_mobile\cpu-int4-rtn-block-32-acc-level-4")
        .Build();
}
In the main class, we declared a private field _kernel, that will store the kernel used for the chat. The kernel is the central component of Semantic Kernel and it could be seen as a Dependency Injection container that manages all of the services and plugins necessary to run your AI application. You will provide the services needed for the application, so they can be used in your application.
In our case, we are using the AddOnnxRuntimeGenAIChatCompletion service, that is available as part of the Onnx connector. We must pass the model identifier (normally a name like "phi-3") and the path to the directory where the model files are located. If you need to change to a different ONNX model in the future, is very easy: all needed is just to supply different name and path of the new model to be used.
For the UI, you can add this code in MainWindow.xaml:
<Grid>
    <Grid.RowDefinitions>
        <RowDefinition Height="*" />
        <RowDefinition Height="Auto" />
    </Grid.RowDefinitions>
    <Grid.Resources>
        <Style x:Key="CardPanelStyle" TargetType="StackPanel">
            <Style.Setters>
                <Setter Property="Padding" Value="12" />
                <Setter Property="Background"
                        Value="{ThemeResource CardBackgroundFillColorDefaultBrush}" />
                <Setter Property="BorderThickness" Value="1" />
                <Setter Property="BorderBrush"
                        Value="{ThemeResource CardStrokeColorDefaultBrush}" />
                <Setter Property="CornerRadius"
                        Value="{StaticResource OverlayCornerRadius}" />
            </Style.Setters>
        </Style>
        <local:ChatTemplateSelector x:Key="ChatTemplateSelector"
                AssistantTemplate="{StaticResource AssistantDataTemplate}"
                SystemTemplate="{StaticResource SystemDataTemplate}"
                UserTemplate="{StaticResource UserDataTemplate}" />
        <DataTemplate x:Key="UserDataTemplate" x:DataType="local:ChatMessage">
            <StackPanel MaxWidth="486" HorizontalAlignment="Right" Spacing="8"
                    Style="{StaticResource CardPanelStyle}">
                <TextBlock IsTextSelectionEnabled="True"
                        Text="{x:Bind Content, Mode=OneWay}" TextWrapping="Wrap" />
            </StackPanel>
        </DataTemplate>
        <DataTemplate x:Key="AssistantDataTemplate" x:DataType="local:ChatMessage">
            <Grid Margin="0,4" HorizontalAlignment="Left">
                <StackPanel MaxWidth="486" HorizontalAlignment="Right"
                        Background="{ThemeResource AccentFillColorDefaultBrush}"
                        Spacing="8" Style="{StaticResource CardPanelStyle}">
                    <TextBlock HorizontalAlignment="Right"
                            Foreground="{ThemeResource TextOnAccentFillColorPrimaryBrush}"
                            IsTextSelectionEnabled="True"
                            Text="{x:Bind Content, Mode=OneWay}" TextWrapping="Wrap" />
                </StackPanel>
            </Grid>
        </DataTemplate>
        <DataTemplate x:Key="SystemDataTemplate" x:DataType="local:ChatMessage">
            <Grid Margin="0,4" HorizontalAlignment="Left">
                <StackPanel MaxWidth="486" HorizontalAlignment="Right"
                        Background="Red"
                        Spacing="8" Style="{StaticResource CardPanelStyle}">
                    <TextBlock HorizontalAlignment="Right"
                            Foreground="{ThemeResource TextOnAccentFillColorPrimaryBrush}"
                            IsTextSelectionEnabled="True"
                            Text="{x:Bind Content, Mode=OneWay}" TextWrapping="Wrap" />
                </StackPanel>
            </Grid>
        </DataTemplate>
    </Grid.Resources>
    <ListView x:Name="ChatListView" ItemsSource="{x:Bind ChatMessages}" Grid.Row="0"
            Margin="10" HorizontalContentAlignment="Stretch" ItemTemplateSelector="{StaticResource ChatTemplateSelector}">
        <ListView.ItemsPanel>
            <ItemsPanelTemplate>
                <ItemsStackPanel VerticalAlignment="Bottom"
                        ItemsUpdatingScrollMode="KeepLastItemInView" />
            </ItemsPanelTemplate>
        </ListView.ItemsPanel>
        <ListView.ItemContainerStyle>
            <Style TargetType="ListViewItem">
                <Setter Property="HorizontalContentAlignment" Value="Stretch" />
            </Style>
        </ListView.ItemContainerStyle>
    </ListView>
    <Grid Grid.Row="1" Margin="10">
        <Grid.ColumnDefinitions>
            <ColumnDefinition Width="*" />
            <ColumnDefinition Width="Auto" />
        </Grid.ColumnDefinitions>
        <TextBox x:Name="UserInputBox" PlaceholderText="Type your message here..."
                Grid.Column="0" />
        <Button Content="Send" Click="SendButton_Click" Grid.Column="1"
                Margin="10,0,0,0" />
    </Grid>
</Grid>
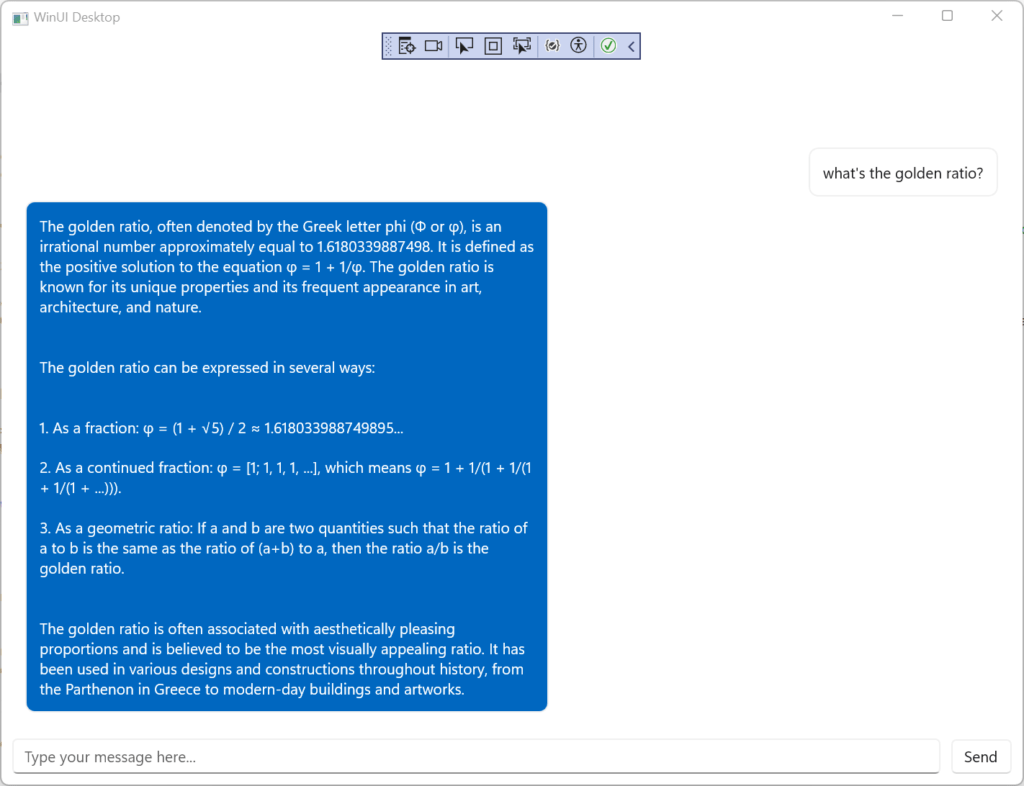
At the bottom, we have a textbox and a button, so the user can type the prompt and send the request. At the top, we have a listview, where the messages will be displayed. We use a DataTemplateSelector that will change the template, depending on where the message comes from: the user (a white background box right aligned), the assistant (a blue background box left aligned), or the system (a red background box left aligned). The code for the DataTemplateSelector must be added in a new file, named ChatTemplateSelector.cs:
internal class ChatTemplateSelector : DataTemplateSelector
{
    public DataTemplate UserTemplate { get; set; }
    public DataTemplate SystemTemplate { get; set; }
    public DataTemplate AssistantTemplate { get; set; }

    protected override DataTemplate SelectTemplateCore(object item)
    {
        if (item is ChatMessage message)
        {
            return message.Role switch
            {
                MessageRole.User => UserTemplate,
                MessageRole.Assistant => AssistantTemplate,
                MessageRole.System => SystemTemplate,
                _ => base.SelectTemplateCore(item),
            };
        }
        return base.SelectTemplateCore(item);
    }
}
This class will select the correct template, depending on the role of the message. We must declare the class ChatMessage and the enum MessageRole:
public enum MessageRole
{
    User,
    Assistant,
    System
}

public class ChatMessage
{
    public MessageRole Role { get; set; }
    public string Content { get; set; }
}
The last part is the code for the Send button, where the prompt is sent to the model and the response is retrieved and sent to the UI:
private ObservableCollection<ChatMessage> ChatMessages { get; set; } =
    new ObservableCollection<ChatMessage>();

private async void SendButton_Click(object sender, RoutedEventArgs e)
{
    string userMessage = UserInputBox.Text;
    if (string.IsNullOrWhiteSpace(userMessage)) return;

    // Add user message to chat
    ChatMessages.Add(new ChatMessage { Role = MessageRole.User, Content = userMessage });
    UserInputBox.Text = string.Empty;

    try
    {
        // Get AI response
        string response = await GetAIResponseAsync(userMessage);

        // Add AI response to chat
        ChatMessages.Add(new ChatMessage { Role = MessageRole.Assistant, Content = response });
    }
    catch (Exception ex)
    {
        ChatMessages.Add(new ChatMessage { Role = MessageRole.System, Content = $"Error: {ex.Message}" });
    }

    // Scroll to the bottom of the chat
    ChatListView.ScrollIntoView(ChatListView.Items[ChatListView.Items.Count - 1]);
}

private async Task<string> GetAIResponseAsync(string userMessage)
{
    var result = await _kernel.InvokePromptAsync(userMessage);
    return result.GetValue<string>().Trim();
}
We declare a list of ChatMessage, that will store the messages and will be shown in the listview. The query of the model will be made in GetAIResponseAsync: we call kernel.InvokePromptAsync(userMessage) and get the result and add it to the list of messages. That's all we must do. Simple, no?
When we run the project, we get something like this:

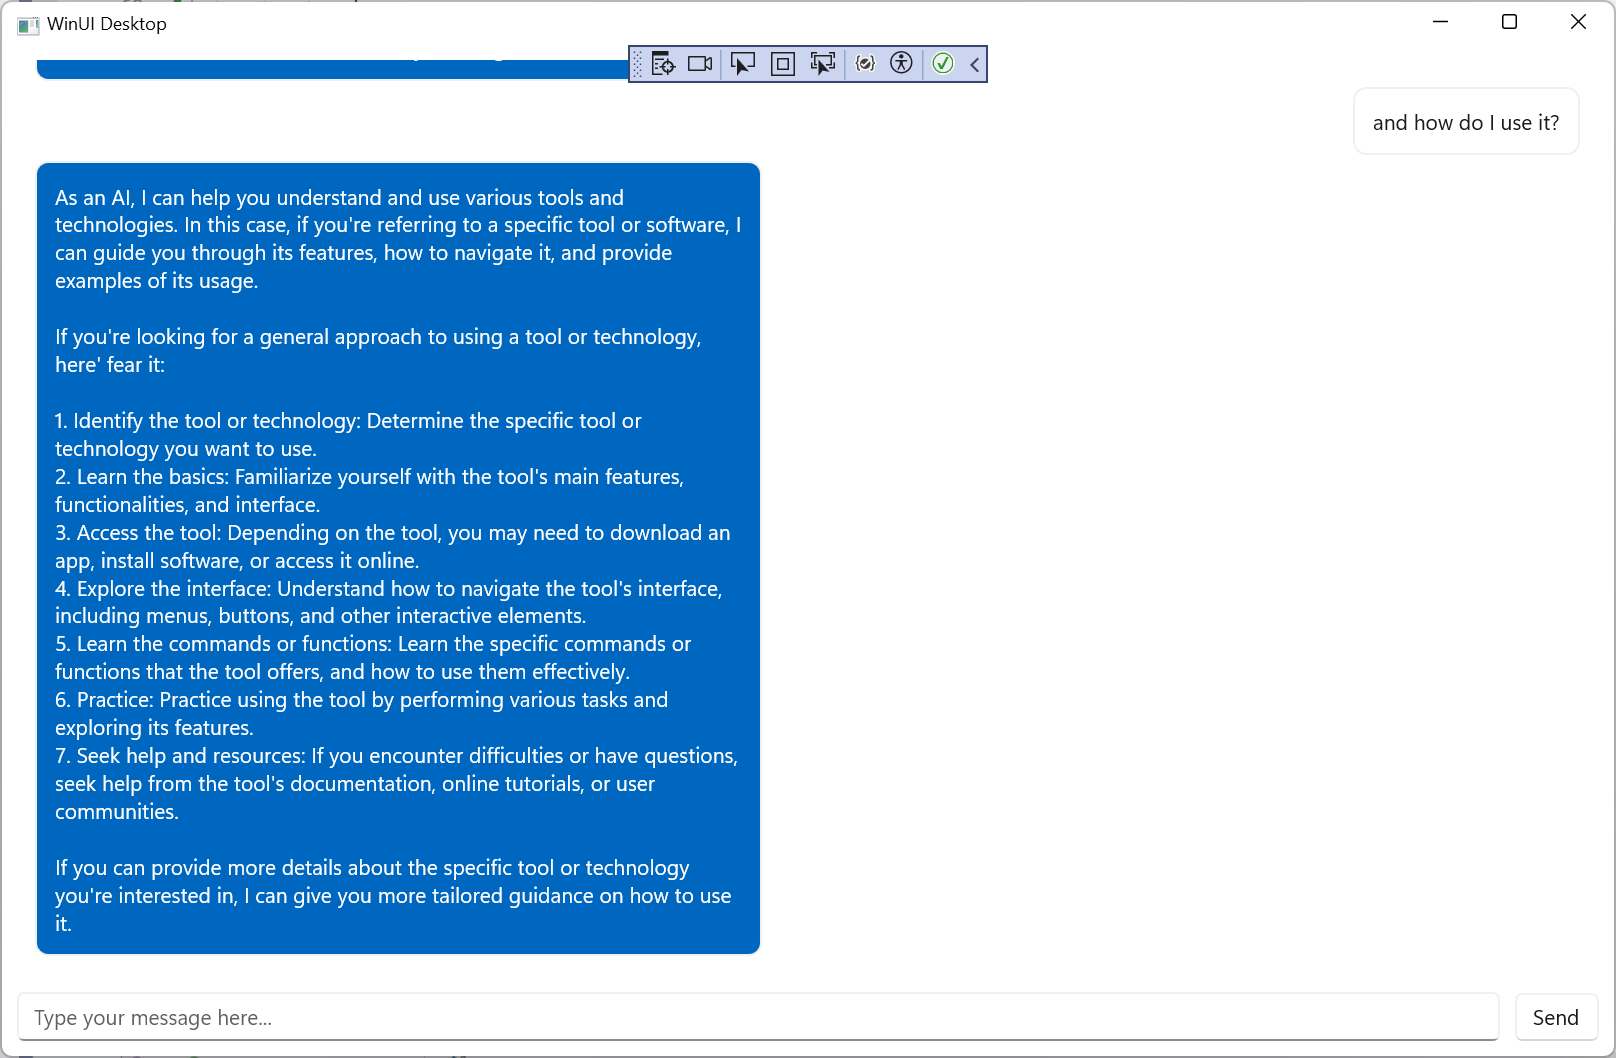
That's great, but it has some issues:
- The chat response comes at once, while the users are used to getting a streaming response, where the words come one-by-one
- There is no history, that is, the chat has no memory. If you would ask something like "and how do I use it" (referring to the golden ratio), you would get:

We must add these features to the source code. In Semantic Kernel, the answer is in the ChatCompletionService. If we want to send a chat history and receive the answer in a streaming fashion, we must get an instance of IChatCompletionService from the Kernel instance with:
_chatCompletionService = _kernel.GetRequiredService<IChatCompletionService>();
Once we get it, we can stream our messages providing a chat history for context with:
private async Task GetAIStreamResponseAsync(string userMessage)
{
    history.AddUserMessage(userMessage);
    var message = new ChatMessage { Role = MessageRole.Assistant };
    ChatMessages.Add(message);

    var response = _chatCompletionService.GetStreamingChatMessageContentsAsync(
        chatHistory: history,
        kernel: _kernel
    );

    var assistResponse = "";
    await foreach (var chunk in response)
    {
        assistResponse += chunk;
        DispatcherQueue.TryEnqueue(() => message.Content += chunk);
    }
    history.AddAssistantMessage(assistResponse);
}
This should work fine, but in fact, it doesn't: the changes in the message aren't propagated to the UI. To make this work, we must implement the INotifyPropertyChanged interface and raise the event in the ChatMessage class:
public class ChatMessage : INotifyPropertyChanged
{
    private string content;

    public MessageRole Role { get; set; }
    public string Content {
        get => content;
        set
        {
            content = value;
            PropertyChanged?.Invoke(this,new PropertyChangedEventArgs("Content"));
        }
    }

    public event PropertyChangedEventHandler PropertyChanged;
}
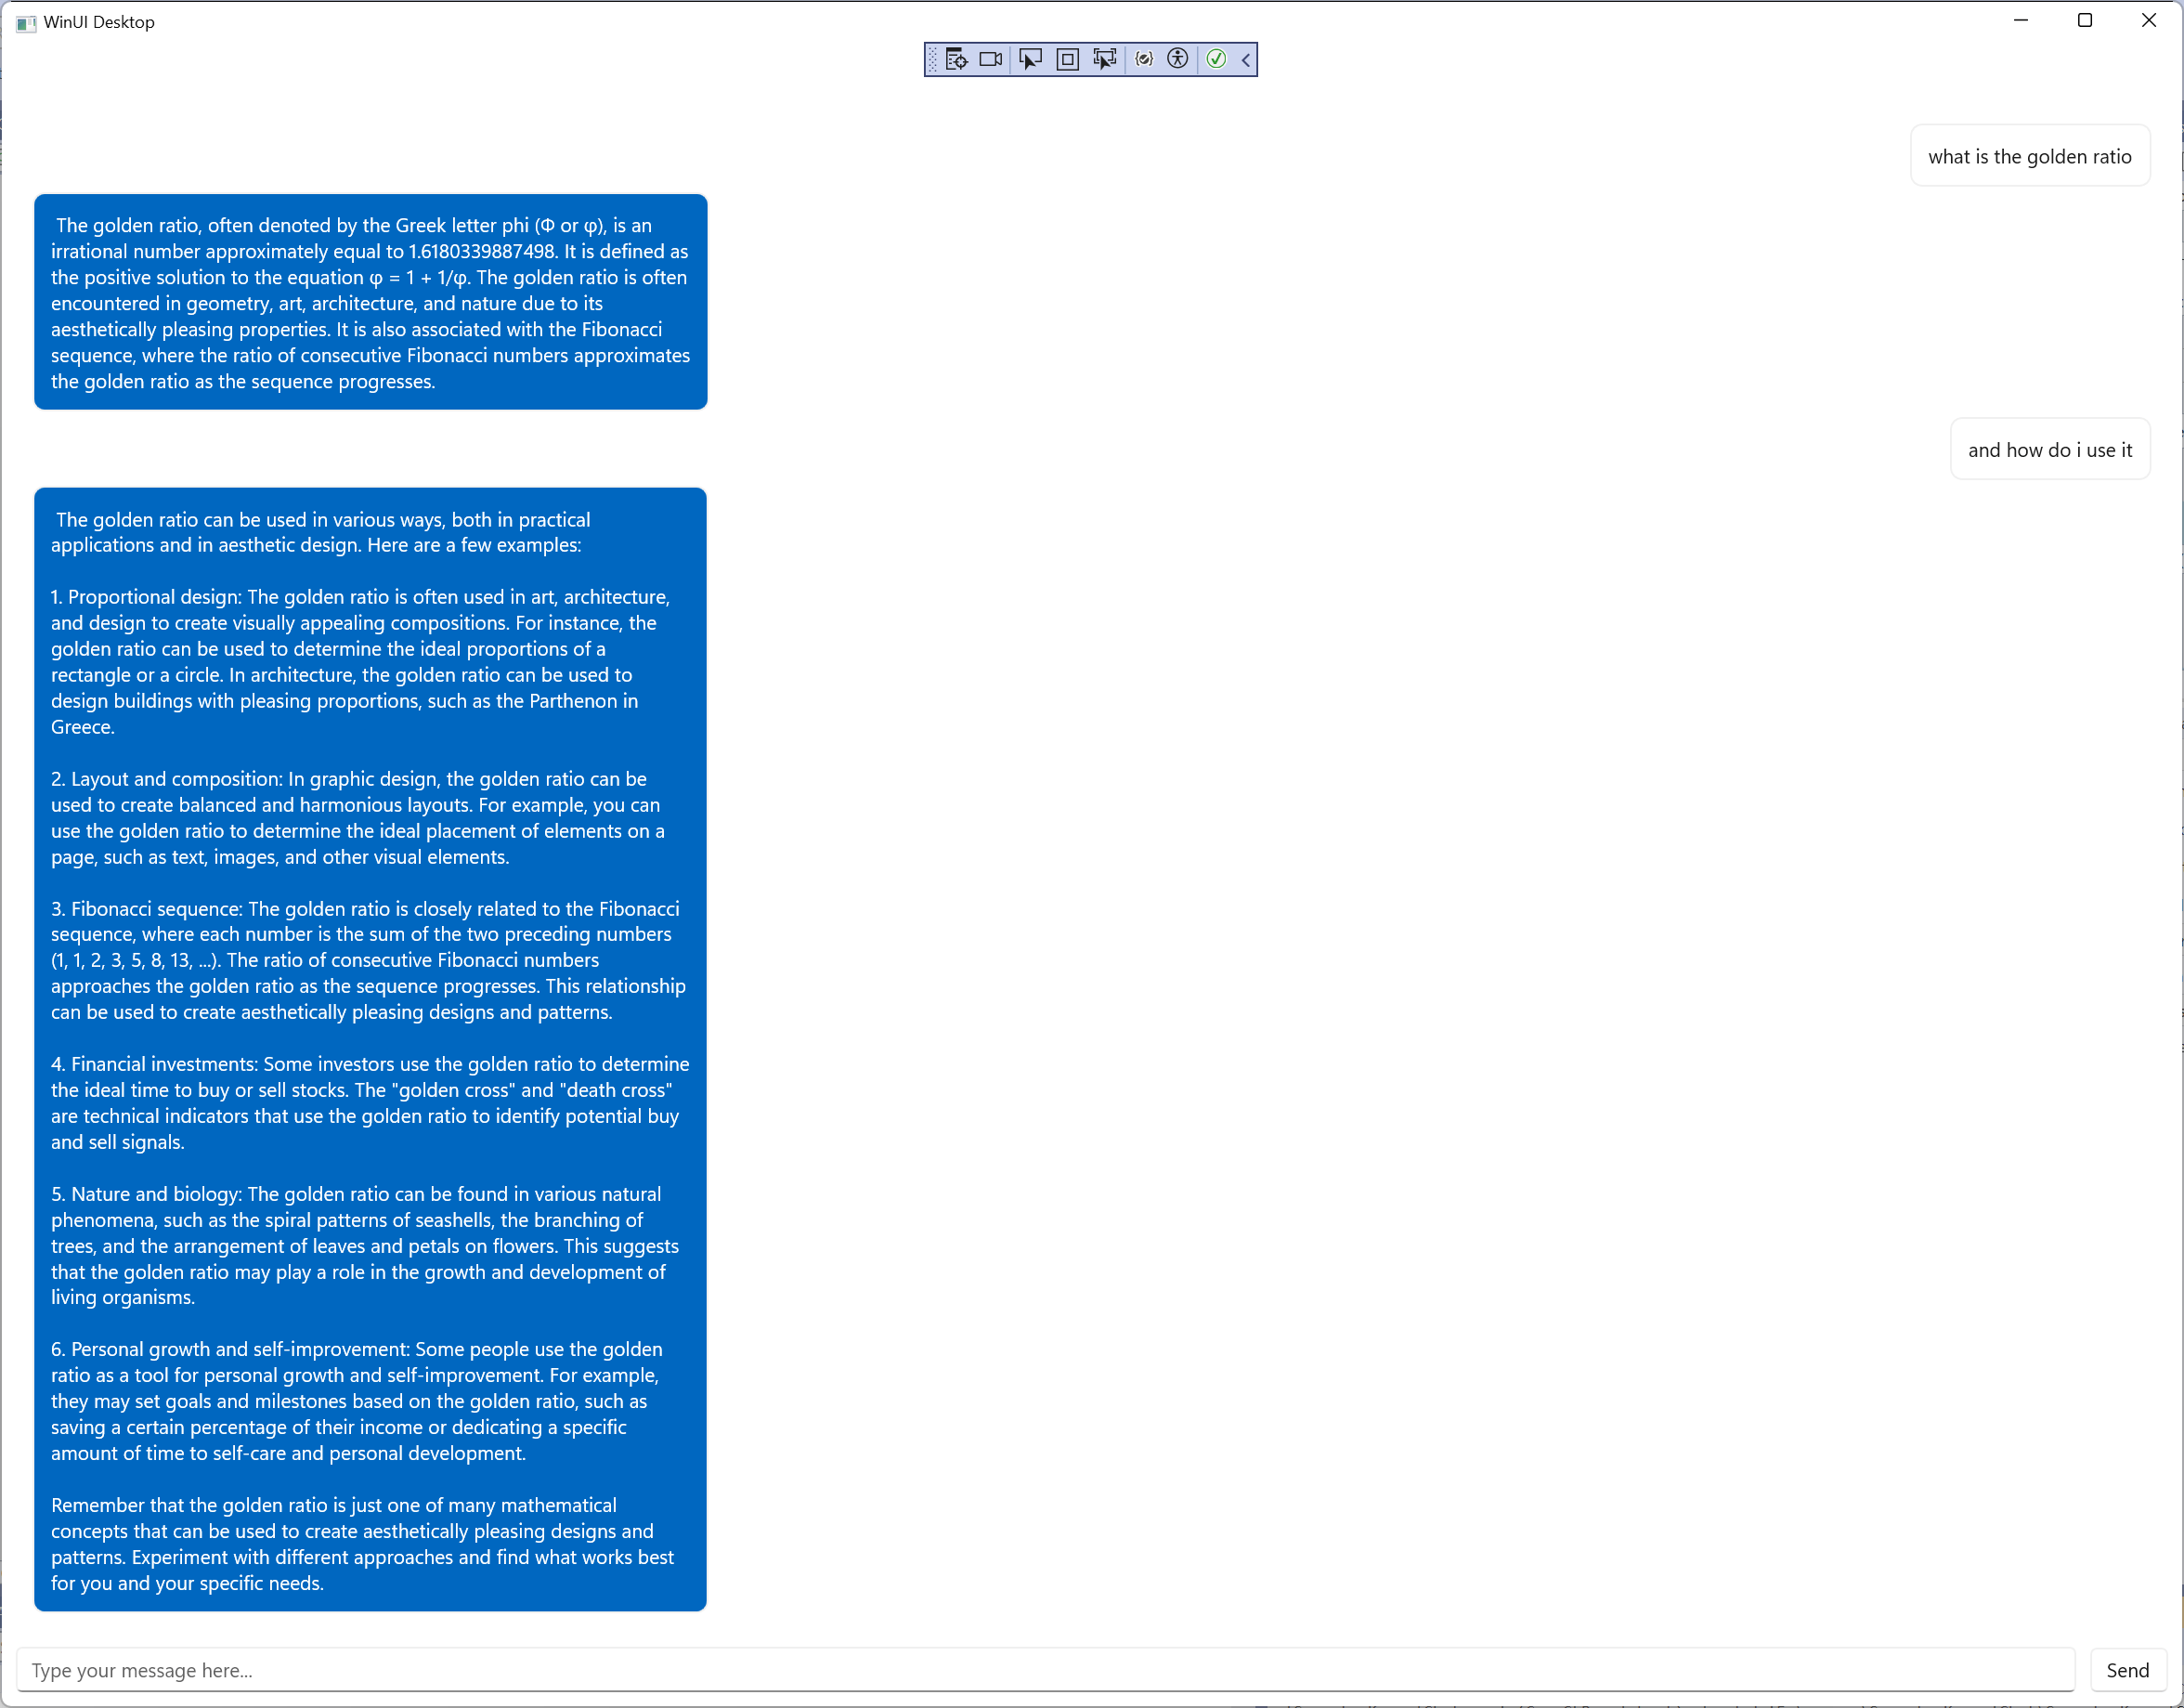
For every message, we are adding the user prompt and the assistant message to the history and passing the history to the chat. That way, we have a richer chat, that remembers the previous messages:

Conclusion
As you can see, the Semantic Kernel eases AI development, hiding complexities of the underlying framework, while giving flexibility to tweak the usage. You can change models just by changing the path used, or you can
even change the platform, using a service like OpenAI just by changing a single line of code (in this case, you would also need to add the Microsoft.SemanticKernel.Connectors.OpenAI NuGet package to the project).
All the source code for this article is at https://github.com/bsonnino/SemanticKernelChat
Many thanks to Roger Barreto, from the Microsoft Semantic Kernel Team, for reviewing and making suggestions for this article.
