
One advantage of the new .NET Core (now .NET) apps is that they are cross platform. Once you create an app, the same code will run on Windows, Mac or Linux with no change. But there are some exceptions to this: WPF or WinForms apps are only for Windows. You cannot create a WPF app and run it on Linux, for example.
If you want to create a cross platform app, you will have to use another technology, like Blazor or MAUI. Blazor UI is based on Razor components and it's not compatible with XAML, so it may be very difficult to convert. MAUI, on the other side, uses XAML and can be used to port your app to Mac, iOS or Android. But MAUI apps don't run on Linux. If you want a Linux app, this is not the way. You can use Uno Platform (see my article here), but this is a Web technology (it uses WebAssembly in the browser), and you won't be able to create a desktop app (yes, you can create a PWA, but technically, it's not a desktop app). The other option is to use Avalonia UI.
In this article we will show how to convert an existing WPF app to Avalonia UI. We will use the project described in my MVVM Community toolkit 8.0 article. This project has some interesting features to explore:
- It uses a .NET Standard library for the repository
- It has a Datagrid to display the data
- It uses the MVVM pattern and the MVVM Community toolkit NuGet package
Avalonia UI is an open source cross platform framework for .NET to develop cross platform apps using XAML. To use it, you need to install the Avalonia project templates with:
dotnet new install Avalonia.Templates

Once you do it, you can create a new basic project with:
dotnet new avalonia.app -o BasicApp
cd BasicApp
dotnet run
When you run it, you will see a basic app: 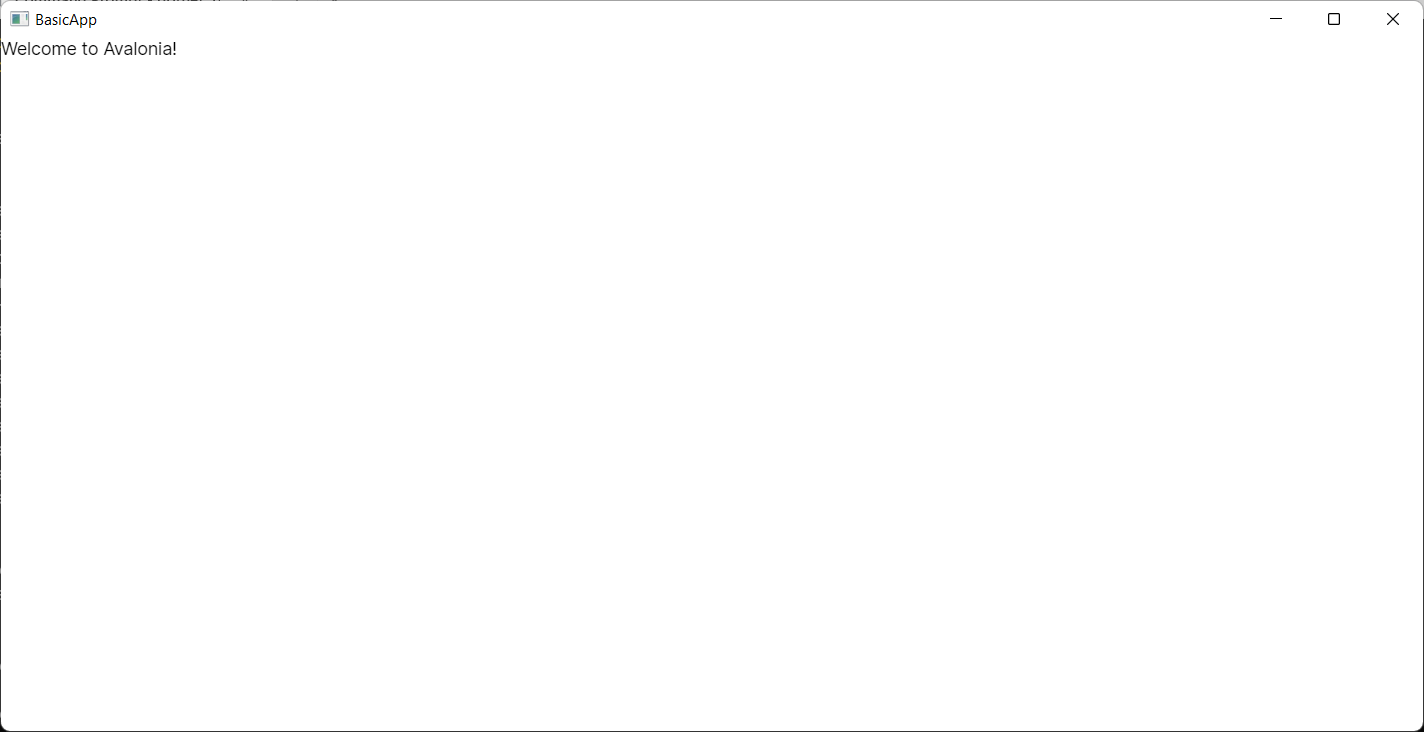
The generated code has these differences:
- The extension for the view files is axaml instead of xaml (and the code behind extension is axaml.cs)
- The default namespace for the view files is https://github.com/avaloniaui instead of http://schemas.microsoft.com/winfx/2006/xaml/presentation
- The project includes the Avalonia, Avalonia.Desktop, Avalonia.Diagnostics and XamlNameReferenceGenerator NuGet packages
- The project targets net6.0 (or net7.0), instead of net6.0-windows
- There is no need to include the UseWPF clause in the project file
- The Program.cs file and Main method are explicit
- There is some initialization code in App.axaml.cs
Apart from that, designing the UI and the C# code aren't much different from the standard WPF app.
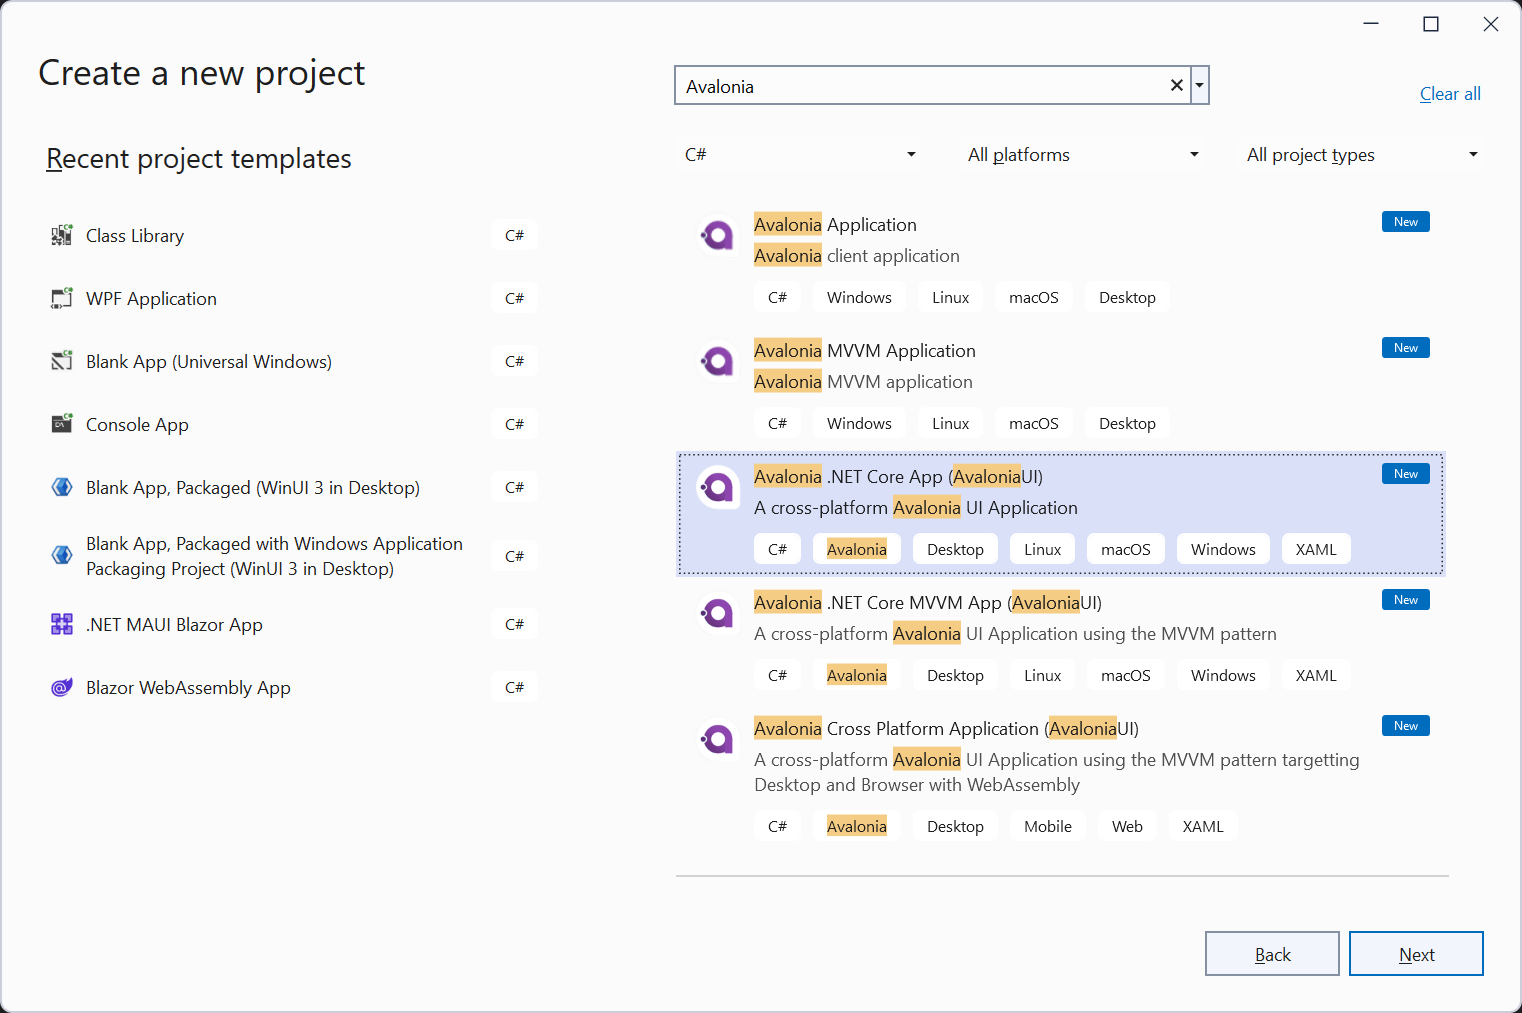
For this app, we will use Visual Studio 2022 and the Avalonia Extension. This extension will provide all templates and a designer for the views. If you don't want to use Visual Studio, you can use VS Code, but you won't have the visual designer. In Visual Studio, go to Extensions/Manage Extensions and install the Avalonia for Visual Studio 2022 extension:

Let's start converting our app. We have two approaches, here: convert our app in place, making changes in the files as needed, or create a new basic Avalonia project and add the features incrementally. I prefer to use the second approach, in this case all the basic infrastructure is already set and we can make sure that things are running while we are adding the features. In the in place conversion, it's an all-or-nothing, and at the end we may not have any clue of what we've missed, in case it doesn't run.
The first step is to clone our app from https://github.com/bsonnino/MVVMToolkit8.git. Then, we will create our app in Visual Studio:
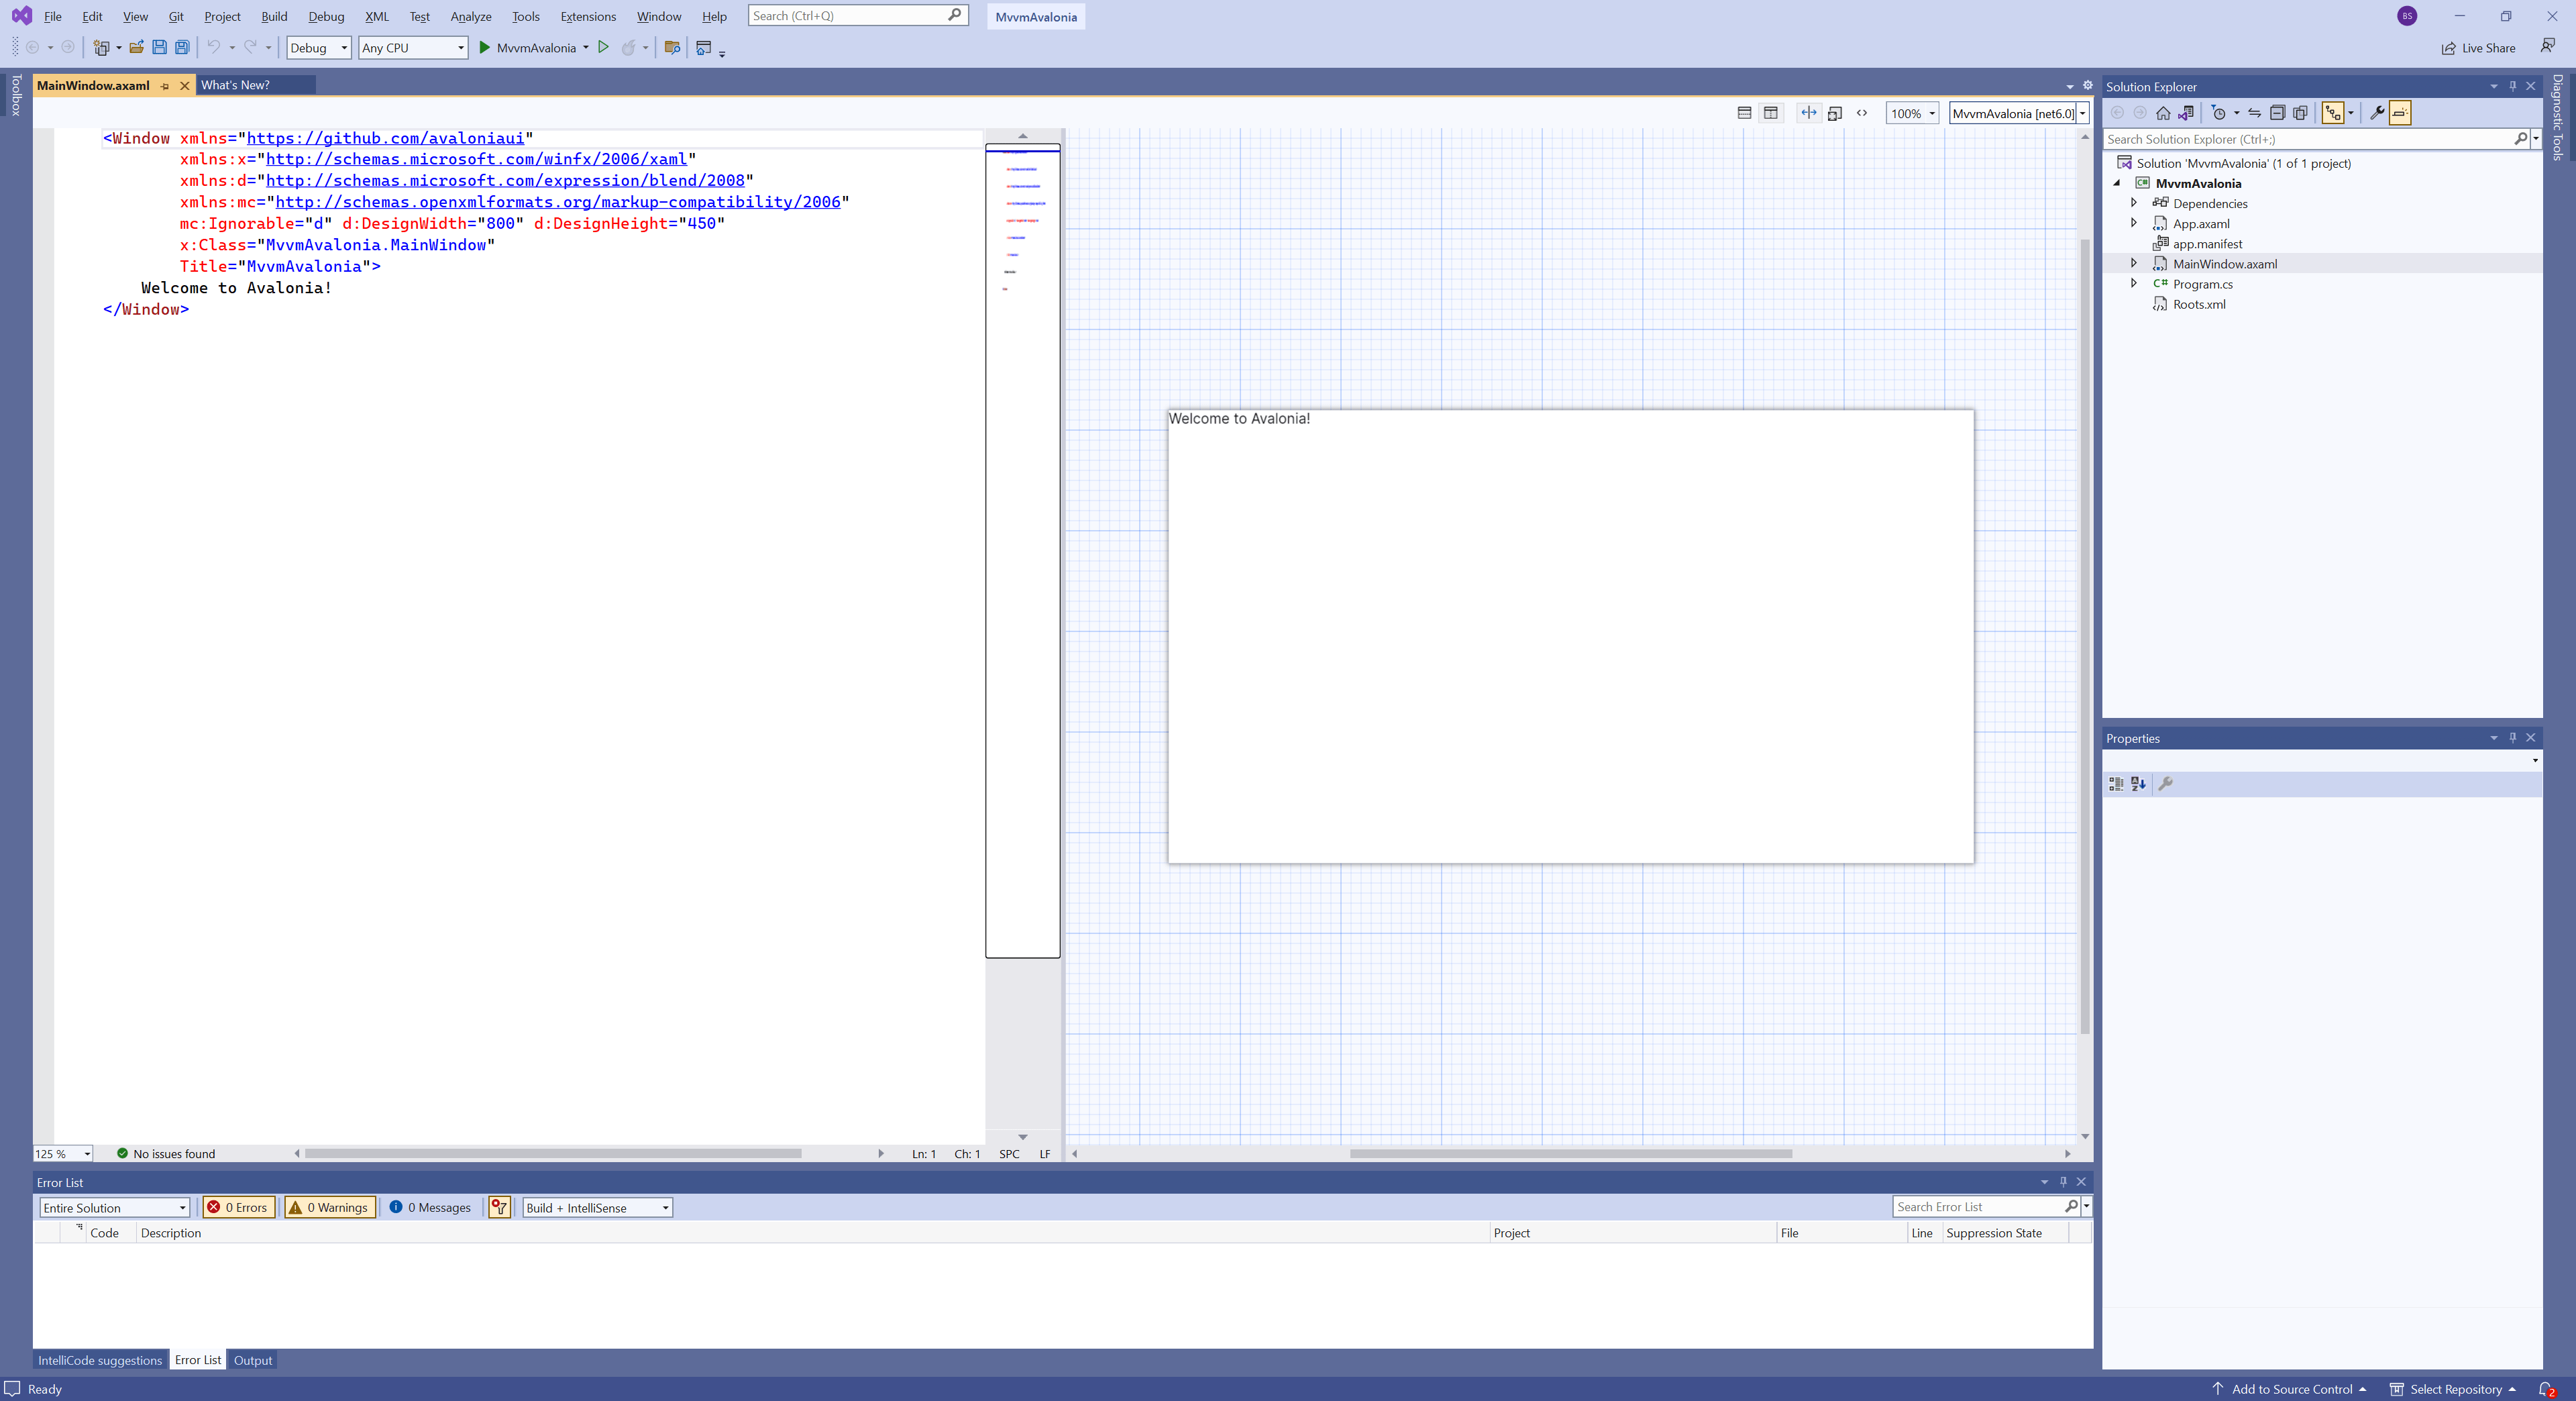
That will create a new basic app. If you open MainWindow.axaml, you will see the code and the visual designer:
Let's start converting our app. The first step is to add the two NuGet packages, CommunityToolkit.Mvvm and Microsoft.Extensions.DependencyInjection.
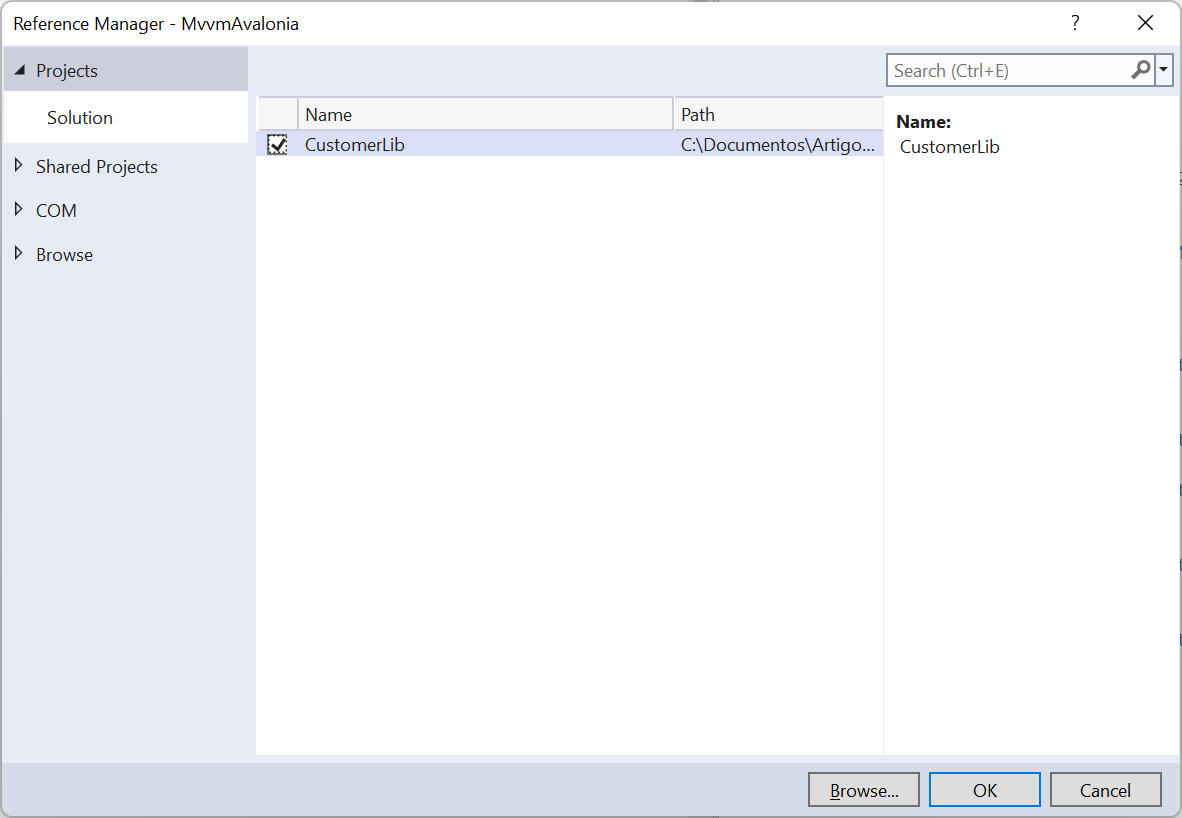
Then, copy the CustomerLib folder with all files to the folder of the Avalonia solution. We will use this project as is, as it's a .NET Standard project and it can be used by Avalonia unchanged. In the solution explorer, add an existing project and select the CustomerLib.csproj file. That will add the lib to our solution. In the main project, add a project reference and add the CustomerLib project:
Then, copy the ViewModel folder to the project folder, it will appear in the solution explorer. Open MainViewModel.cs, you will see an error in ColletionViewSource:
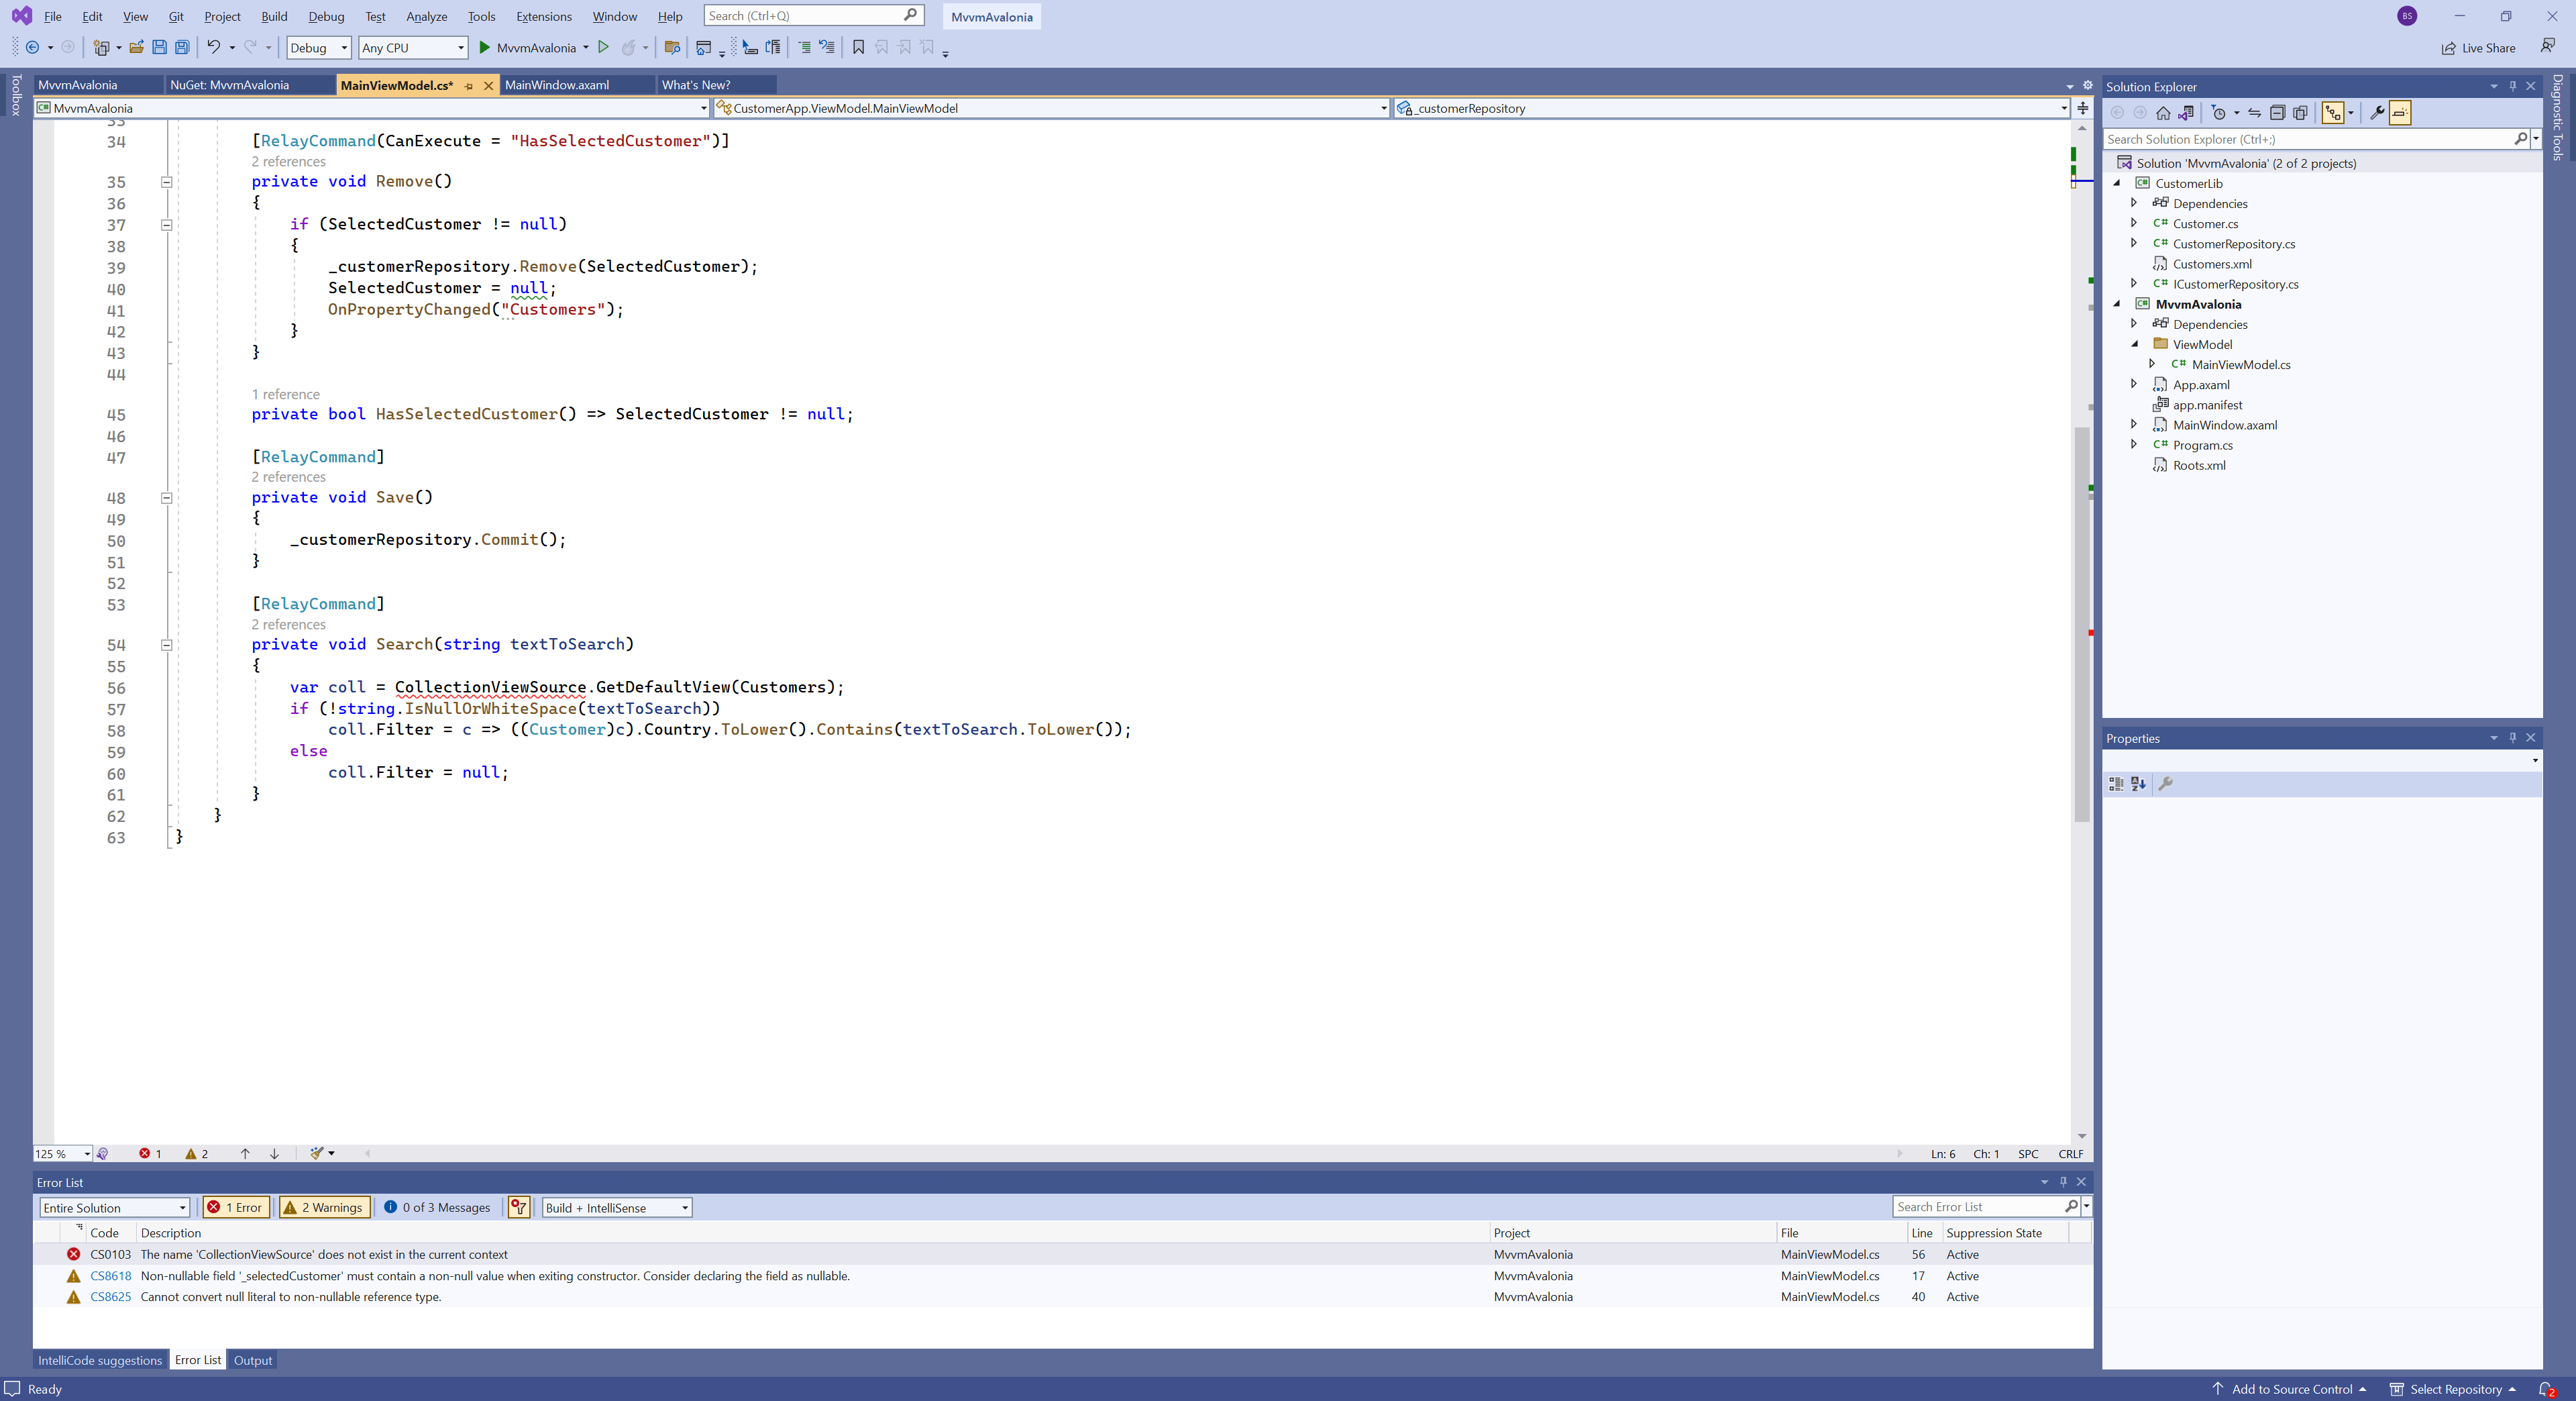
That's because the CollectionViewSource class doesn't exist in Avalonia and we need to replace it with this code:
private readonly ICustomerRepository _customerRepository;
private Func<Customer, bool> _filter = c => true;
public IEnumerable<Customer> Customers => _customerRepository.Customers.Where(_filter);

[RelayCommand]
private void Search(string textToSearch)
{
    if (!string.IsNullOrWhiteSpace(textToSearch))
        _filter = c => ((Customer)c).Country.ToLower().Contains(textToSearch.ToLower());
    else
        _filter = c => true;
    OnPropertyChanged(nameof(Customers));
}
Instead of using the WPF CollectionViewSource class, we are creating our filter and using it before displaying the data. Just to check, we can copy the Test project to the solution folder, add it to the current solution and run the tests to check. For that, we must do the following changes:
- Change the Target Framework in the csproj file to .net6.0
- Change the reference for the main project to MvvmAvalonia
Once we do that, we can compile the project, but we get the errors for the CollectionViewSource. For that, we must change the tests to:
[TestMethod]
public void SearchCommand_WithText_ShouldSetFilter()
{
    var customers = new List<Customer>
    {
        new Customer { Country = "a"},
        new Customer { Country = "text"},
        new Customer { Country = "b"},
        new Customer { Country = "texta"},
        new Customer { Country = "a"},
        new Customer { Country = "b"},
    };
    var repository = A.Fake<ICustomerRepository>();
    A.CallTo(() => repository.Customers).Returns(customers);
    var vm = new MainViewModel(repository);
    vm.SearchCommand.Execute("text");
    vm.Customers.Count().Should().Be(2);
}

[TestMethod]
public void SearchCommand_WithoutText_ShouldSetFilter()
{
    var customers = new List<Customer>
    {
        new Customer { Country = "a"},
        new Customer { Country = "text"},
        new Customer { Country = "b"},
        new Customer { Country = "texta"},
        new Customer { Country = "a"},
        new Customer { Country = "b"},
    };
    var repository = A.Fake<ICustomerRepository>();
    A.CallTo(() => repository.Customers).Returns(customers);
    var vm = new MainViewModel(repository);
    vm.SearchCommand.Execute("");
    vm.Customers.Count().Should().Be(6);
}
Now, when we run the tests, they all pass and we can continue. We will start adding the UI to the main window:
<Grid>
    <Grid.RowDefinitions>
        <RowDefinition Height="40" />
        <RowDefinition Height="*" />
        <RowDefinition Height="2*" />
        <RowDefinition Height="50" />
    </Grid.RowDefinitions>
    <StackPanel Orientation="Horizontal">
        <TextBlock Text="Country" VerticalAlignment="Center" Margin="5"/>
        <TextBox x:Name="searchText" VerticalAlignment="Center" Margin="5,3" Width="250" Height="25" VerticalContentAlignment="Center"/>
        <Button x:Name="PesqBtn" Content="Find" Width="75" Height="25" Margin="10,5" VerticalAlignment="Center"
                Command="{Binding SearchCommand}" CommandParameter="{Binding ElementName=searchText,Path=Text}"/>
    </StackPanel>
    <DataGrid AutoGenerateColumns="False" x:Name="master" CanUserAddRows="False" CanUserDeleteRows="True" Grid.Row="1"
              ItemsSource="{Binding Customers}" SelectedItem="{Binding SelectedCustomer, Mode=TwoWay}">
        <DataGrid.Columns>
            <DataGridTextColumn x:Name="customerIDColumn" Binding="{Binding Path=CustomerId}" Header="Customer ID" Width="60" />
            <DataGridTextColumn x:Name="companyNameColumn" Binding="{Binding Path=CompanyName}" Header="Company Name" Width="160" />
            <DataGridTextColumn x:Name="contactNameColumn" Binding="{Binding Path=ContactName}" Header="Contact Name" Width="160" />
            <DataGridTextColumn x:Name="contactTitleColumn" Binding="{Binding Path=ContactTitle}" Header="Contact Title" Width="60" />
            <DataGridTextColumn x:Name="addressColumn" Binding="{Binding Path=Address}" Header="Address" Width="130" />
            <DataGridTextColumn x:Name="cityColumn" Binding="{Binding Path=City}" Header="City" Width="60" />
            <DataGridTextColumn x:Name="regionColumn" Binding="{Binding Path=Region}" Header="Region" Width="40" />
            <DataGridTextColumn x:Name="postalCodeColumn" Binding="{Binding Path=PostalCode}" Header="Postal Code" Width="50" />
            <DataGridTextColumn x:Name="countryColumn" Binding="{Binding Path=Country}" Header="Country" Width="80" />
            <DataGridTextColumn x:Name="faxColumn" Binding="{Binding Path=Fax}" Header="Fax" Width="100" />
            <DataGridTextColumn x:Name="phoneColumn" Binding="{Binding Path=Phone}" Header="Phone" Width="100" />
        </DataGrid.Columns>
    </DataGrid>
    <customerApp:Detail Grid.Row="2" DataContext="{Binding SelectedCustomer}" Margin="5" x:Name="detail"/>
    <StackPanel Orientation="Horizontal" HorizontalAlignment="Right" Margin="5" Grid.Row="3">
        <Button Width="75" Height="25" Margin="5" Content="Add" Command="{Binding AddCommand}" />
        <Button Width="75" Height="25" Margin="5" Content="Remove" Command="{Binding RemoveCommand}" />
        <Button Width="75" Height="25" Margin="5" Content="Save" Command="{Binding SaveCommand}" />
    </StackPanel>
</Grid>
There is an error with the DataGrid. That's because we need to add the package Avalonia.Controls.Datagrid. Once we add that, we can see some other errors:
- The ItemsSource property has been changed to Items
- The columns don't have the Name field and should be removed
- The CanUserAddRows and CanUserDeleteRows do not exist and should be removed
- We should add the themes for the DataGrid in App.axaml:
<Application.Styles>
    <StyleInclude Source="avares://Avalonia.Themes.Default/DefaultTheme.xaml"/>
    <StyleInclude Source="avares://Avalonia.Themes.Default/Accents/BaseLight.xaml"/>
    <StyleInclude Source="avares://Avalonia.Controls.DataGrid/Themes/Default.xaml"/>
</Application.Styles>
We can also see that this code is missing the Detail control. Add to the project a new item of type UserControl (Avalonia) and add the content from the original project:
<Grid>
    <Grid Name="grid1" >
        <Grid.ColumnDefinitions>
            <ColumnDefinition Width="Auto" />
            <ColumnDefinition Width="*" />
        </Grid.ColumnDefinitions>
        <Grid.RowDefinitions>
            <RowDefinition Height="Auto" />
            <RowDefinition Height="Auto" />
            <RowDefinition Height="Auto" />
            <RowDefinition Height="Auto" />
            <RowDefinition Height="Auto" />
            <RowDefinition Height="Auto" />
            <RowDefinition Height="Auto" />
            <RowDefinition Height="Auto" />
            <RowDefinition Height="Auto" />
            <RowDefinition Height="Auto" />
            <RowDefinition Height="Auto" />
        </Grid.RowDefinitions>
        <Label Content="Customer Id:" Grid.Column="0" Grid.Row="0"  Margin="3" VerticalAlignment="Center" />
        <TextBox Grid.Column="1" Grid.Row="0"   Margin="3" Name="customerIdTextBox" Text="{Binding Path=CustomerId, Mode=TwoWay, ValidatesOnExceptions=true, NotifyOnValidationError=true}" VerticalAlignment="Center"  />
        <Label Content="Company Name:" Grid.Column="0" Grid.Row="1"  Margin="3" VerticalAlignment="Center" />
        <TextBox Grid.Column="1" Grid.Row="1"   Margin="3" Name="companyNameTextBox" Text="{Binding Path=CompanyName, Mode=TwoWay, ValidatesOnExceptions=true, NotifyOnValidationError=true}" VerticalAlignment="Center"  />
        <Label Content="Contact Name:" Grid.Column="0" Grid.Row="2"  Margin="3" VerticalAlignment="Center" />
        <TextBox Grid.Column="1" Grid.Row="2"   Margin="3" Name="contactNameTextBox" Text="{Binding Path=ContactName, Mode=TwoWay, ValidatesOnExceptions=true, NotifyOnValidationError=true}" VerticalAlignment="Center"  />
        <Label Content="Contact Title:" Grid.Column="0" Grid.Row="3"  Margin="3" VerticalAlignment="Center" />
        <TextBox Grid.Column="1" Grid.Row="3"   Margin="3" Name="contactTitleTextBox" Text="{Binding Path=ContactTitle, Mode=TwoWay, ValidatesOnExceptions=true, NotifyOnValidationError=true}" VerticalAlignment="Center"  />
        <Label Content="Address:" Grid.Column="0" Grid.Row="4" HorizontalAlignment="Left" Margin="3" VerticalAlignment="Center" />
        <TextBox Grid.Column="1" Grid.Row="4" Margin="3" Name="addressTextBox" Text="{Binding Path=Address, Mode=TwoWay, ValidatesOnExceptions=true, NotifyOnValidationError=true}" VerticalAlignment="Center" />
        <Label Content="City:" Grid.Column="0" Grid.Row="5"  Margin="3" VerticalAlignment="Center" />
        <TextBox Grid.Column="1" Grid.Row="5"   Margin="3" Name="cityTextBox" Text="{Binding Path=City, Mode=TwoWay, ValidatesOnExceptions=true, NotifyOnValidationError=true}" VerticalAlignment="Center"  />
        <Label Content="Postal Code:" Grid.Column="0" Grid.Row="6"  Margin="3" VerticalAlignment="Center" />
        <TextBox Grid.Column="1" Grid.Row="6"   Margin="3" Name="postalCodeTextBox" Text="{Binding Path=PostalCode, Mode=TwoWay, ValidatesOnExceptions=true, NotifyOnValidationError=true}" VerticalAlignment="Center"  />
        <Label Content="Region:" Grid.Column="0" Grid.Row="7"  Margin="3" VerticalAlignment="Center" />
        <TextBox Grid.Column="1" Grid.Row="7"   Margin="3" Name="regionTextBox" Text="{Binding Path=Region, Mode=TwoWay, ValidatesOnExceptions=true, NotifyOnValidationError=true}" VerticalAlignment="Center"  />
        <Label Content="Country:" Grid.Column="0" Grid.Row="8"  Margin="3" VerticalAlignment="Center" />
        <TextBox Grid.Column="1" Grid.Row="8"   Margin="3" Name="countryTextBox" Text="{Binding Path=Country, Mode=TwoWay, ValidatesOnExceptions=true, NotifyOnValidationError=true}" VerticalAlignment="Center"  />
        <Label Content="Phone:" Grid.Column="0" Grid.Row="9"  Margin="3" VerticalAlignment="Center" />
        <TextBox Grid.Column="1" Grid.Row="9"   Margin="3" Name="phoneTextBox" Text="{Binding Path=Phone, Mode=TwoWay, ValidatesOnExceptions=true, NotifyOnValidationError=true}" VerticalAlignment="Center"  />
        <Label Content="Fax:" Grid.Column="0" Grid.Row="10"  Margin="3" VerticalAlignment="Center" />
        <TextBox Grid.Column="1" Grid.Row="10"   Margin="3" Name="faxTextBox" Text="{Binding Path=Fax, Mode=TwoWay, ValidatesOnExceptions=true, NotifyOnValidationError=true}" VerticalAlignment="Center"  />
    </Grid>
</Grid>
We must remove the , ValidatesOnExceptions=true, NotifyOnValidationError=true from the code, as it's not available in Avalonia. Then, we should add the correct using clause in the main xaml:
xmlns:customerApp="using:MvvmAvalonia"
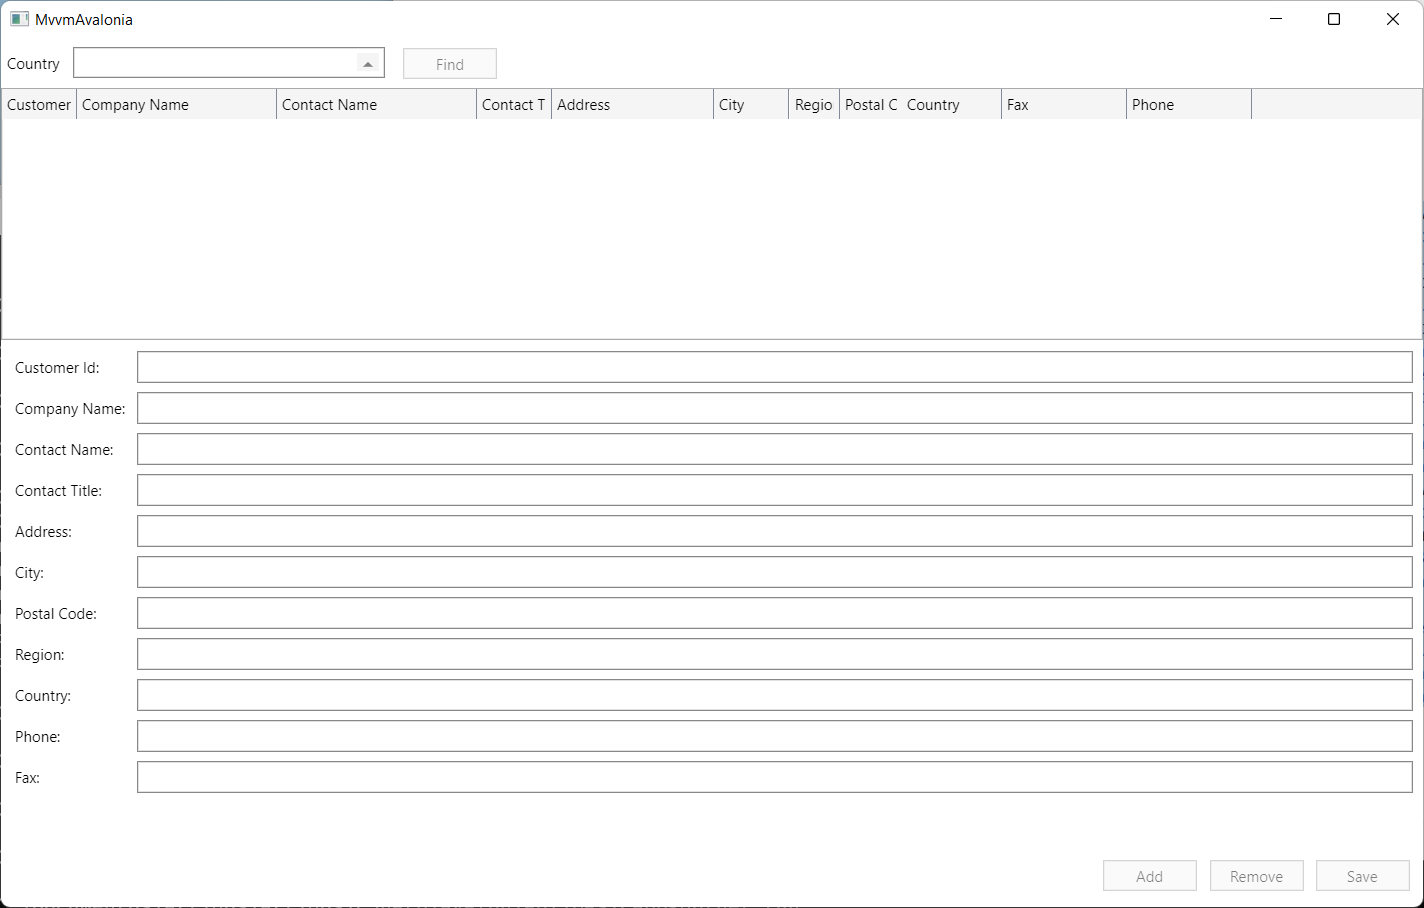
Once we do that and we run, we can see the UI (but not the data):
For the data, we must add the configuration for the services, in App.axaml.cs:
public partial class App : Application
{
    public override void Initialize()
    {
        AvaloniaXamlLoader.Load(this);
        Services = ConfigureServices();
    }

    public override void OnFrameworkInitializationCompleted()
    {
        if (ApplicationLifetime is IClassicDesktopStyleApplicationLifetime desktop)
        {
            desktop.MainWindow = new MainWindow();
        }

        base.OnFrameworkInitializationCompleted();
    }

    public new static App Current => (App)Application.Current;

    public IServiceProvider Services { get; private set; }

    private static IServiceProvider ConfigureServices()
    {
        var services = new ServiceCollection();

        services.AddSingleton<ICustomerRepository, CustomerRepository>();
        services.AddSingleton<MainViewModel>();

        return services.BuildServiceProvider();
    }

    public MainViewModel MainVM => Services.GetService<MainViewModel>();
}
Then, we must set the DataContext on MainWindow.axaml.cs:
public MainWindow()
{
    InitializeComponent();
    DataContext = App.Current.MainVM;
}
Now, when we run the code, we can see it runs fine: 
We've ported our WPF project to Avalonia, now it's ready to be run on Linux. We'll use WSLg (Windows Subsystem for Linux GUI) to run the app. Just open a Linux tab on terminal and cd to the project directory (the drive is mounted on /mnt/drive, like /mnt/c) and run the app with dotnet run. You should have something like this:

As you can see, porting a WPF app to Avalonia requires some changes, but most of the code is completely portable. If you want to ease the process, you can move the non-UI code to .NET Standard libraries and use them as-is.
All the source code for the project is at https://github.com/bsonnino/MvvmAvalonia
If `NotifyOnValidationError=true ` is a must, how to handle it in Avalonia?
You can check this: https://docs.avaloniaui.net/docs/guides/development-guides/data-validation