
Introduction
Office 2007 brought many significant changes for this app suite. The most visible was the Ribbon, an new user interface that eases the use of the applications.

Another change, less visible, allows the integration of Office applications with a large variety of programs: the new file format. Until the previous version, the file format was proprietary: when you wanted to open or save an Office document in our applications, you should use Ole Automation, what required that Office was installed in the client’s machine, or try to discover the internal file format, which wasn’t documented and could be changed at any time.
The new file format, besides being documented, is based in open standards, thus allowing that any aplication for any platform, written in any language to open or create Office 2007 files. This new standard, named OpenXML, is based on the zip packaging and XML files. It creates smaller files and allows other applications to open and change these files.
This opens a lot of possibilities:
- Programs to index and search text from the files in the machine
- Programs for batch generation of documents, based on databases and templates
- Programs for batch text replacement
- Simple text editors that generate Office files
- Spreadsheet generation using data from many sources
- …
In this article, we will show the new file format and how we can read and create them using Delphi, with no need to install Office.
Analyzing an OpenXML file
Any OpenXML file is, in fact, a zip file with many folders and XML files. We can see that in practice, by creating a Word file with some text and save it. If we rename this file to zip, we can open it with any program that can open zip files:
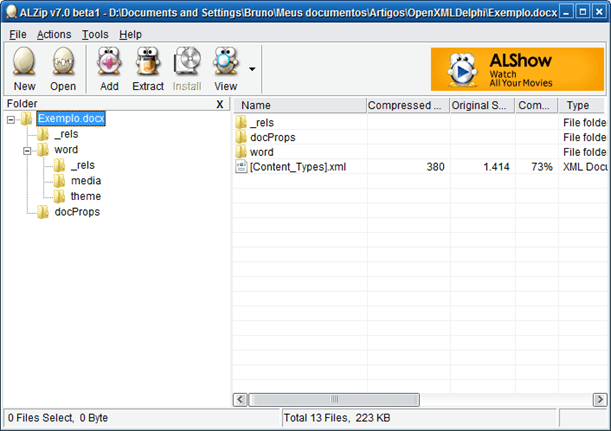
As you can see in the figure above, the file contains in the root three directories, _rels, docProps and word and a file, [Content_Types].xml. This directory structure is created by Word and it’s not obligatory to maintain it. The files location is in the .rels file, located in the _rels folder. This file contains the relations between the package and the files in the upper level. The following code shows the rels file from the example:
<?xml version="1.0" encoding="UTF-8" standalone="yes"?>
 <Relationships xmlns="http://schemas.openxmlformats.org/package/2006/relationships">
   <Relationship Id="rId3" Type="http://schemas.openxmlformats.org/package/2006/relationships/metadata/core-properties" Target="docProps/core.xml"/>
   <Relationship Id="rId2" Type="http://schemas.openxmlformats.org/package/2006/relationships/metadata/thumbnail" Target="docProps/thumbnail.wmf"/>
   <Relationship Id="rId1" Type="http://schemas.openxmlformats.org/officeDocument/2006/relationships/officeDocument" Target="word/document.xml"/>
   <Relationship Id="rId4" Type="http://schemas.openxmlformats.org/officeDocument/2006/relationships/extended-properties" Target="docProps/app.xml"/>
 </Relationships>
Analyzing this file, we see the following:
- The core properties are in the docProps/core.xml file.
- The thumbnail is in the docProps/thumbnail.wmf file.
- The main document is in word/document.xml.
- The extended-properties are in docProps/app.xml.
Besides that, we can see that the word directory contains a _rels subdirectory, which contains the relations for the document. In the file document.txt.rels, we find the following relations:
<?xml version="1.0" encoding="UTF-8" standalone="yes"?> <Relationships xmlns="http://schemas.openxmlformats.org/package/2006/relationships">
  <Relationship Id="rId3" Type="http://schemas.openxmlformats.org/officeDocument/2006/relationships/webSettings" Target="webSettings.xml"/>
  <Relationship Id="rId2" Type="http://schemas.openxmlformats.org/officeDocument/2006/relationships/settings" Target="settings.xml"/>
  <Relationship Id="rId1" Type="http://schemas.openxmlformats.org/officeDocument/2006/relationships/styles" Target="styles.xml"/>
  <Relationship Id="rId6" Type="http://schemas.openxmlformats.org/officeDocument/2006/relationships/theme" Target="theme/theme1.xml"/>
  <Relationship Id="rId5" Type="http://schemas.openxmlformats.org/officeDocument/2006/relationships/fontTable" Target="fontTable.xml"/>
  <Relationship Id="rId4" Type="http://schemas.openxmlformats.org/officeDocument/2006/relationships/image" Target="media/image1.png"/>
</Relationships>
Here you can find the relations for the document. We see that the styles used in the document are in styles.xml and any image in the document is in the media folder. That way, we can access any part of the document.
Based on these informations, we can open the files that are in the OpenXML package. Now, we will create a small Delphi program that opens an Office file and lists its properties in a component TValueListEditor.
Accessing OpenXml files
To open OpenXml files, we need to divide our program in the following parts:
- Open the OpenXml package with a component that allows to read and write zip files
- Open the .rels file and read the relations, extracting the parts that interest us
- Access the parts, executing what we want
To open the zip files, we will use the TZipFile component, which is available in Delphi since version XE2. This component allows to manipulate zip files in a relatively simple way. You should create a new Delphi project and add to the main form a button, an OpenDialog and a Memo.
Configure the Caption property of the button to Open. Configure the Filter property of the OpenDialog to “Word Files (*.docx, *.docm)|*.docx;*.docm| Excel Files(*.xlsx, *.xlsm)|*.xlsx;*.xlsm| Powerpoint Files(*.pptx, *.pptm)|*.pptx;*.pptm”.
On the OnClick event handler of the button, add the following code:
procedure TMainFrm.Button1Click(Sender: TObject);
var
  ZipStream: TStream;
  XmlNode: IXMLNode;
  i: Integer;
  AttType: String;
  ZipFile: TZipFile;
  LocalHeader: TZipHeader;
begin
  if OpenDialog1.Execute then begin
    ZipFile := TZipFile.Create();
    try
      ZipFile.Open(OpenDialog1.FileName, TZipMode.zmRead);
      try
        ZipFile.Read('_rels/.rels', ZipStream, LocalHeader);
        ZipStream.Position := 0;
        XMLDocument1.LoadFromStream(ZipStream);
        Memo1.Text := XMLDoc.FormatXMLData(XMLDocument1.XML.Text);
      finally
        ZipStream.Free;
      end;
    finally
      ZipFile.Close();
      ZipFile.Free;
    end;
  end;
end;
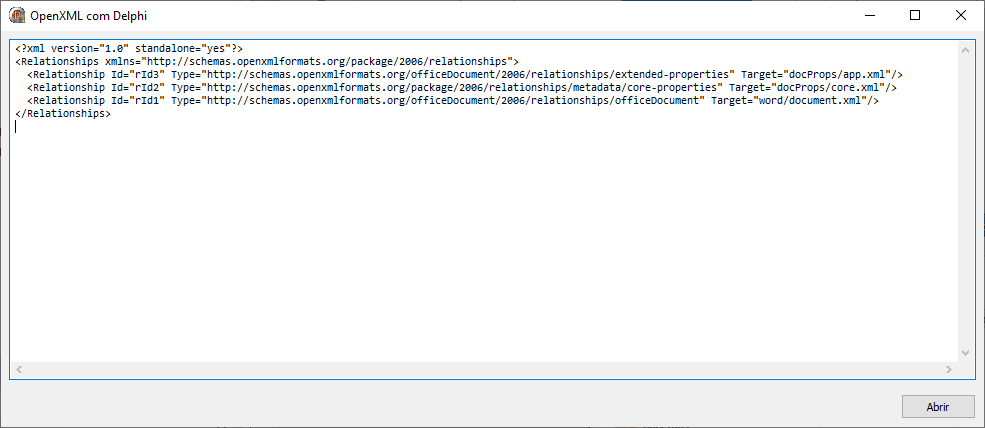
If the user chooses a file, we open the file with the TZipFile and extract the .rels file to a stream and load the lines of the memo with this stream formatted with the FormatXMLData. The following figure shows the result of this operation:
Once we have the .rels file, we must read it and interpret the relations. We could use the functions to read text files and interpret the document, but this is not the best way to do this operation. The ideal is to use a component to read XML files, like the TXMLDocument component that comes with Delphi.
Put two TXMLDocument components and a TValueListEditor on the form. Modify the TileCaptions property of the TValueListEditor to Property/Value. On the OnClick handler of the button modify the code to this one:
procedure TMainFrm.Button1Click(Sender: TObject);
var
  ZipStream: TStream;
  XmlNode: IXMLNode;
  i: Integer;
  AttType: String;
  ZipFile: TZipFile;
  LocalHeader: TZipHeader;
begin
  if OpenDialog1.Execute then begin
    ZipFile := TZipFile.Create();
    try
      ZipFile.Open(OpenDialog1.FileName, TZipMode.zmRead);
      ZipFile.Read('_rels/.rels', ZipStream, LocalHeader);
      try
        ZipStream.Position := 0;
        XMLDocument1.LoadFromStream(ZipStream);
        Memo1.Text := XMLDoc.FormatXMLData(XMLDocument1.XML.Text);
        ValueListEditor1.Strings.Clear;
        for i := 0 to XMLDocument1.DocumentElement.ChildNodes.Count - 1 do begin
          XmlNode := XMLDocument1.DocumentElement.ChildNodes.Nodes[i];
          AttType := ExtractFileName(XmlNode.Attributes['Type']);
          if AttType.EndsWith('core-properties') or
             AttType.EndsWith('extended-properties') then
            ReadProperties(ZipFile, XmlNode.Attributes['Target']);
        end;
      finally
        ZipStream.Free;
      end;
    finally
      ZipFile.Close();
      ZipFile.Free;
    end;
  end;
end;
We load the stream in XMLDocument1 and process the nodes, to find the ones with the types we want (core-properties or extended-properties). When we find them, we pass the name of the file (which is in the Target attribute) to the ReadProperties function, which will read the property file and add them to the ValueListEditor. The ReadProperties function is:
procedure TMainFrm.ReadProperties(ZipFile: TZipFile; const FileName: String);
var
  ZipStream: TStream;
  i: Integer;
  XmlNode: IXMLNode;
  LocalHeader: TZipHeader;
begin
  ZipFile.Read(FileName, ZipStream, LocalHeader);
  try
    ZipStream.Position := 0;
    XMLDocument2.LoadFromStream(ZipStream);
    for i := 0 to XMLDocument2.DocumentElement.ChildNodes.Count - 1 do begin
      XmlNode := XMLDocument2.DocumentElement.ChildNodes.Nodes[i];
      try
        ValueListEditor1.InsertRow(XmlNode.NodeName, XmlNode.NodeValue, True);
      except
        On EXMLDocError do;
        On EVariantTypeCastError do
          ValueListEditor1.InsertRow(XmlNode.NodeName, '', True);
      end;
    end;
  finally
    ZipStream.Free;
  end;
end;
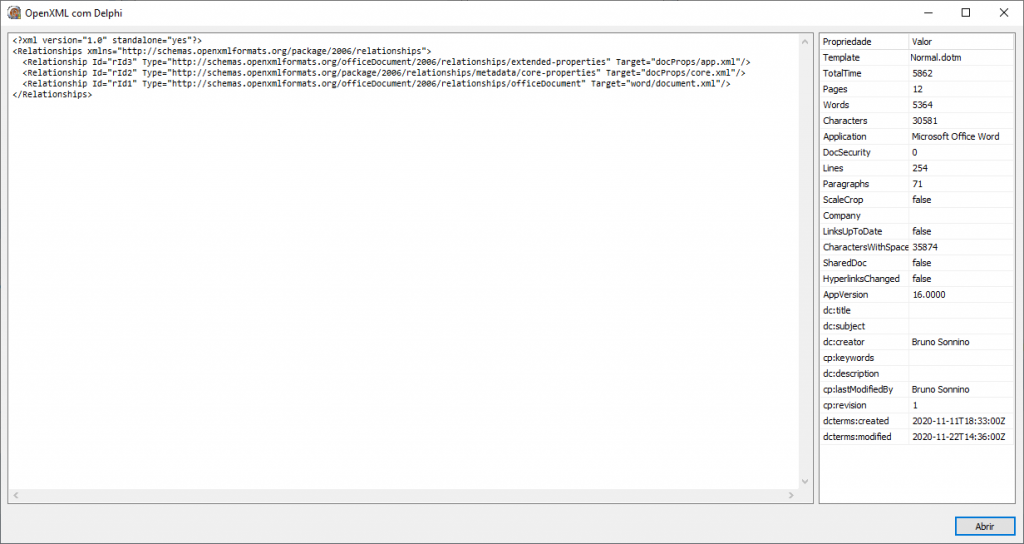
This function is similar with the previous one. We will read the properties file in the second TXMLDcoument and insert a line in the ValueListEditor for each property found. We treat here two types of exceptions: EXMLDocError, which can be raised when the type of the information is not a single type, like a string or an integer and EVariantTypeCastError, which happens when the value is null. This way, we add the properties on the list, like in the next figure:
As we can see, the access to the data of an OpenXml file is relatively simple and can be made using components available in Delphi, but this isn’t everything that can be done: as we are working with zip and xml files, using open technology, we can also modify the files, using the same techniques. In the next section, we’ll see how to create a file from our data.
Creating an OpenXml file
To create an OpenXml file, we need to create some files that will be added to the package. The package should contain at least three files:
- [Content_Types].xml
- _rels/.rels
- xml
It’s not necessary to create a folder structure like the one created by Word, we just need to point the location of the files in the .rels file. When adding new functionalities, like images, headers, themes and styles, we must add new files to add these parts to the document. Initially, we will create a simple file, to show the file generation process and then, we will show how to create a more complex file.
Create a new project and place a Label, a Memo and a button on the Form. Change the Caption property of the Label to **Text 😗*, the Caption property of the Button to Create and clear the Lines property of the Memo.
Place an XMLDocument component. In the button’s OnClick event, place the following code:
procedure TMainFrm.Button1Click(Sender: TObject);
var
  zipFile: TZipFile;
  contentTypes: TStream;
  rels: TStream;
  doc: TStream;
begin
  zipFile := TZipFile.Create();
  try
    zipFile.Open('SimpleFile.docx', TZipMode.zmWrite);
    contentTypes := CreateContentTypes();
    try
      zipFile.Add(contentTypes, '[Content_Types].xml');
    finally
      contentTypes.Free;
    end;
    rels := CreateRels();
    try
      zipFile.Add(rels, '_rels\\.rels');
    finally
      rels.Free;
    end;
    doc := CreateDoc();
    try
      zipFile.Add(doc, 'word\\document.xml');
    finally
      doc.Free;
    end;
  finally
    zipFile.Close();
    zipFile.Free;
  end;
end;
The program will create the necessary files, add the streams to the zip file and create a file with the name SimpleFile.docx. The function that creates the file [Content_Types.xml] is:
function TMainFrm.CreateContentTypes(): TStream;
var
  Root: IXmlNode;
  Type: IXmlNode;
  XMLDoc: IXmlDocument;
begin
  Result := TMemoryStream.Create();
  XMLDoc := CriaXml;
  Root := XMLDoc.addChild('Types',
    'http://schemas.openxmlformats.org/package/2006/content-types');
  Type := Root.addChild('Default');
  Type.Attributes['Extension'] := 'rels';
  Type.Attributes['ContentType'] :=
    'application/vnd.openxmlformats-package.relationships+xml';
  Type := Root.addChild('Default');
  Type.Attributes['Extension'] := 'xml';
  Type.Attributes['ContentType'] :=
    'application/vnd.openxmlformats-officedocument.wordprocessingml.document.main+xml';
  XMLDoc.SaveToStream(Result);
  Result.Position := 0;
end;
The function that create the relations file is:
function TMainFrm.CreateRels(): TStream;
var
  Root: IXmlNode;
  Rel: IXmlNode;
  XMLDoc: IXmlDocument;
begin
  Result := TMemoryStream.Create();
  XMLDoc := CriaXml;
  Root := XMLDoc.addChild('Relationships',
    'http://schemas.openxmlformats.org/package/2006/relationships');
  Rel := Root.addChild('Relationship');
  Rel.Attributes['Id'] := 'rId1';
  Rel.Attributes['Type'] :=
    'http://schemas.openxmlformats.org/officeDocument/2006/relationships/officeDocument';
  Rel.Attributes['Target'] := 'word/document.xml';
  XMLDoc.SaveToStream(Result);
  Result.Position := 0;
end;

The code to write the document with the text entered in the Memo is:

function TMainFrm.CreateDoc(): TStream;
var
  Root: IXmlNode;
  XMLDoc: IXmlDocument;
begin
  Result := TMemoryStream.Create();
  XMLDoc := CriaXml;
  Root := XMLDoc.addChild('wordDocument',
    'http://schemas.openxmlformats.org/wordprocessingml/2006/main');
  Root.addChild('body').addChild('p').addChild('r').addChild('t').NodeValue :=
    Memo1.Text;
  XMLDoc.SaveToStream(Result);
  Result.Position := 0;
end;
Here we just need to write a node inside the wordDocument root node: it is the body of the document, which has a paragraph (node p), a “run” (node r) and the text, which is the content of the Memo. When compiling and running the program, we can type some text in the Memo and click on the Create button. The docx file is created with the typed text.
Putting more information in the file
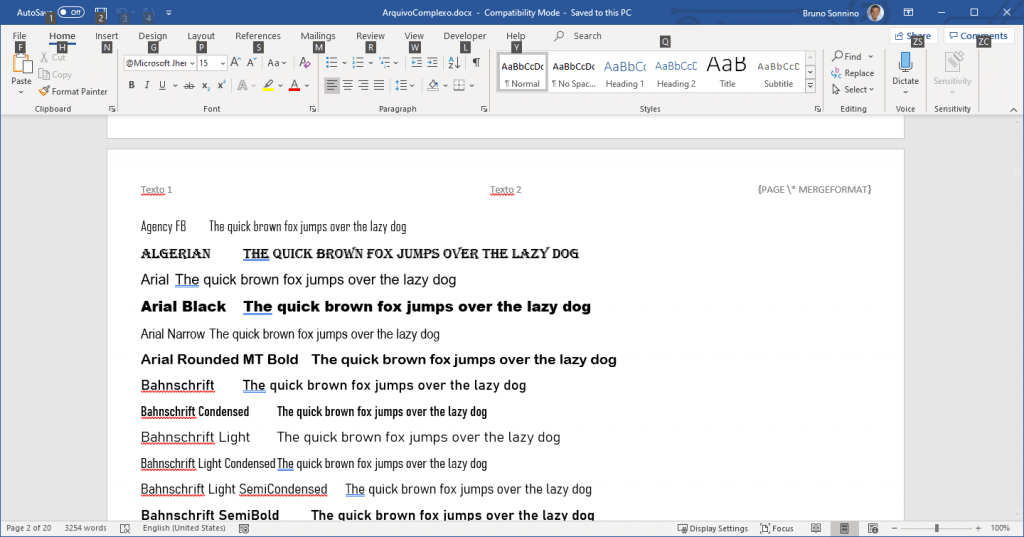
Once we know how to create our files, we can add more information to what is being created. We will now create an example that shows all the fonts available in the system. This document will be generated in landscape format, and we will put a header with three columns and the page number.
Create a new project and place a button and an XmlDocument Change the Caption property of the button to Create. In the button’s OnClick event, put:
procedure TMainFrm.Button1Click(Sender: TObject);
var
  ZipFile: TZipFile;
  MemStream: TMemoryStream;
begin
  ZipFile := TZipFile.Create();
  try
    ZipFile.Open('ComplexFile.docx', TZipMode.zmWrite);
    MemStream := TMemoryStream.Create();
    try
      CreateContentTypes(MemStream);
      ZipFile.Add(MemStream, '[Content_Types].xml');
      MemStream.Clear;
      CreateRels(MemStream);
      ZipFile.Add(MemStream, '_rels\\.rels');
      MemStream.Clear;
      CreateDoc(MemStream);
      ZipFile.Add(MemStream, 'word\\document.xml');
    finally
      MemStream.Free;
    end;
  finally
    ZipFile.Close();
    ZipFile.Free;
  end;
end;
The functions CreateRels and CreateContentTypes are the same as the previous routine. The function CreateDocument is the following:
procedure TMainFrm.CreateDocument(AStream: TStream);
var
  Root, Body, PgSz: IXMLNode;
  i: Integer;
  SectPr: IXMLNode;
  Header: IXMLNode;
begin
  LimpaXML;
  CreateHeader;
  Root := XMLDocument1.addChild('w:wordDocument');
  Root.DeclareNamespace('w',
    'http://schemas.openxmlformats.org/wordprocessingml/2006/main');
  Body := Root.addChild('w:body');
  for i := 0 to Screen.Fonts.Count - 1 do
    AddFont(Body, Screen.Fonts[i]);

  XMLDocument1.SaveToStream(AStream);
  AStream.Position := 0;
end;
We will loop for the system fonts, calling the function AddFont, which will add the formatted text in the Document.xml file:
procedure TMainFrm.AddFont(Body: IXMLNode; NomeFonte: String);
var
  Fonte: IXMLNode;
  Run: IXMLNode;
  RunPr: IXMLNode;
begin
  Run := Body.addChild('w:p').addChild('w:r');
  RunPr := Run.addChild('w:rPr');
  Fonte := RunPr.addChild('w:rFonts');
  Fonte.Attributes['w:ascii'] := NomeFonte;
  Fonte.Attributes['w:hAnsi'] := NomeFonte;
  Fonte.Attributes['w:cs'] := NomeFonte;
  RunPr.addChild('w:sz').Attributes['w:val'] := 30;
  Run.addChild('w:t').NodeValue := NomeFonte;
  Run.addChild('w:tab');
  Run.addChild('w:t').NodeValue :=
    'The quick brown fox jumps over the lazy dog';
end;
For each font in the system, we add a paragraph and, in it, a Run. The Run must be formatted with the rPr element, placing the rFonts element and the font name as values of the ASCII, hAnsi and cs attributes as children. We also changed the font size by adding the sz element. Then, we put the name of the font as text, adding the tab element to generate a tab and sample text. When running the program, we see that the list of fonts is generated in the document.
The next step is to have the document placed in landscape. To do this, we must add a sectPr element (section properties) to the end of the document, which indicates the formatting of the section. Place the following code at the end of CreateDocument, before the XMLDocument1.SaveToStream (AStream) line:
SectPr := Body.addChild('sectPr');
PgSz := SectPr.addChild('w:pgSz');
PgSz.Attributes['w:w'] := Round(297 / 25.4 \* 1440);
PgSz.Attributes['w:h'] := Round(210 / 25.4 \* 1440);
PgSz := SectPr.addChild('w:pgMar');
PgSz.Attributes['w:top'] := 1440;
PgSz.Attributes['w:bottom'] := 1440;
PgSz.Attributes['w:left'] := 720;
PgSz.Attributes['w:right'] := 720;
PgSz.Attributes['w:header'] := 720;
PgSz.Attributes['w:footer'] := 720;
In this code we add the element pgSz (Page size), giving the attributes w and h for the width and height of the page. These measurements are in twips (1/1440 of an inch), so we convert the page size from A4 to twips. Then, we put the pgMar element (Page margins), which determines the page margins and the position of the header and footer. When we run the program and open the document, we see that it is in landscape.
The last step is to place the header. We put the header in a separate file and, therefore, we must change all references so that this new document can be read.
Initially, we created a reference to the header in the section, as a child of sectPr. Place the following code in CreateDocument, after the line SectPr: = Body.AddChild (‘sectPr’):
Header := SectPr.addChild('w:headerReference'); Header.Attributes['w:type'] := 'default'; Header.Attributes['r:id'] := 'rId1';
To use the references, we must add a new namespace to the document. This is done by adding the following line after declaring the namespace in CreateDocument:
Root.DeclareNamespace ('r', 'http://schemas.openxmlformats.org/officeDocument/2006/relationships');
We created a reference rId1 in the document. We must then create a function that creates this relationship in the file word_rels\document.xml.rels:
procedure TMainFrm.CreateDocRels(AStream: TStream);
var
  Root: IXMLNode;
  Rel: IXMLNode;
begin
  CleanXML;
  CreateHeader;
  Root := XMLDocument1.addChild('Relationships',
    'http://schemas.openxmlformats.org/package/2006/relationships');
  // Definição de relações
  Rel := Root.addChild('Relationship');
  Rel.Attributes['Id'] := 'rId1';
  Rel.Attributes['Type'] :=
    'http://schemas.openxmlformats.org/officeDocument/2006/relationships/header';
  Rel.Attributes['Target'] := 'header1.xml';
  XMLDocument1.SaveToStream(AStream);
  AStream.Position := 0;
end;
This function is similar to the one that creates the package relationship. The function that creates the header in the file header1.xml is:
procedure TMainFrm.CreateHeader(AStream: TStream);
var
  Root, Header, PTab: IXMLNode;
begin
  CleanXML;
  CriaCabecalho;
  Root := XMLDocument1.addChild('w:hdr');
  Root.DeclareNamespace('w',
    'http://schemas.openxmlformats.org/wordprocessingml/2006/main');
  Header := Root.addChild('w:p');
  Header.addChild('w:r').addChild('w:t').NodeValue := 'Texto 1';
  PTab := Header.addChild('w:r').addChild('w:ptab');
  PTab.Attributes['w:relativeTo'] := 'margin';
  PTab.Attributes['w:alignment'] := 'center';
  PTab.Attributes['w:leader'] := 'none';
  Header.addChild('w:r').addChild('w:t').NodeValue := 'Texto 2';
  PTab := Header.addChild('w:r').addChild('w:ptab');
  PTab.Attributes['w:relativeTo'] := 'margin';
  PTab.Attributes['w:alignment'] := 'right';
  PTab.Attributes['w:leader'] := 'none';
  Header.addChild('w:fldSimple').Attributes['w:instr'] := 'PAGE \\\* MERGEFORMAT';
  XMLDocument1.SaveToStream(AStream);
  AStream.Position := 0;
end;
Here we create the header with text left-aligned, a tab to align the centered text and another tab to align the page number to the right.
The page number is given by the fldSimple element, using the instr attribute with the value *PAGE\MERGEFORMAT. After creating these functions, we must place the code to call them, at the end of the button’s OnClick event:
MemStream.Clear;
CreateDocRels(MemStream);
ZipFile.Add(MemStream, 'word\_rels\\document.xml.rels');
MemStream.Clear;
CreateHeader(MemStream);
ZipFile.Add(MemStream, 'word\\header1.xml');

Now, we need only to make a small change in **[Content_Types].xml**, adding the **Override** element, to show the type of the **header1.xml** file. Put the following code in the  **CreateContentTypes**, before the line XMLDocument1.SaveToStream(AStream):

Tipo := Root.addChild('Override');
Tipo.Attributes['PartName'] := '/word/header1.xml';
Tipo.Attributes['ContentType'] :=
  'application/vnd.openxmlformats-officedocument.wordprocessingml.header+xml';
With that, our program is ready. When executing it, we generate a document similar to the one shown in the following figure:
Conclusions
The OpenXML format has great advantages for those who want to process and open Office files. As this format uses open technologies and is fully documented, we can access, change or even create Office files using any development tools (or even changing files manually), on any platform or language.
No proprietary APIs or special programs are required, which allows the information to be available to anyone who wants to access it. We show here how to manipulate Delphi files, noting that we use only standard Delphi components, using only zip and XML files.
The source code for this project is in https://github.com/bsonnino/OpenXmlDelphiEng