
In the last post I showed how to use Xaml Islands to modernize your .NET app. As you could see, there are a lot of steps and the procedure is a little clumsy. But now it’s getting better, Microsoft has introduced WinUI 3 and, with that, things are getting better: you don’t need special components to add your WinUI code, you can use the WinUI components directly in you app. But there is a pitfall – right now, when I’m writing this article (end of 2020), Win UI 3 is still in preview and you need the preview version of Visual Studio to use it. You can install the preview version side-by-side with the production version, there is no problem with that. You can download the preview version from here. Once you download and install the preview version of Visual Studio, you need to download the WinUI3 templates to create new apps. This is done by installing the VSIX package from here. Now we are ready to modernize our app from the last post with WinUI3. In Visual Studio Preview, create a new app. We’ll create a new blank, packaged desktop app:
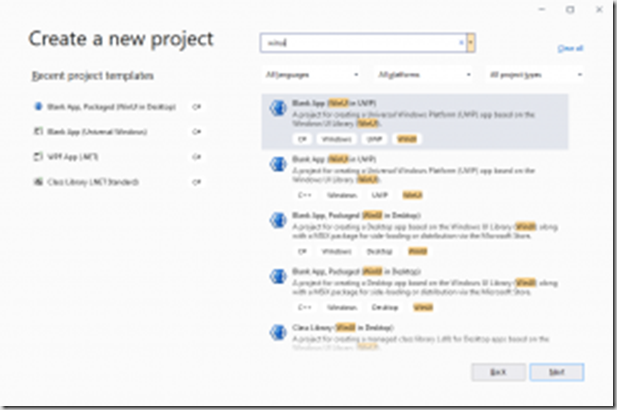
When you create that app, Visual Studio will create a solution with two projects: a WPF app and a package app that will create a MSIX package that will allow your program to run in a sandbox and to send it to Windows Store:

If you run the application right now, the package will install the app, with a button in the center of the window, that will change its text when clicked. We’ll change the app to show our photos. The first step is to add the Newtonsoft.Json NuGet package. The MVVM Light package wasn’t ported to .NET 5.0, so we’ll use the MVVM framework from the Community toolkit (https://github.com/windows-toolkit/MVVM-Samples). In the NuGet package manager, install the Microsoft.Toolkit.MVVM package. Once you installed these packages, you can copy the Converters, Model, Photos and ViewModels paths from the WPFXamlIslands project from my Github. If you build the application, you will see some errors. Some of them are due to the conversion to WinUI3 and other ones are due to the use of the new MVVM Framework. Let’s begin converting the files for the framework. The MVVM Toolkit doesn’t have the ViewModelBase class, but has the similar ObservableObject. In MainViewModel.cs, changed the base class of the viewmodel to ObservableObject:
public class MainViewModel : ObservableObject

Then, we must change the IoC container that is used in MVVM Light to the one used in the MVVM toolkit. For that, you must add this code in App.xaml.cs:

/// <summary>
/// Gets the current <see cref="App"/> instance in use
/// </summary>
public new static App Current => (App)Application.Current;

/// <summary>
/// Gets the <see cref="IServiceProvider"/> instance to resolve application services.
/// </summary>
public IServiceProvider Services { get; }

/// <summary>
/// Configures the services for the application.
/// </summary>
private static IServiceProvider ConfigureServices()
{
  var services = new ServiceCollection();
  services.AddSingleton<MainViewModel>();
return services.BuildServiceProvider();
}
This code will configure the service collection, adding the instantiation of MainViewModel as a singleton, when required and will configure the service provider. We should call the ConfigureServices method in the constructor, like this:
public App()
{
  Services = ConfigureServices();
  this.InitializeComponent();
  this.Suspending += OnSuspending;
}
Now, we can get a reference to the ViewModel, when we need it, as the DataContext for the view. In MainWindow.xaml.cs, when you try to set the DataContext like this, you get an error, saying that DataContext is not defined:
public MainWindow()
{
    this.InitializeComponent();
    DataContext = App.Current.Services.GetService(typeof(MainViewModel));
}
That’s because the Window in WinUI isn’t a UIElement and thus, doesn’t have a DataContext. There are two workarounds to this issue:
- Use x:Bind, that doesn’t need a DataContext for data binding
- Set the DataContext to the main element of the window
So, we’ll choose the second option and initialize the DataContext with this code:
public MainWindow()
{
    this.InitializeComponent();
    MainGrid.DataContext = App.Current.Services.GetService(typeof(MainViewModel));
}
The next step is to remove the ViewModelLocator, as it won’t be needed. One other error is in the converter. The namespaces in the WinUI have changed, and we must change them to use the code. System.Windows.Data has changed to Microsoft.UI.Xaml.Data and System.Windows.Media.Imaging has changed to Microsoft.UI.Xaml.Media.Imaging (as you can see, there was a change from System.Windows to Microsoft.UI.Xaml).
Besides that, in WinUI, the interface IValueConverter is implemented, but the signatures of Convert and ConvertBack are different, so we have to change the signature of the methods (the code remains unchanged):
public object Convert(object value, Type targetType, object parameter, string language)
{
    string imagePath = $"{AppDomain.CurrentDomain.BaseDirectory}Photos\\{value}.jpg";
    BitmapImage bitmapImage = !string.IsNullOrWhiteSpace(value?.ToString()) &&
                              File.Exists(imagePath) ?
        new BitmapImage(new Uri(imagePath)) :
        null;
    return bitmapImage;
}

public object ConvertBack(object value, Type targetType, object parameter, string language)
{
    throw new NotImplementedException();
}
Now we can add the FlipView to the main window. In this case, we don’t need any component nor setup in the code behind – all the code is in MainWindow.xaml:
<Grid x:Name="MainGrid">
 <FlipView ItemsSource="{Binding Photos}">
   <FlipView.ItemTemplate>
     <DataTemplate>
       <Grid Margin="5">
         <Grid.RowDefinitions>
           <RowDefinition Height="\*" />
           <RowDefinition Height="40" />
         </Grid.RowDefinitions>
         <Image Source="{Binding PhotoUrl}" Grid.Row="0" Margin="5"
             Stretch="Uniform" />
         <TextBlock Text="{Binding UserName}" HorizontalAlignment="Center" VerticalAlignment="Center" Grid.Row="1"/>
       </Grid>
     </DataTemplate>
   </FlipView.ItemTemplate>
 </FlipView>
</Grid>
With that, we can run the program and we get another error:
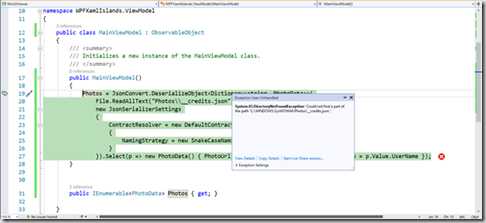
We get a DirectoryNotFoundException because of the package. When we are using the package, the current directory has changed and it’s not the install folder anymore, so we have to point to the full path. This is done with a code like this:
public MainViewModel()
{
    var fileName = $"{AppDomain.CurrentDomain.BaseDirectory}Photos\\_credits.json";
    Photos = JsonConvert.DeserializeObject<Dictionary<string, PhotoData>>(
        File.ReadAllText(fileName),
        new JsonSerializerSettings
        {
            ContractResolver = new DefaultContractResolver
            {
                NamingStrategy = new SnakeCaseNamingStrategy()
            }
        }).Select(p => new PhotoData() { PhotoUrl = $".\\Photos\\{p.Key}.jpg", UserName = p.Value.UserName });
}
Now, when you run the app, it should run ok, but I got a C++ exception:
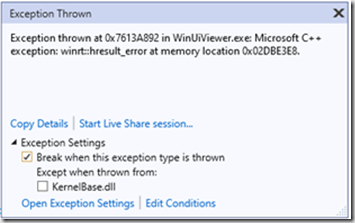
In this case, I just unchecked the “Break when this exception is thrown” box and everything worked fine:

We now have our app modernized with WinUI3 components, there is no need to add a new component to interface, like XamlIslands and everything works as a single program. There were some things to update, like components that weren’t ported to .NET 5, new namespaces and some issues with the path, but the changes were pretty seamless. WinUI3 is still in preview and there will surely be changes before it goes to production, but you can have a glance of what is coming and how you can modernize your apps with WinUI 3.
All the code for this article is at https://github.com/bsonnino/WinUiViewer