Introduction
One important step in developing an application is to debug it. This task will take you a lot of time and it will be especially difficult to debug an application that is live in the field (that doesn't happen in my machine 😉). One solution is to add logging to the application and analyze the logs after the error occurred.
You can develop your own logging framework, but this will take some time and will be cumbersome and not standard, so I tend to search a tested framework out there to do this task for me. The most used frameworks, like Log4Net don't work for UWP, and you cannot log to some places, like a Sql Server database. I've found two that work nicely with UWP apps: MetroLog (https://github.com/onovotny/MetroLog) and Serilog (https://serilog.net//)
I've used Metrolog for a long time, it's very easy to use and very flexible, but Serilog has two features that make it better: Structured Logging and Sinks (logging providers).
Structured Logging
When you are logging, you usually do something like this:
Log.Information("The current time is " + DateTime.Now);
That's fine when you have a small log, but what about a log that has thousands of lines? How can you extract some useful information from the log? You end up with some program that will use Regex patterns to extract the information you want from a large log. With Serilog you will log something like this:
Log.Information("The current time is {CurrentTime}", DateTime.Now);
This will log a property with name CurrentTime along with the log record that can be retrieved later, when you are analyzing the log. This can be used for simple objects and for complex classes. Let's say you have a class named Customer like this one:
public class Customer
{
public Guid Id { get; set; }
public string Name { get; set; }
public string Address { get; set; }
...
}
If you use something like this:
Customer customer = new Customer();
...
Log.Information("Customer Data: {@Customer}", customer);
Serilog will generate a log record with a Customer property and will list all properties for that customer. Notice we are using the @ character before the variable name. That instructs Serilog to preserve the structure of the class, instead of flattening it in a single string. That way it will be easier to extract this information from the log file.
Sinks
The second feature in Serilog that makes it a good choice is the concept of Sinks, or logging providers. There are many logging providers for Serilog and you can even log to more than one place at once. A fast search of "Serilog Sinks" lists 342 packages, including some common ones, like files, console, event viewer, MS Sql Server, email, some to No-SQL DBs, like DocumentDB, RavenDB and MongoDB, and some not so common like Slack, Seq, or even a Reactive Extensions sink, that uses an Observable sequence of events for the logging.
As I'm always interested in Rx, I thought it would be very nice to use this sink to show the logging in UWP with Serilog. So, let's start our project.
Creating an UWP app
In Visual Studio, create a new UWP blank project. In the solution explorer, right click on the References node and select “Manage NuGet packages”. Install the Serilog, Serilog.Sinks.Observable and System.Reactive packages, then install the MVVM Light package – we will use it as a MVVM framework for this project.
Usually, adding the MVVM Light package adds a ViewModelLocator and a Main ViewModel automatically, but this doesn’t happen in UWP, so we must add them manually. In the Solution Explorer, create a ViewModel folder and add a MainViewModel class:
public class MainViewModel
{
}
Then add a ViewModelLocator class in this folder:
public class ViewModelLocator
{
public ViewModelLocator()
{
ServiceLocator.SetLocatorProvider(() => SimpleIoc.Default);
SimpleIoc.Default.Register();
}
public MainViewModel Main => ServiceLocator.Current.GetInstance();
}
The next step is to add a reference to the ViewModelLocator in App.xaml:
<Application
x:Class="LoggingSerilog.App"
xmlns="http://schemas.microsoft.com/winfx/2006/xaml/presentation"
xmlns:x="http://schemas.microsoft.com/winfx/2006/xaml"
xmlns:vm="using:LoggingSerilog.ViewModel"
RequestedTheme="Light">
<Application.Resources>
<vm:ViewModelLocator x:Key="Locator" />
</Application.Resources>
</Application>
Finally, we set the DataContext of the Main View to the MainViewModel in MainPage.xaml:
<Page
x:Class="LoggingSerilog.MainPage"
xmlns="http://schemas.microsoft.com/winfx/2006/xaml/presentation"
xmlns:x="http://schemas.microsoft.com/winfx/2006/xaml"
xmlns:d="http://schemas.microsoft.com/expression/blend/2008"
xmlns:mc="http://schemas.openxmlformats.org/markup-compatibility/2006"
mc:Ignorable="d"
DataContext="{Binding Main, Source={StaticResource Locator}}">
With all this in place, we can start our project. We will create a small project that allows you to add, modify or delete Customers from a list. Every change will be logged to a view below the main view.
We will create our model, that will be used for the project. Create a new folder named Model and insert a new class named Customer:
public class Customer
{
public string Id { get; set; }
public string Name { get; set; }
public string Address { get; set; }
public string City { get; set; }
public string Country { get; set; }
public string Phone { get; set; }
public static IEnumerable<Customer> GetCustomers()
{
string customerXml = Path.Combine(Package.Current.InstalledLocation.Path, "Customers.xml");
return XDocument.Load(customerXml).Descendants("Customer").Select(c =>
new Customer
{
Id = c.Element("CustomerID")?.Value,
Name = c.Element("CompanyName")?.Value,
Address = c.Element("Address")?.Value,
City = c.Element("City")?.Value,
Country = c.Element("Country")?.Value,
Phone = c.Element("Phone")?.Value,
});
}
}
This class also has a static method to get all the customers from a xml file based on the Customers table in the Northwind database. You can get this file from the source code for this article. When you get the file, you must add it to the project, so it will be copied to the install folder for the app. One note here: as the install folder is read-only, you will not be able to save the data once it's updated. To do that, you must copy the file to the local app data store and work from there, but I let this for you.
As you can see, this class is a POCO (Plain Old Clr Object) class, it doesn't have any mechanism to trigger updates when it's changed, so we'll create a ViewModel for it. In the ViewModel folder, create a new CustomerViewModel class:
public class CustomerViewModel : ViewModelBase
{
private readonly Customer _customer;
public CustomerViewModel(Customer customer)
{
_customer = customer;
}
public string Id
{
get => _customer.Id;
set
{
_customer.Id = value;
RaisePropertyChanged();
}
}
public string Name {
get => _customer.Name;
set
{
_customer.Name = value;
RaisePropertyChanged();
}
}
public string Address
{
get => _customer.Address;
set
{
_customer.Address = value;
RaisePropertyChanged();
}
}
public string City
{
get => _customer.City;
set
{
_customer.City = value;
RaisePropertyChanged();
}
}
public string Country
{
get => _customer.Country;
set
{
_customer.Country = value;
RaisePropertyChanged();
}
}
public string Phone
{
get => _customer.Phone;
set
{
_customer.Phone = value;
RaisePropertyChanged();
}
}
}
The ViewModel is derived from the MVVM Light's ViewModelBase class, which implements the INotifyPropertyChanged interface. That way, all changes in the values for the customer will be reflected in the UI. We also need to create a CustomersViewModel class to expose all customers to the UI:
public class CustomersViewModel : ViewModelBase
{
readonly ObservableCollection<CustomerViewModel> _customers =
new ObservableCollection<CustomerViewModel>(
Customer.GetCustomers().Select(c => new CustomerViewModel(c)));
public CustomersViewModel()
{
_selectedCustomer = _customers.Count > 0 ? _customers[0] : null;
}
private CustomerViewModel _selectedCustomer;
public ObservableCollection<CustomerViewModel> Customers => _customers;
public CustomerViewModel SelectedCustomer
{
get => _selectedCustomer;
set
{
_selectedCustomer = value;
RaisePropertyChanged();
}
}
}
The ViewModel has two properties: Customers, an ObservableCollection of CustomerViewModel, and SelectedCustomer, the customer selected in the list.
The next step is to create a new view to show the data. Create a new folder called View and add a new UserControl named Customers. I am using here a UserControl because this will be added to the Main page - the main page will be the shell for the customer view and the logging view. The view will be like this:
<UserControl
x:Class="LoggingSerilog.View.Customers"
xmlns="http://schemas.microsoft.com/winfx/2006/xaml/presentation"
xmlns:x="http://schemas.microsoft.com/winfx/2006/xaml"
xmlns:d="http://schemas.microsoft.com/expression/blend/2008"
xmlns:mc="http://schemas.openxmlformats.org/markup-compatibility/2006"
mc:Ignorable="d"
d:DesignHeight="500"
d:DesignWidth="700"
DataContext="{Binding Customers, Source={StaticResource Locator}}">
<Grid>
<Grid.ColumnDefinitions>
<ColumnDefinition Width="*"/>
</Grid.ColumnDefinitions>
<ListView ItemsSource="{Binding Customers}" SelectedItem="{Binding SelectedCustomer, Mode=TwoWay}">
<ListView.ItemTemplate>
<DataTemplate>
<StackPanel>
<TextBlock Text="{Binding Id}" FontWeight="Bold"/>
<TextBlock Text="{Binding Name}" />
</StackPanel>
</DataTemplate>
</ListView.ItemTemplate>
</ListView>
<Grid Grid.Column ="1" Margin="10">
<Grid.RowDefinitions>
<RowDefinition Height="Auto"/>
<RowDefinition Height="*"/>
</Grid.RowDefinitions>
<Grid DataContext="{Binding SelectedCustomer}">
<Grid.RowDefinitions>
<RowDefinition Height="35"/>
</Grid.RowDefinitions>
<Grid.ColumnDefinitions>
<ColumnDefinition Width="*"/>
</Grid.ColumnDefinitions>
<TextBlock Text ="Id" Grid.Row="0" VerticalAlignment="Center"/>
<TextBlock Text ="Name" Grid.Row="1" Grid.Column="0" VerticalAlignment="Center"/>
<TextBlock Text ="Address" Grid.Row="2" Grid.Column="0" VerticalAlignment="Center"/>
<TextBlock Text ="City" Grid.Row="3" Grid.Column="0" VerticalAlignment="Center"/>
<TextBlock Text ="Country" Grid.Row="4" Grid.Column="0" VerticalAlignment="Center"/>
<TextBlock Text ="Phone" Grid.Row="5" Grid.Column="0" VerticalAlignment="Center"/>
<TextBox Text ="{Binding Id, Mode=TwoWay}" Grid.Row="0" Grid.Column="1" VerticalAlignment="Center"/>
<TextBox Text ="{Binding Name, Mode=TwoWay}" Grid.Row="1" Grid.Column="1" VerticalAlignment="Center"/>
<TextBox Text ="{Binding Address, Mode=TwoWay}" Grid.Row="2" Grid.Column="1" VerticalAlignment="Center"/>
<TextBox Text ="{Binding City, Mode=TwoWay}" Grid.Row="3" Grid.Column="1" VerticalAlignment="Center"/>
<TextBox Text ="{Binding Country, Mode=TwoWay}" Grid.Row="4" Grid.Column="1" VerticalAlignment="Center"/>
<TextBox Text ="{Binding Phone, Mode=TwoWay}" Grid.Row="5" Grid.Column="1" VerticalAlignment="Center"/>
</Grid>
<StackPanel Grid.Row="1" Orientation="Horizontal" HorizontalAlignment="Right" VerticalAlignment="Bottom">
<Button Content="New" Margin="5,0" Width="65" Command="{Binding NewCustomerCommand}"/>
<Button Content="Delete" Margin="5,0" Width="65" Command="{Binding DeleteCustomerCommand}"/>
</StackPanel>
</Grid>
</Grid>
</UserControl>
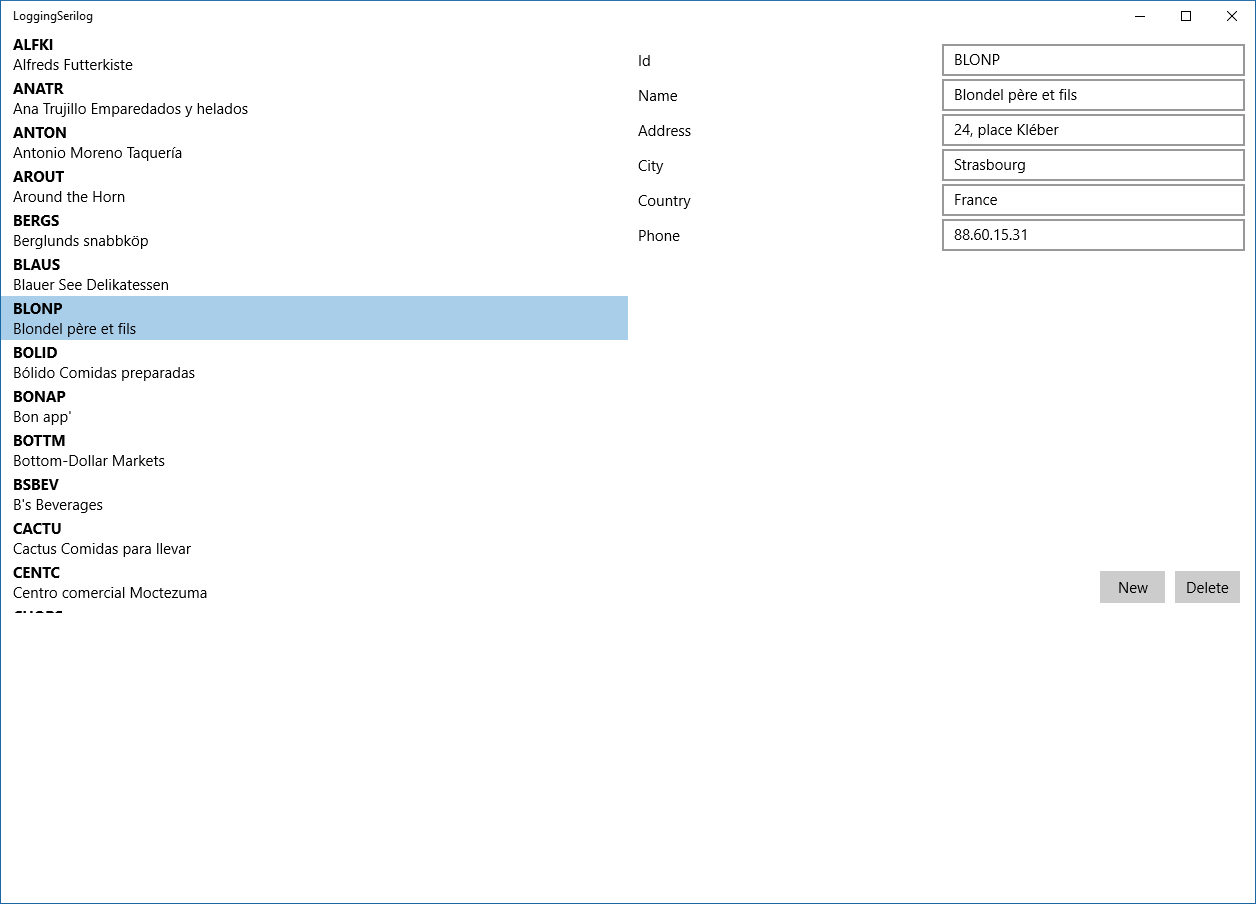
The main grid has two columns: the first one shows the customers list and the second one shows the details for the selected customer. At the bottom of the second column there are two buttons to create or delete a customer. These two buttons are bound to two commands in the CustomersViewModel:
public class CustomersViewModel : ViewModelBase
{
readonly ObservableCollection<CustomerViewModel> _customers =
new ObservableCollection<CustomerViewModel>(
Customer.GetCustomers().Select(c => new CustomerViewModel(c)));
public CustomersViewModel()
{
_selectedCustomer = _customers.Count > 0 ? _customers[0] : null;
_newCustomerCommand = new RelayCommand(AddCustomer);
_deleteCustomerCommand = new RelayCommand(DeleteCustomer, () => SelectedCustomer != null);
}
private CustomerViewModel _selectedCustomer;
private readonly RelayCommand _newCustomerCommand;
private readonly RelayCommand _deleteCustomerCommand;
public ObservableCollection<CustomerViewModel> Customers => _customers;
public CustomerViewModel SelectedCustomer
{
get => _selectedCustomer;
set
{
_selectedCustomer = value;
RaisePropertyChanged();
_deleteCustomerCommand.RaiseCanExecuteChanged();
}
}
public ICommand NewCustomerCommand => _newCustomerCommand ;
private void AddCustomer()
{
var customer = new CustomerViewModel(new Customer());
_customers.Add(customer);
SelectedCustomer = customer;
}
public ICommand DeleteCustomerCommand => _deleteCustomerCommand;
private void DeleteCustomer()
{
_customers.Remove(SelectedCustomer);
SelectedCustomer = null;
}
}
One note here: we want to disable the delete command if there is no selected customer. This is done with the overload when we create the delete command, but we must tell Windows that the command has changed when the selected customer has changed. We do that by calling the RaiseCanExecuteChanged method in the setter of the SelectedCustomer property.
As you can see in the top of the usercontrol, I've set the DataContext of the view to a property in the locator. We must create this property in ViewModelLocator.cs:
public class ViewModelLocator
{
public ViewModelLocator()
{
ServiceLocator.SetLocatorProvider(() => SimpleIoc.Default);
SimpleIoc.Default.Register<MainViewModel>();
SimpleIoc.Default.Register<CustomersViewModel>();
}
public MainViewModel Main => ServiceLocator.Current.GetInstance<MainViewModel>();
public CustomersViewModel Customers => ServiceLocator.Current.GetInstance<CustomersViewModel>();
}
Then we must add the usercontrol to the Main page. In MainPage.xaml add this code:
<Grid Background="{ThemeResource ApplicationPageBackgroundThemeBrush}">
<Grid.RowDefinitions>
<RowDefinition Height="2*"/>
<RowDefinition Height="*"/>
</Grid.RowDefinitions>
<view:Customers />
</Grid>
Now, when you run the application, you will see something like this:
Adding logging to our app
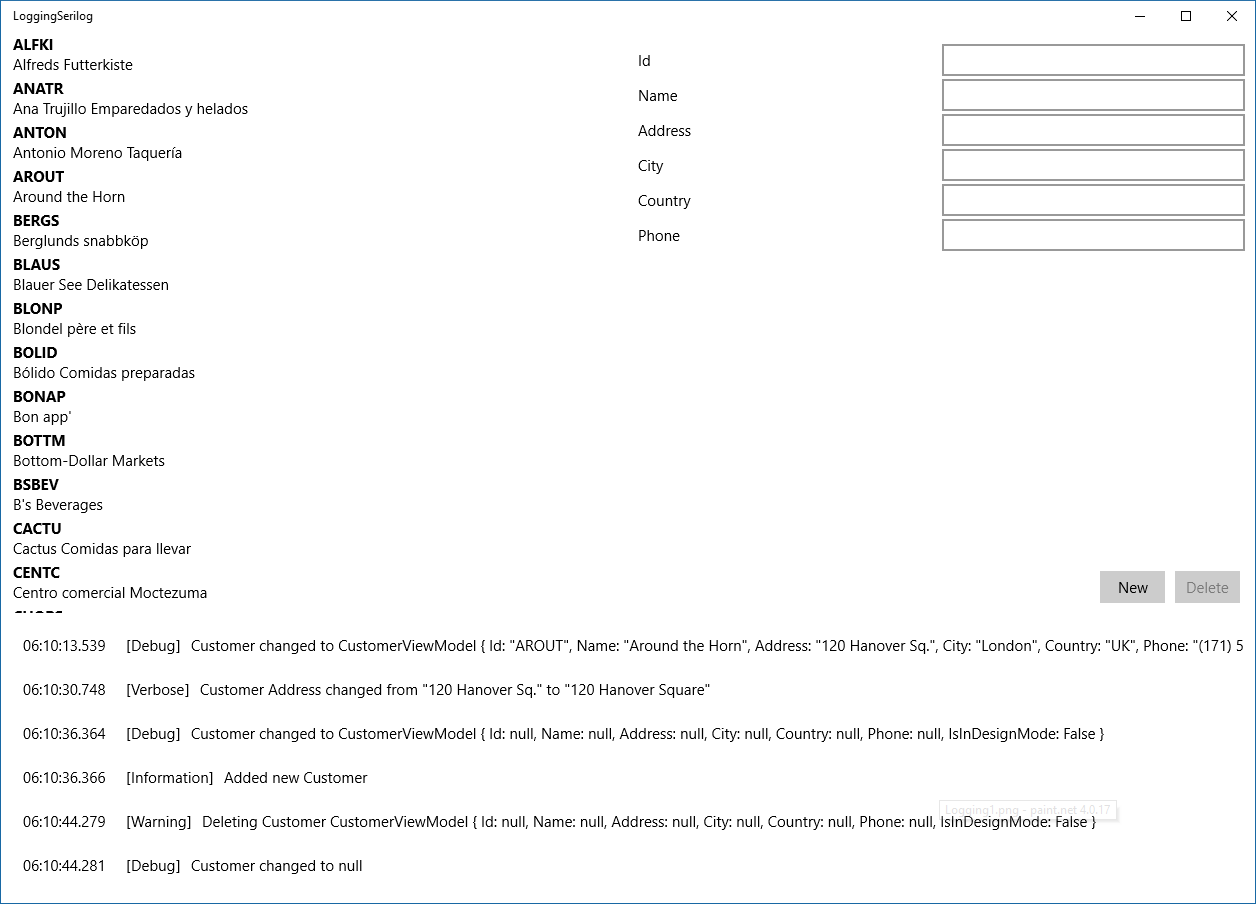
Once we have our app ready, we can add logging to it. I want to add some kind of live logging, where the log records are shown in the main window when they are generated. For that, we must create a new view. In the View folder, add a new UserControl and name it Log. Add this code in the UserControl:
<UserControl
x:Class="LoggingSerilog.View.Log"
xmlns="http://schemas.microsoft.com/winfx/2006/xaml/presentation"
xmlns:x="http://schemas.microsoft.com/winfx/2006/xaml"
xmlns:d="http://schemas.microsoft.com/expression/blend/2008"
xmlns:mc="http://schemas.openxmlformats.org/markup-compatibility/2006"
xmlns:events="using:Serilog.Events"
xmlns:l="using:LoggingSerilog"
mc:Ignorable="d"
d:DesignHeight="300"
d:DesignWidth="400"
DataContext="{Binding Log, Source={StaticResource Locator}}">
<Grid>
<ListView ItemsSource="{Binding LogItems}" Margin="0,10,0,0"
ItemContainerStyleSelector="{StaticResource LogStyleSelector}">
<ListView.ItemTemplate>
<DataTemplate x:DataType="events:LogEvent">
<StackPanel Orientation="Horizontal">
<TextBlock Text="{x:Bind Timestamp.ToString('hh:MM:ss.fff', x:Null)}" Margin="10,0"/>
<TextBlock Text="[" Margin="10,0,0,0"/>
<TextBlock Text="{x:Bind Level}"/>
<TextBlock Text="]" />
<TextBlock Text="{x:Bind RenderMessage(x:Null)}" Margin="10,0"/>
</StackPanel>
</DataTemplate>
</ListView.ItemTemplate>
</ListView>
</Grid>
</UserControl>
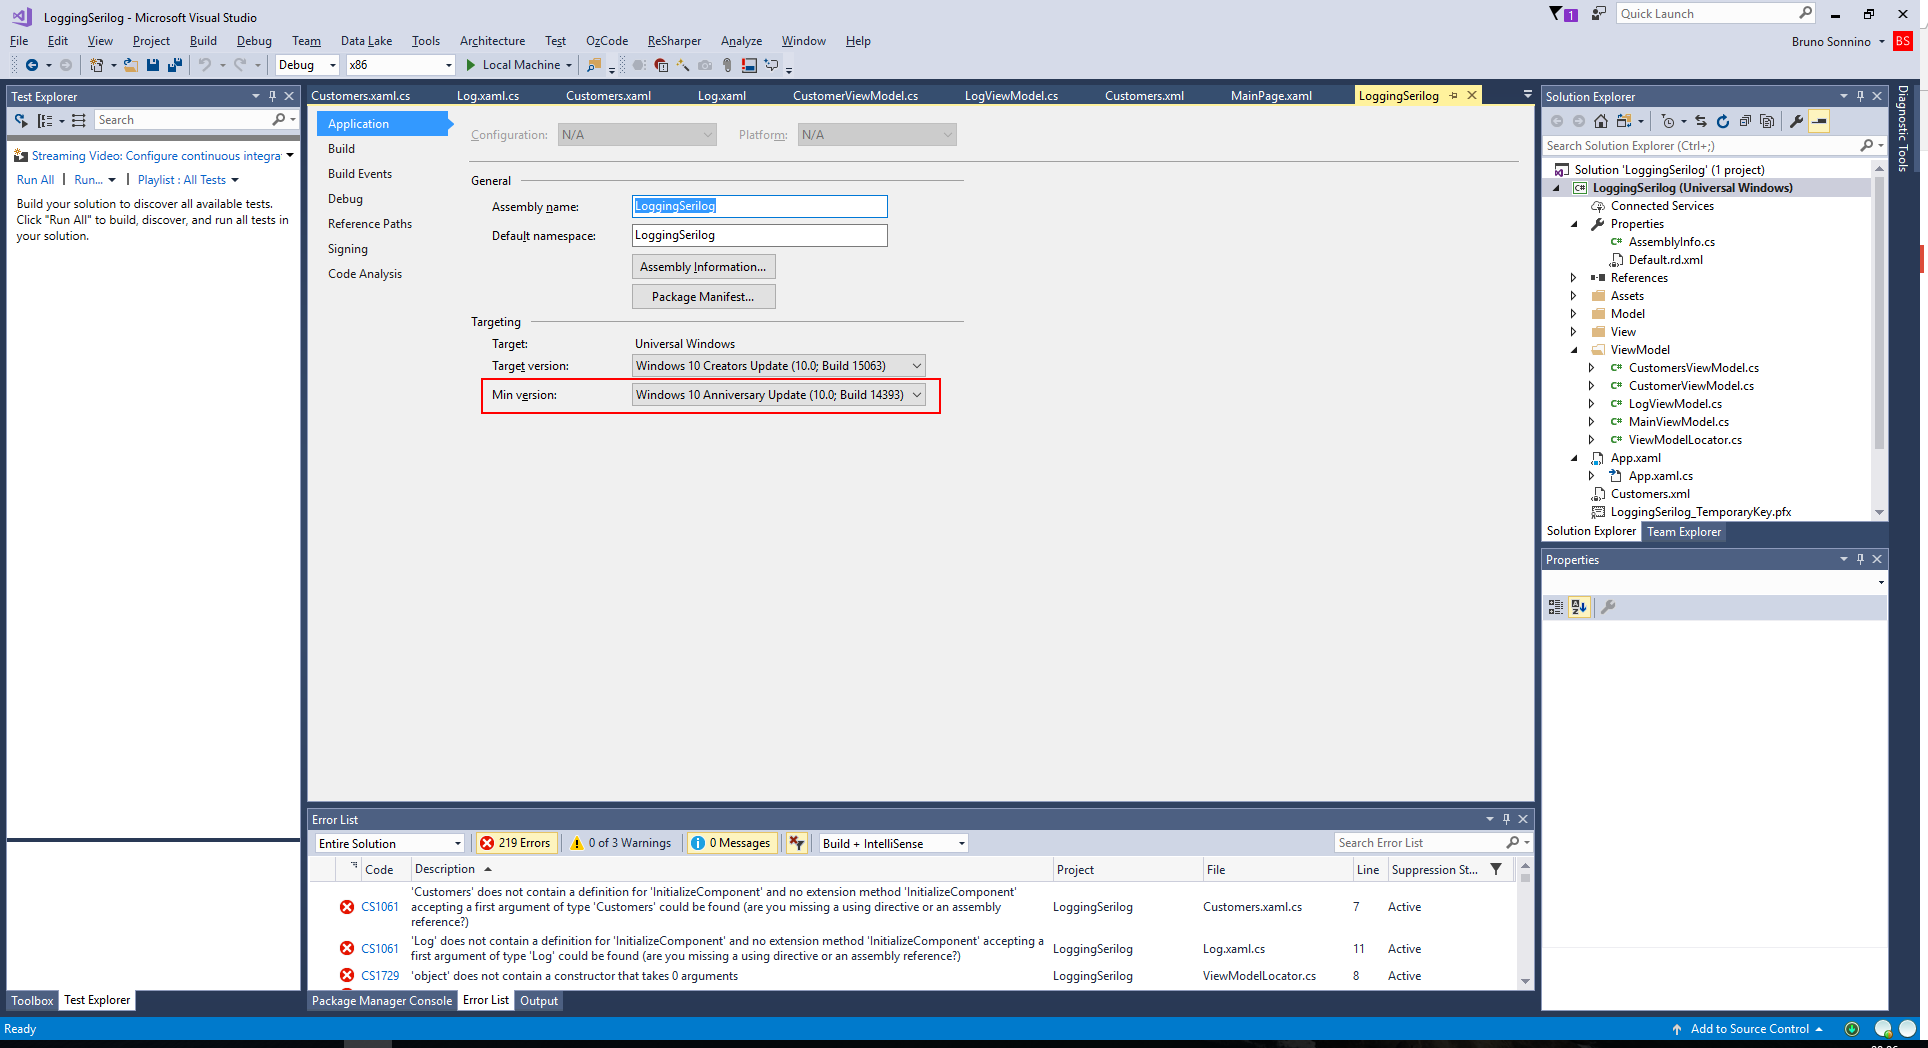
We've added a listview to show the log items. To display the items we've added an ItemTemplate with a horizontal StackPanel with five TextBlocks in it. As you can see, I've not used the Binding markup for data binding, but I've used the x:Bind markup. I've done it because when I use it I can bind to functions, and not only to properties. That way, I can use the RenderMessage and the ToString messages in the bindings. To use this feature, you must set the project to use the Windows 10 Anniversary update. You can change that in the project properties:
The next step is to create the LogViewModel to store the log events, that will be used as the data context for the view. In the ViewModel folder, add a new class and name it LogViewModel:
public class LogViewModel :ViewModelBase
{
public LogViewModel()
{
LogItems = new ObservableCollection<LogEvent>();
Log.Logger = new LoggerConfiguration()
.MinimumLevel.Verbose()
.WriteTo.Observers(events => events
.Do(evt => LogItems.Add(evt))
.Subscribe())
.CreateLogger();
}
public ObservableCollection<LogEvent> LogItems { get; }
}
This class has only one property, LogItems, an ObservableCollection that stores the log events. In the constructor of the ViewModel, I initialize the logger, setting the minimum level to be logged to Verbose and writing the log events to the log items inside the observer. This is enough to capture all the log events emitted everywhere in the program. We must also declare it in the ViewModelLocator:
public class ViewModelLocator
{
public ViewModelLocator()
{
ServiceLocator.SetLocatorProvider(() => SimpleIoc.Default);
SimpleIoc.Default.Register<MainViewModel>();
SimpleIoc.Default.Register<CustomersViewModel>();
SimpleIoc.Default.Register<LogViewModel>();
}
public MainViewModel Main => ServiceLocator.Current.GetInstance<MainViewModel>();
public CustomersViewModel Customers => ServiceLocator.Current.GetInstance<CustomersViewModel>();
public LogViewModel Log => ServiceLocator.Current.GetInstance<LogViewModel>();
}
With all the infrastructure in place, we can add the logging in CustomerViewModel.cs and CustomersViewModel.cs:
public class CustomerViewModel : ViewModelBase
{
private readonly Customer _customer;
public CustomerViewModel(Customer customer)
{
_customer = customer;
}
public string Id
{
get => _customer.Id;
set
{
Log.Verbose("Customer Id changed from {OldId} to {NewId}", _customer.Id,value);
_customer.Id = value;
RaisePropertyChanged();
}
}
public string Name {
get => _customer.Name;
set
{
Log.Verbose("Customer Name changed from {OldName} to {NewName}", _customer.Name, value);
_customer.Name = value;
RaisePropertyChanged();
}
}
public string Address
{
get => _customer.Address;
set
{
Log.Verbose("Customer Address changed from {OldAddress} to {NewAddress}", _customer.Address, value);
_customer.Address = value;
RaisePropertyChanged();
}
}
public string City
{
get => _customer.City;
set
{
Log.Verbose("Customer City changed from {OldCity} to {NewCity}", _customer.City, value);
_customer.City = value;
RaisePropertyChanged();
}
}
public string Country
{
get => _customer.Country;
set
{
Log.Verbose("Customer Country changed from {OldCountry} to {NewCountry}", _customer.Country, value);
_customer.Country = value;
RaisePropertyChanged();
}
}
public string Phone
{
get => _customer.Phone;
set
{
Log.Verbose("Customer Phone changed from {OldPhone} to {NewPhone}", _customer.Phone, value);
_customer.Phone = value;
RaisePropertyChanged();
}
}
public class CustomersViewModel : ViewModelBase
{
readonly ObservableCollection<CustomerViewModel> _customers =
new ObservableCollection<CustomerViewModel>(
Customer.GetCustomers().Select(c => new CustomerViewModel(c)));
public CustomersViewModel()
{
_selectedCustomer = _customers.Count > 0 ? _customers[0] : null;
_newCustomerCommand = new RelayCommand(AddCustomer);
_deleteCustomerCommand = new RelayCommand(DeleteCustomer, () => SelectedCustomer != null);
}
private CustomerViewModel _selectedCustomer;
private readonly RelayCommand _newCustomerCommand;
private readonly RelayCommand _deleteCustomerCommand;
public ObservableCollection<CustomerViewModel> Customers => _customers;
public CustomerViewModel SelectedCustomer
{
get => _selectedCustomer;
set
{
_selectedCustomer = value;
RaisePropertyChanged();
_deleteCustomerCommand.RaiseCanExecuteChanged();
Log.Debug("Customer changed to {@Customer}", SelectedCustomer);
}
}
public ICommand NewCustomerCommand => _newCustomerCommand ;
private void AddCustomer()
{
var customer = new CustomerViewModel(new Customer());
_customers.Add(customer);
SelectedCustomer = customer;
Log.Information("Added new Customer");
}
public ICommand DeleteCustomerCommand => _deleteCustomerCommand;
private void DeleteCustomer()
{
Log.Warning("Deleting Customer {@Customer}", SelectedCustomer);
_customers.Remove(SelectedCustomer);
SelectedCustomer = null;
}
}
Note that we are using Serilog's structured logging, where we have the logging message and level (like any other logging framework) and the properties attached to the log message, that can be used to process the log files in a later time. With that, you can run the program and get something like this:
Coloring the log list
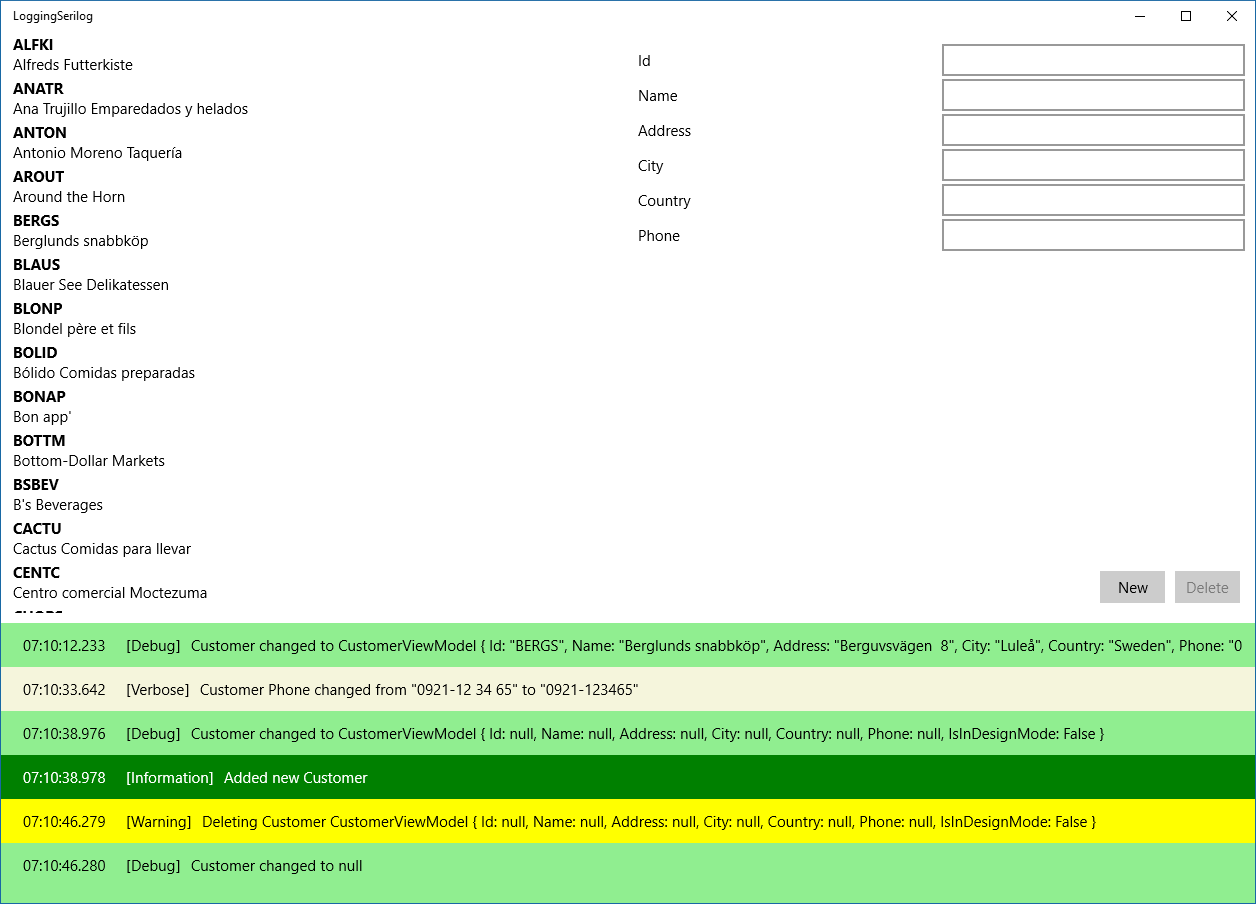
While running the app, I've seen that all messages have the same color, and it's difficult to differentiate between message levels, so I decided to color the list items, depending on their level. For that, I've used a resource called StyleSelector. You must declare a class inherited from StyleSelector, overrride its method SelectStyleCore and return a style that will be used to render the current item. Then you set the ListView's ItemContainerStyleSelector property to the instance of the class.
To declare the class. you must create a new class and name it LogStyleSelector and add this code:
public class LogStyleSelector : StyleSelector
{
public Style VerboseStyle { get; set; }
public Style DebugStyle { get; set; }
public Style InformationStyle { get; set; }
public Style WarningStyle { get; set; }
public Style ErrorStyle { get; set; }
public Style FatalStyle { get; set; }
protected override Style SelectStyleCore(object item, DependencyObject container)
{
var logEvent = item as LogEvent;
if (logEvent == null)
return null;
switch (logEvent.Level)
{
case LogEventLevel.Verbose:
return VerboseStyle;
case LogEventLevel.Debug:
return DebugStyle;
case LogEventLevel.Information:
return InformationStyle;
case LogEventLevel.Warning:
return WarningStyle;
case LogEventLevel.Error:
return ErrorStyle;
case LogEventLevel.Fatal:
return FatalStyle;
default:
return null;
}
}
}
In this class, I have declared six Style properties, each one pointing to a log message level. These properties will be filled in the xaml files with the styles wanted for each kind of message. Then, in SelectStyleCore, we get the level for the current item and return the corresponding style.
In Log.xaml we must declare the selector and the six styles in the Resources section:
<UserControl.Resources>
<l:LogStyleSelector x:Key="LogStyleSelector" >
<l:LogStyleSelector.VerboseStyle>
<Style TargetType="ListViewItem">
<Setter Property="Background" Value="Beige" />
</Style>
</l:LogStyleSelector.VerboseStyle>
<l:LogStyleSelector.DebugStyle>
<Style TargetType="ListViewItem">
<Setter Property="Background" Value="LightGreen" />
</Style>
</l:LogStyleSelector.DebugStyle>
<l:LogStyleSelector.InformationStyle>
<Style TargetType="ListViewItem">
<Setter Property="Background" Value="Green" />
<Setter Property="Foreground" Value="White" />
</Style>
</l:LogStyleSelector.InformationStyle>
<l:LogStyleSelector.WarningStyle>
<Style TargetType="ListViewItem">
<Setter Property="Background" Value="Yellow" />
</Style>
</l:LogStyleSelector.WarningStyle>
<l:LogStyleSelector.ErrorStyle>
<Style TargetType="ListViewItem">
<Setter Property="Background" Value="Red" />
<Setter Property="Foreground" Value="White" />
</Style>
</l:LogStyleSelector.ErrorStyle>
<l:LogStyleSelector.FatalStyle>
<Style TargetType="ListViewItem">
<Setter Property="Background" Value="DarkRed" />
<Setter Property="Foreground" Value="White" />
</Style>
</l:LogStyleSelector.FatalStyle>
</l:LogStyleSelector>
</UserControl.Resources>
and set the ItemContainerStyleSelector property of the listview to it:
<ListView ItemsSource="{Binding LogItems}" Margin="0,10,0,0"
ItemContainerStyleSelector="{StaticResource LogStyleSelector}">
That's all we need to color the list items depending on the item's level. Much better, no?
Conclusions
It's been a long journey, but we've come to an end. We've seen how to use Serilog to use logging in a UWP app, and we've used a Rx sink, getting all log messages in an observable - it would be a simple change to log the messages to another place, like a Sqlite database, a flat file on disk or even a remote destination, like HoockeyApp. You can take advantage of the structured logging, where you can check the properties logged (that can be a big time saver when examining long logs).
In the middle of the project I've added some extra features, like the x:Bind compiled data binding, and use functions and other kinds of bindings, and the style selector to change the background color of the list items depending on the value of the level property.
All the source code in this project is available on https://github.com/bsonnino/LoggingSerilog
Very nice tutorial. Many thx for this.
This is so confusing and dispersive.. I just want to know how to add Serilog in an existing UWP app.
Nice tutorial IMHO
agreed
agreed