
You have an app developed a long time ago and it’s showing its age. It’s time to modernize it, but rewrite isn’t an option: it’s too complicated to rewrite it and it’s still working fine, there is no budget for rewriting the app, there are other priorities, and so on.
If the main reason for not rewriting the app is that it’s working fine, and the only thing that is showing its age is the UI, you have no reason to not modernize it. Microsoft sent the developers a clear message that WPF, Winforms and Win32 are alive and well, open sourcing them and porting to .NET Core. And, the best thing is that you can use the newest features in the Operating System and integrate them to your app without the need to rewrite it. You can even use the new UI of UWP apps in your own app, by using the technology named XamlIslands, where you can embed your own controls in your old app.
To show how this is done, we’ll create a WPF app that shows images and modernize it with Xaml Islands. For this app, I’ve dowloaded 30 images from http://unsample.net/ . This service sends me a zip file with a maximum of 30 photos, downloaded from https://unsplash.com, with a Json file with the credits. Our apps will show the photos and the credits.
Initially, go to http://unsample.net/ and download a set of 30 photos. In Visual Studio, create a new WPF app and name it WPFXamlIslands. In the Solution Explorer, create a new folder named Photos in the project and add the photos and the Json file from the zip to it. Select all files in the folder and change the Build Action to None and the Copy to Output Directory to Copy if Newer.
As we will be manipulating Json files, right-click on the References node and select Manage NuGet Packages, then install the Newtonsoft.Json package. After that, install the MVVM Light package, as we will be using MVVM for this project. You will have to remove the Microsoft.Practices.ServiceLocation using clause in the ViewModelLocator class and add the CommonServiceLocator using clause in the same file to make it compile.
Then, in MainWindow.xaml file, add this code:
<Window x:Class="WPFXamlIslands.MainWindow"
        xmlns="http://schemas.microsoft.com/winfx/2006/xaml/presentation"
        xmlns:x="http://schemas.microsoft.com/winfx/2006/xaml"
        xmlns:d="http://schemas.microsoft.com/expression/blend/2008"
        xmlns:mc="http://schemas.openxmlformats.org/markup-compatibility/2006"
        xmlns:c="clr-namespace:WPFXamlIslands.Converters"
        mc:Ignorable="d"
        Title="MainWindow" Height="450" Width="800"
        DataContext="{Binding Source={StaticResource Locator}, Path=Main}">
    <Window.Resources>
        <c:StringToImageConverter x:Key="StringToImageConverter" />
    </Window.Resources>
    <Grid>
        <ScrollViewer HorizontalScrollBarVisibility="Disabled">
            <ItemsControl ItemsSource="{Binding Photos}" >
                <ItemsControl.ItemsPanel>
                    <ItemsPanelTemplate>
                        <WrapPanel />
                    </ItemsPanelTemplate>
                </ItemsControl.ItemsPanel>
                <ItemsControl.ItemTemplate>
                    <DataTemplate>
                        <Border BorderBrush="Black" Background="Beige"  BorderThickness="1" Margin="5">
                            <StackPanel Margin="5">
                                <Image Source="{Binding Key, Converter={StaticResource StringToImageConverter}}"
                                       Width="150" Height="150" Stretch="Uniform" />
                                <TextBlock Text="{Binding Value.UserName}" MaxWidth="150" Margin="0,5" />
                            </StackPanel>
                        </Border>
                    </DataTemplate>
                </ItemsControl.ItemTemplate>
            </ItemsControl>
        </ScrollViewer>
    </Grid>
</Window>
We’ve added a ItemsControl with a datatemplate to show the images and the name of the author. The items are presented in a WrapGrid, so the items are wrapped and the number of items change depending on the window width. To present the images, I’ve created a converter to convert the name of the image to a bitmap that can be assigned to the image:
public class StringToImageConverter : IValueConverter
{
    public object Convert(object value, Type targetType, object parameter, CultureInfo culture)
    {
        string imagePath = $"{AppDomain.CurrentDomain.BaseDirectory}Photos\\\\{value}.jpg";
        BitmapImage bitmapImage = !string.IsNullOrWhiteSpace(value?.ToString()) &&
            File.Exists(imagePath) ?
            new BitmapImage(new Uri(imagePath)) :
            null;
        return bitmapImage;
    }

    public object ConvertBack(object value, Type targetType, object parameter, CultureInfo culture)
    {
        throw new NotImplementedException();
    }
}
It will take the name of the image and create a BitmapImage with it. That way, we can use the converter in the data binding for the list items. The MainViewModel will be like this:
public class MainViewModel : ViewModelBase
{
    /// <summary>
    /// Initializes a new instance of the MainViewModel class.
    /// </summary>
    public MainViewModel()
    {
        Photos = JsonConvert.DeserializeObject<Dictionary<string, PhotoData>>(
            File.ReadAllText("Photos\\\\__credits.json"),
            new JsonSerializerSettings
            {
                ContractResolver = new DefaultContractResolver
                {
                    NamingStrategy = new SnakeCaseNamingStrategy()
                }
            });
    }

    public Dictionary<string, PhotoData> Photos { get; private set; }
It will read the files, deserialize the Json file and assign the resulting Dictionary to the property Photos. This dictionary has the name of the file as the key and a class named PhotoData as the value. PhotoData is declared as:
public class PhotoData
{
    public string UserName { get; set; }
    public string UserUrl { get; set; }
    public string PhotoUrl { get; set; }
}
Now, when you run the application, it will show something like this:
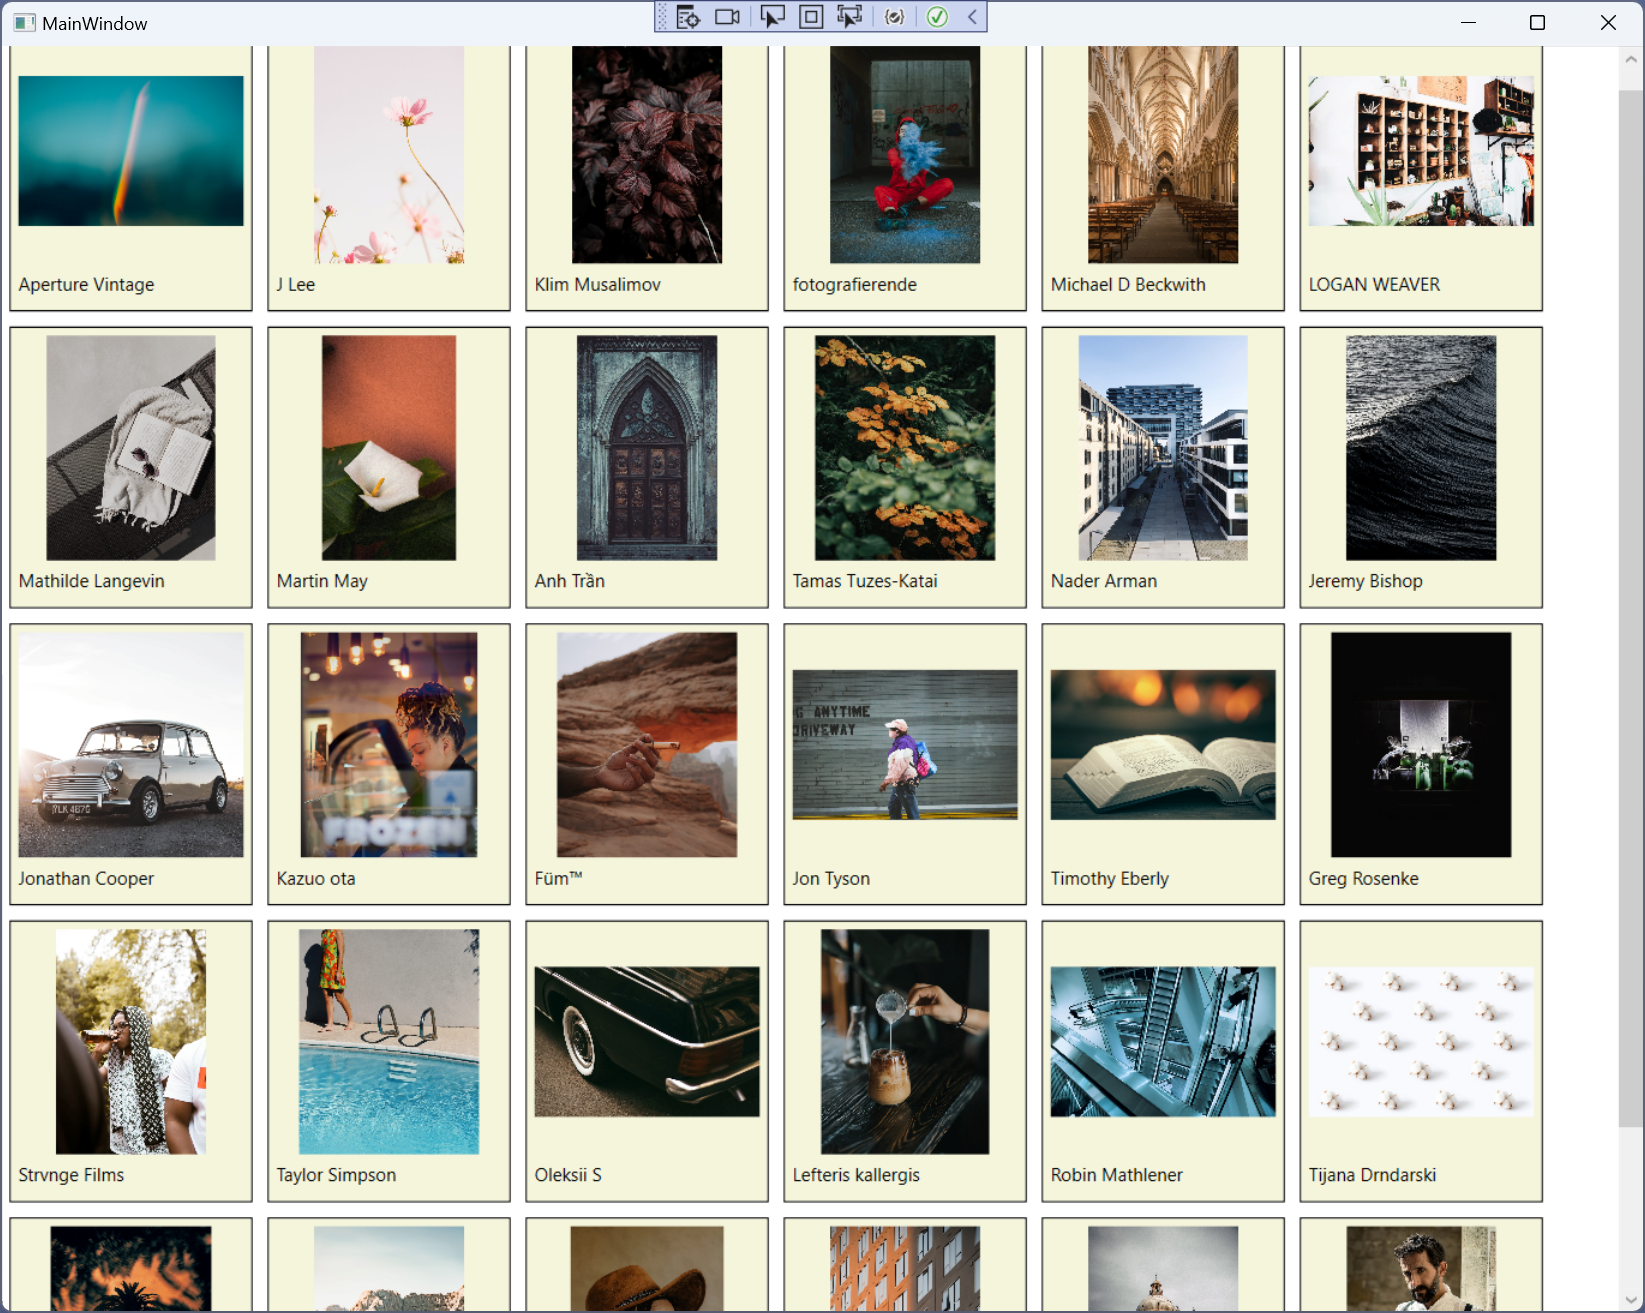
The app runs fine, but it can be improved to add the new features and animations given by UWP, using the Xaml Islands.
The easiest way to use a UWP control in a WPF or Winforms app is to use the Windows Community Toolkit. This is a toolkit of components created by the community and Microsoft and can be found on https://github.com/windows-toolkit/WindowsCommunityToolkit.
To use a UWP control, you must use the WindowsXamlHost control in the window. It can be found in the Microsoft.Toolkit.WPF.UI.XamlHost NuGet package. Install it and add a WindowsXamlHost control in the main window:
<Grid>
    <xaml:WindowsXamlHost x:Name="UwpButton"
                          InitialTypeName="Windows.UI.Xaml.Controls.Button"
                          ChildChanged="UwpButton_ChildChanged" />
</Grid>
In the code behind, you must add the code to initialize the button in the event handler for ChildChanged:
private void UwpButton_ChildChanged(object sender, EventArgs e)
{
    WindowsXamlHost windowsXamlHost = (WindowsXamlHost)sender;

    Windows.UI.Xaml.Controls.Button button =
        (Windows.UI.Xaml.Controls.Button)windowsXamlHost.Child;
    if (button == null)
        return;
    button.Width = 100;
    button.Height = 40;
    button.Content = "UWP button";
    button.Click += Button_Click;
}

private void Button_Click(object sender, Windows.UI.Xaml.RoutedEventArgs e)
{
    MessageBox.Show("UWP button works");
}
The ChildChanged is called when the child in the XamlHost changes. There you must configure the control added as a child (with the use of the InitialTypeName property).
That should be everything, but when you see the code, you see that the Button is not defined. In the error window, there is a warning saying that that Windows.Foundation.UniversalApiContract is missing. My first try was to find a dll with this name, which couldn’t be found. Then I noticed that what was needed was not the dll, but a winmd file with the Windows Metadata for the controls. In fact, there is a Windows.Foundation.UniversalApiContract.winmd file located in C:\Program Files (x86)\Windows Kits\10\References\10.0.18362.0\Windows.Foundation.UniversalApiContract\8.0.0.0\ (the version in your system might change), and I added this file as a reference and the errors regarding the button disappeared.
Then I ran the project and got a Catatstrophic Failure (this one is nice – I was expecting my computer to melt down, but fortunately, that didn’t occur 😃). After some more research, I came to this article (yes, Microsoft also suffers with Catastrophic Failures 😃), and the answer was pretty simple: add an Application Manifest. In the Solution Explorer, add an Application Manifest and change it like this:
<compatibility xmlns="urn:schemas-microsoft-com:compatibility.v1">
  <application>
    <!-- A list of the Windows versions that this application has been tested on
         and is designed to work with. Uncomment the appropriate elements
         and Windows will automatically select the most compatible environment. -->

    <!-- Windows Vista -->
    <!--<supportedOS Id="{e2011457-1546-43c5-a5fe-008deee3d3f0}" />-->

    <!-- Windows 7 -->
    <!--<supportedOS Id="{35138b9a-5d96-4fbd-8e2d-a2440225f93a}" />-->

    <!-- Windows 8 -->
    <!--<supportedOS Id="{4a2f28e3-53b9-4441-ba9c-d69d4a4a6e38}" />-->

    <!-- Windows 8.1 -->
    <!--<supportedOS Id="{1f676c76-80e1-4239-95bb-83d0f6d0da78}" />-->

    <!-- Windows 10 -->
    <maxversiontested Id="10.0.18358.0"/>0
    <supportedOS Id="{8e0f7a12-bfb3-4fe8-b9a5-48fd50a15a9a}" />

  </application>
</compatibility>
That will set the MaxVersionTested and the error disappears.
Now we can see that our program works with the UWP control, then let’s continue to modernize it. We will add a FlipView to show the images. For that, we must change the InitialTypeName of the WindowsXamlHost to show the FlipView:
<xaml:WindowsXamlHost x:Name="XamlHost"
                      InitialTypeName="Windows.UI.Xaml.Controls.FlipView"
                      ChildChanged="XamlHost_ChildChanged" />

The code for the ChildChanged event will configure the FlipView and its DataTemplate:

        private void XamlHost_ChildChanged(object sender, EventArgs e)
        {
            WindowsXamlHost windowsXamlHost = (WindowsXamlHost)sender;

            Windows.UI.Xaml.Controls.FlipView flipView =
                (Windows.UI.Xaml.Controls.FlipView)windowsXamlHost.Child;
            if (flipView == null)
                return;
            var dataTemplate = (Windows.UI.Xaml.DataTemplate)XamlReader.Load(@"
<DataTemplate xmlns=""http://schemas.microsoft.com/winfx/2006/xaml/presentation"">
  <Grid Margin=""5"">
      <Grid.RowDefinitions>
         <RowDefinition Height=""\*"" />
         <RowDefinition Height=""40"" />
      </Grid.RowDefinitions>
      <Image Source=""{Binding PhotoUrl}"" Grid.Row=""0"" Margin=""5""
            Stretch=""Uniform"" />
      <TextBlock Text=""{Binding UserName}"" HorizontalAlignment=""Center""
            VerticalAlignment=""Center"" Grid.Row=""1""/>
  </Grid>
</DataTemplate>");

            flipView.ItemTemplate = dataTemplate;
            flipView.ItemsSource = ((MainViewModel)DataContext).Photos;
        }
We create the DataTemplate as a string and load it with XamlReader.Read, then set the ItemsSource to the Photos property of the ViewModel. In order to use it in a UWP control, we modified the obtention of the Photos property:
public class MainViewModel : ViewModelBase
{
    /// <summary>
    /// Initializes a new instance of the MainViewModel class.
    /// </summary>
    public MainViewModel()
    {
        Photos = JsonConvert.DeserializeObject<Dictionary<string, PhotoData>>(
            File.ReadAllText("Photos\\\\__credits.json"),
            new JsonSerializerSettings
            {
                ContractResolver = new DefaultContractResolver
                {
                    NamingStrategy = new SnakeCaseNamingStrategy()
                }
            }).Select(p => new PhotoData() {PhotoUrl = $".\\\\Photos\\\\{p.Key}.jpg", UserName = p.Value.UserName});
    }

    public IEnumerable<PhotoData> Photos { get; private set; }

}
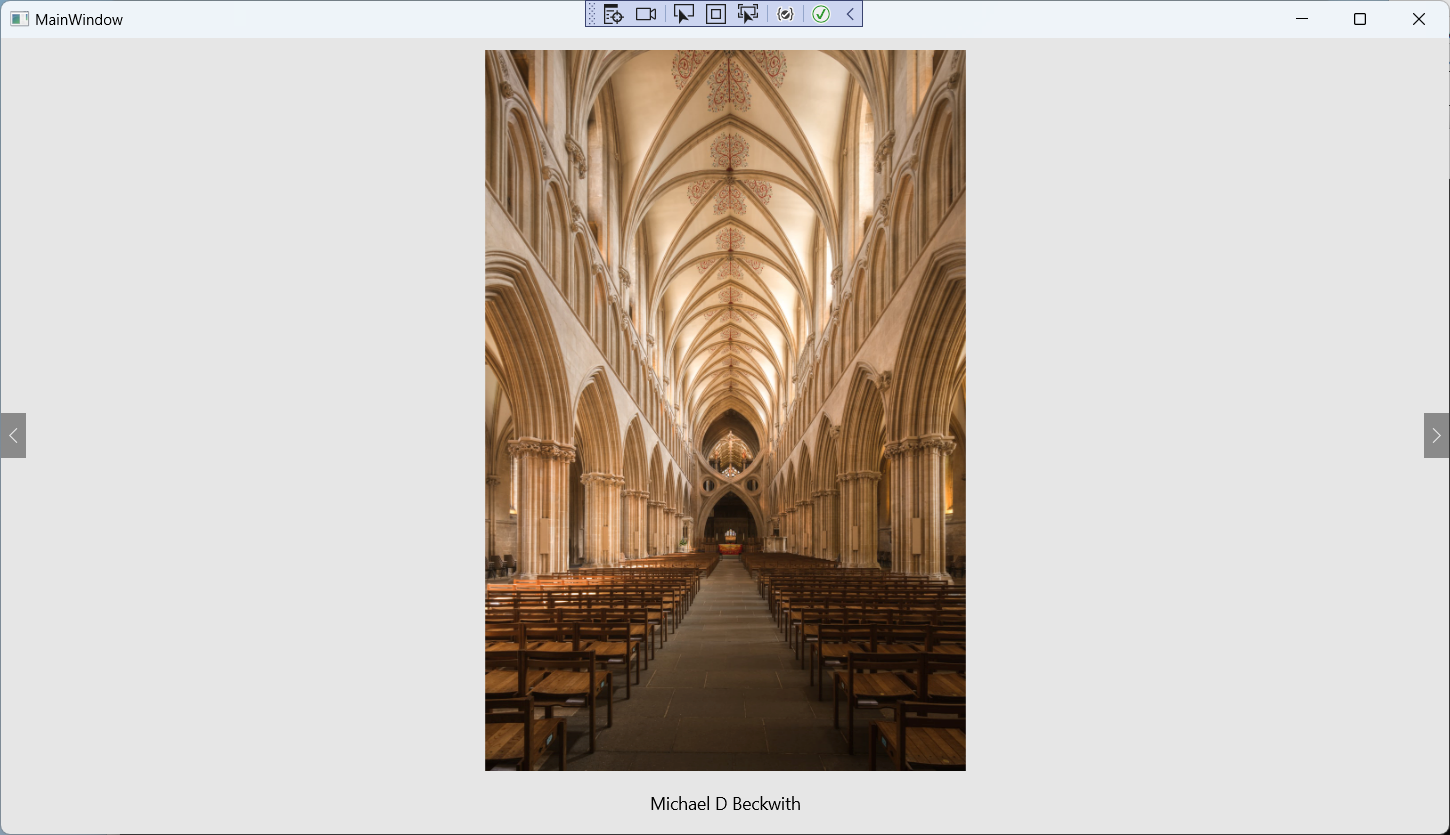
With these changes, you can now run the program and see the photos in a FlipView:
Conclusion
As you can see, you can modernize your desktop application with UWP controls, using Xaml Islands. The WindowsXamlHost eases this work a lot, but the work is still clumsy: you must add the winmd file, add the manifest to the project and manipulate the UWP control in code, using the Windows.UI.Xaml namespace. Adding a DataTemplate to the FlipView requires parsing Xaml code that comes from a string. Not a simple task, but still feasible. Hopefully, things will be easier with Project Reunion and WinUI 3.
All the source code for this article is available at https://github.com/bsonnino/WPFXamlIslands