
You have an old .NET app and would like to upgrade to .NET 6, to be up-to date with the latest features and go forward with the app.
Every time you think about it, you notice that you have no time to do it and there are more important things to do. And you see that you’re stuck with an old .NET version. But, in this case, Microsoft has helped you to be able to accomplish your New Year’s resolutions. Now, you have the .NET upgrade assistant to help you to migrate to the latest .NET version: the .NET upgrade assistant.
With it, you can migrate your old .NET app to .NET 6 with very simple steps. It may not be a full migration, but it’s a starting point, which eases a lot the migration.
The first step is have dotnet installed in your machine. If you haven’t done so, you can install it from https://dotnet.microsoft.com/en-us/download/dotnet/6.0. Once installed, you can check the installed version by opening a terminal window and typing the dotnet --versioncommand.

Then, you should install the upgrade assistant with
dotnet tool install -g upgrade-assistant
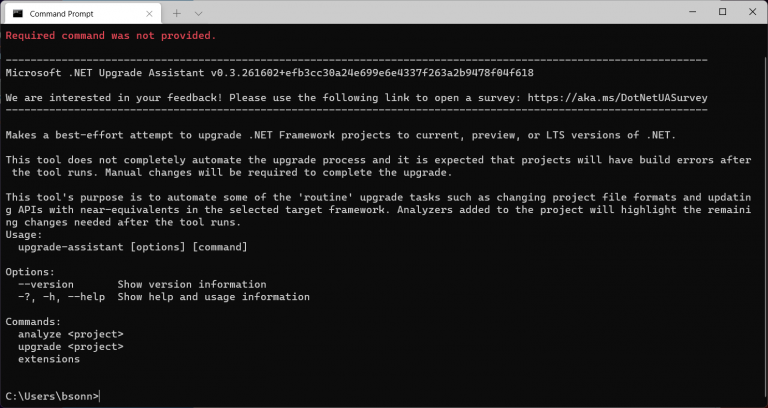
Once installed, you can use it with
upgrade-assistant
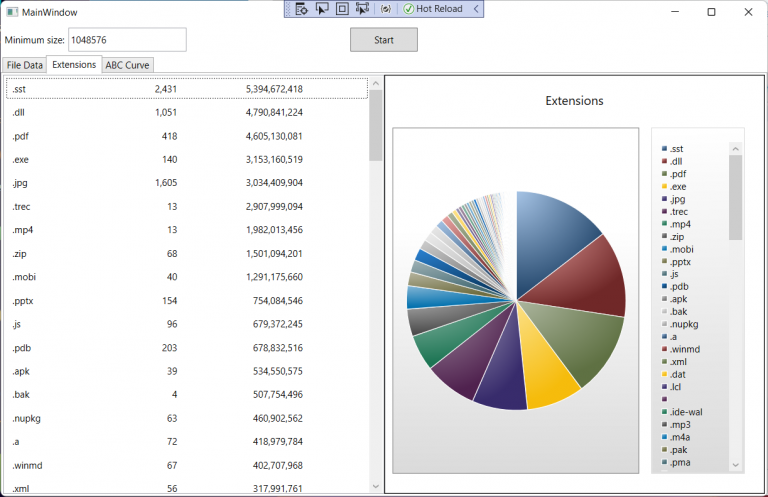
To demonstrate the procedure, I will use the project DiskAnalisys, from https://github.com/bsonnino/DiskAnalysis. This is a .NET 4.5 project and has many features that need to be upgraded: the FolderPicker, Charts, etc. The first step is to clone the project and run the solution in Visual Studio.
When you click the start button, you will be asked for a folder to analyze and, then, a list of files will be shown, ordered by size. On the other tabs, you can see a chart for the extensions and another for the contribution of each file for the total size:
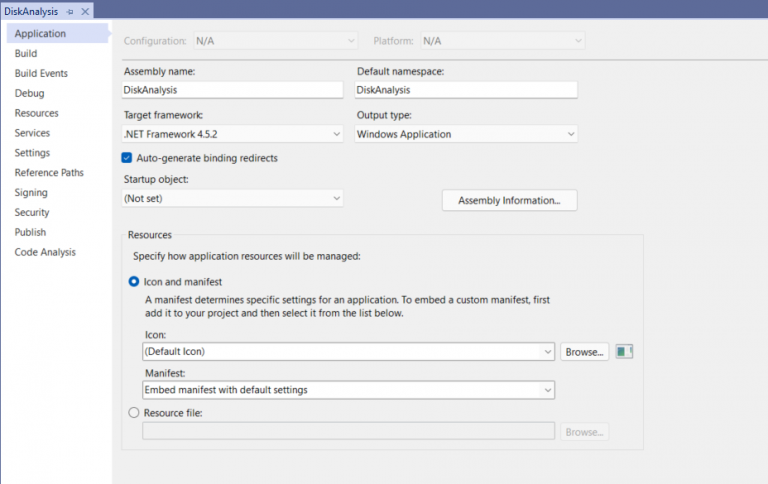
You can check the .NET version in the properties for the project:
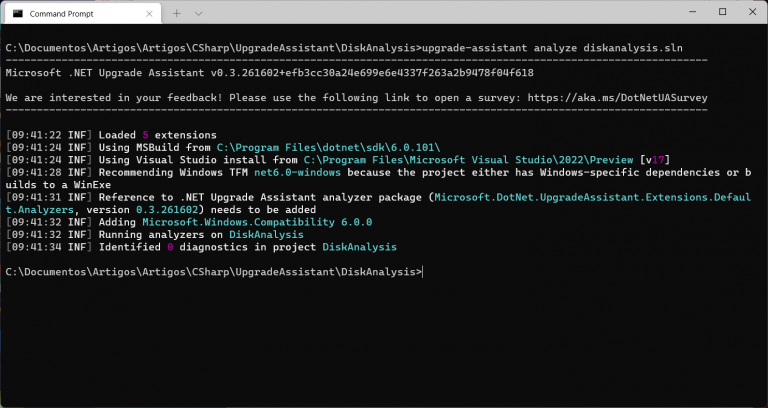
Now we can upgrade the project. Open a terminal window, change to the solution’s directory and type
upgrade-assistant analyze diskanalysis.sln
This will show a report for the upgrade of the project:
If you want the detailed output, you can use the -v option to the command line. In the project’s folder, you can see two files, AnalysisReport.sarif, a json file with the report and upgrade-assistant.clef, a copy of what was output to the screen.
The report shows that the project can be updated, so we will update it with
upgrade-assistant upgrade diskanalysis.sln
That will show the steps that will be followed in the upgrade:

You will move from one step to the other by pressing 1. The steps are:
1. Back up project
Backup the project, so it can be used, if the upgrade fails. The program asks for the path for the backup then copies the project
2. Convert project file to SDK style
Converts the csproj file from the old style to the new style. The new file is changed to something like this:
<Project Sdk="Microsoft.NET.Sdk">
  <PropertyGroup>
    <TargetFramework>net452</TargetFramework>
    <OutputType>WinExe</OutputType>
    <GenerateAssemblyInfo>false</GenerateAssemblyInfo>
    <UseWPF>true</UseWPF>
    <ImportWindowsDesktopTargets>true</ImportWindowsDesktopTargets>
  </PropertyGroup>
  <ItemGroup>
    <AppDesigner Include="Properties\\" />
  </ItemGroup>
  <ItemGroup>
    <PackageReference Include="DotNetProjects.Wpf.Toolkit" Version="5.0.31" />
    <PackageReference Include="Microsoft.CSharp" Version="4.7.0" />
    <PackageReference Include="System.Data.DataSetExtensions" Version="4.5.0" />
    <PackageReference Include="WPFFolderBrowser" Version="1.0.2" />
  </ItemGroup>
</Project>
3. Clean up NuGet package references
This task will clean up the NuGet package references and add the reference to Microsoft.DotNet.UpgradeAssistant.Extensions.Default.Analyzers
4. Update TFM
This task will change the target framework in the csproj to net6.0-windows
5. Update NuGet Packages
This step will check if there are updates in the NuGet packages, update them and add a reference to Microsoft.Windows.Compatibility in the csproj
When you press 1 to go to the next step, the following steps are skipped
6. Add template files
7. Upgrade app config files
a. Convert Application Settings
b. Convert Connection Strings
c. Disable unsupported configuration sections
**8. Update source code
**
a. Apply fix for UA0002: Types should be upgraded
b. Apply fix for UA0012: ‘UnsafeDeserialize()’ does not exist
And the conversion is finished. You must only press 1 to go to the last step:
9. Move to next project
There were no changes in the source code, just in the csproj. If you have your project still opened in Visual Studio, it will ask you to reload it. If you reload it, you will see that it changed to .NET 6 (if you are using VS 2019 you won’t see that, because VS 2019 doesn’t support .NET 6). If you go to the Solution Explorer, you will see that there are two warnings in the dependency packages:
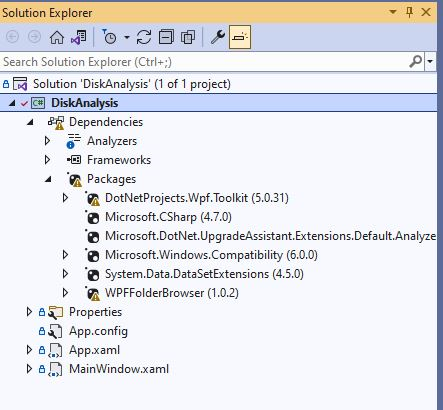
The WPF Toolkit and the WPF Folder Browser packages don’t have the versions for .NET 6, but we’ll run the project to see if it runs fine. Once you run it, you can see that it woks fine, the same way as it did originally. But this time, you get a .NET 6 app running.
We can fix the issues and have a full .NET 6 app running with some extra effort. The WPF Toolkit has been updated and you can use the new packages from https://github.com/dotnetprojects/WpfToolkit. You just have to remove the old package and add the package DotNetProjects.WPF.Toolkit.DataVisualization. For the WPF Folder Browser, you don’t have an updated package, but you can use the source code from https://github.com/McNeight/WpfFolderBrowser.
Clone the repository, run the Upgrade Assistant in the project, to convert it to .NET 6 the same way you did with the main project and add it to the solution. Remove the WPFFolderBrowser package form the project and add a reference for the modified project. When you rebuild the solution, you will get an error Error CA0052 : No targets were selected.
You must edit the project file and remove this property group:
<PropertyGroup Condition=" '$(Configuration)|$(Platform)' == 'Debug|AnyCPU' ">
   <RunCodeAnalysis>true</RunCodeAnalysis>
   <CodeAnalysisRules>
   </CodeAnalysisRules>
   <CheckForOverflowUnderflow>true</CheckForOverflowUnderflow>
   <CodeAnalysisRuleSet>AllRules.ruleset</CodeAnalysisRuleSet>
 </PropertyGroup>
Once you do that, the project compiles fine, but when you try to run it, you get an error saying that WPFFolderBrowserDialog was not found. The only change here is to change the namespace in MainWindow.xaml.cs to WpfFolderBrowser.
Now you can run the project, it runs fine and there are no more compatibility issues.
As you can see, the upgrade assistant eases the migration to .NET 6 a lot. Sometimes, you will need an extra effort to have your app running, but it’s surely easier than doing it by hand. This is a nice step to evolve your apps and port them to the latest version of .NET.
The full code for this article is at https://github.com/bsonnino/UpgradeAssistant