While writing my last article, something occurred to me: what if the app uses an external dll for some functions, how can I package them to send them to the store. Once you are sending an app to the Windows Store, everything it needs to start and run must be packaged, or it won't be certified.
When using an installer to package an app, all you must do is to include the main executable and all the needed files in the install script and the installer will take care of packaging everything. But when your are packaging an app for the Windows Store, there is no such thing as an install script. If you are packaging a Delphi app, just compile it to the Store and voilà!, an appx file is created. With Visual Studio, you can create a packaging project, add all the projects in the solution that you want and it will create an appx file for you.
But sometimes, you need to use an external dll, which you may not have the source code, and it must be packaged with the main executable. In this article, I will show how to package an external dll with the main executable with Delphi and with Visual Studio.
For the article, we will take on the Financial Calculator that we created for the last article and refactor it: the financial functions will be in an external Win32 dll and the UI will be in the main executable. That way, we will do two things:
- Separate the UI and the business rules
- Create an external component that may be used in many situations: we will use it for our two apps - the Delphi and the WPF one. That is a great way to refactor your code when you have stable business rules that you don't want to touch and you need to evolve the UI of your app
Refactoring the Delphi UI
As you can see from this code, the business rules are mixed with the UI, thus making it difficult to understand it and change the code, if it's needed.
procedure TForm1.CalculatePV;
begin
  try
    var FutureValue := StrToFloat(FvPresentValue.Text);
    var InterestRate := StrToFloat(IrPresentValue.Text) / 100.0;
    var NumPeriods := StrToInt(NpPresentValue.Text);
    var PresentValue := FutureValue / Power((1 + InterestRate), NumPeriods);
    PvPresentValue.Text := FormatFloat('0.00', PresentValue);
  except
    On EConvertError do
      PvPresentValue.Text := '';
  end;
end;
For example, all the values are dependent on the text box values and the result is also posted in the result text box. This is bad design and not testable. A better thing would be something like this:
function TForm1.CalculatePV(FutureValue, InterestRate : Double; NumPeriods : Integer); double;
begin
  try
    Result := FutureValue / Power((1 + InterestRate), NumPeriods);
  except
    Result := NAN;
  end;
end;
This is cleaner, does not depend on the UI and easier to understand. But it is not testable, yet, because the method is in the code behind for the UI, so to test it you should need to instantiate a new Form1, which is not feasible under automated tests (unless you are doing UI tests, which is not the case). You could move this code to another unit, to allow it to be testable, but it won't be reusable. If you want to use the same code in another program, you should have to copy the unit, with all the problems you may have with that:
- Difficulty to change the code: if you find an error or want to refactor the code, you should fix the same thing in many places
- Impossible to use in programs written in other languages, unless you rewrite the code
The best way in this case is to move the code to an external dll. That way, the code will be both testable and reusable: you can even use the same dll in programs written in other languages with no change.
The first step is to create a new project in the project group, a dynamic library. Save it and call it FinCalcDll. Then add a new unit to it and save it as PVCalculator. You should be asking why am I saving the unit with this name and not as FinancialCalculators. I am doing this because I want to treat each unit as a single class and respect the Single Responsibility Principle. Following that principle, the class should have only one reason to change. If I put all calculators in a single unit (class), there will be more than one reason to change it: any change in any of the calculators will be a reason to change. Then, we can add the first function:
unit PVCalculator;

interface

Uses Math;

function CalculatePV(FutureValue, InterestRate: Double; NumPeriods : Integer): double; stdcall;

implementation

function CalculatePV(FutureValue, InterestRate: Double; NumPeriods : Integer):
  double;
begin
  try
    Result := FutureValue / Power((1 + InterestRate), NumPeriods);
  except
    Result := NAN;
  end;
end;

end.
We must use the Math unit, to have the Power function available and declare the function in the Interface section, so it can be visible externally. It must be declared as stdcall to be called by other languages. Create new units and save them as FVCalculator, IRRCalculator and PmtCalculator and add these functions:
unit PVCalculator;

interface

Uses Math;

function CalculatePV(FutureValue, InterestRate: Double; NumPeriods : Integer):
  double; stdcall;

implementation

function CalculatePV(FutureValue, InterestRate: Double; NumPeriods : Integer):
  double;
begin
  try
    Result := FutureValue / Power((1 + InterestRate), NumPeriods);
  except
    Result := NAN;
  end;
end;

end.
unit FVCalculator;

interface

Uses Math;

function CalculateFV(PresentValue, InterestRate: Double;NumPeriods : Integer):
  Double; stdcall;

implementation

function CalculateFV(PresentValue, InterestRate: Double;NumPeriods : Integer):
  Double;
begin
  try
    Result := PresentValue * Power((1 + InterestRate), NumPeriods);
  except
    Result := NAN;
  end;
end;

end.
unit IRRCalculator;
interface
Uses Math;
function CalculateIRR(PresentValue, Payment: Double;NumPeriods : Integer):
Double; stdcall;
implementation
function CalculateIRR(PresentValue, Payment: Double;NumPeriods : Integer):
Double;
begin
Result := Nan;
try
var FoundRate := False;
var MinRate := 0.0;
var MaxRate := 1.0;
if Payment * NumPeriods < PresentValue then begin
Result := -1;
exit;
end;
if Payment * NumPeriods = PresentValue then begin
Result := 0;
exit;
end;
while not FoundRate do begin
var Rate := (MaxRate + MinRate) / 2.0;
var SumPayments := 0.0;
for var I := 1 to NumPeriods do
SumPayments := SumPayments + Payment / Power((1 + Rate), I);
if Abs(SumPayments - PresentValue) > 0.01 then begin
if PresentValue < SumPayments then begin
MinRate := Rate;
end
else begin
MaxRate := Rate;
end;
end
else begin
FoundRate := True;
Result := Rate;
end;
end;
except
end;
end;
end.<span id="mce_marker" data-mce-type="bookmark" data-mce-fragment="1"></span>
unit PmtCalculator;

interface

Uses Math;

function CalculatePmt(PresentValue, InterestRate: Double;NumPeriods : Integer):
  Double; stdcall;

implementation

function CalculatePmt(PresentValue, InterestRate: Double;NumPeriods : Integer):
  Double;
begin
  try
    Result := (PresentValue * InterestRate) * Power((1 + InterestRate),
      NumPeriods) / (Power((1 + InterestRate), NumPeriods) - 1);
  except
    Result := Nan;
  end;
end;

end.
In the dpr file, you must export the functions. In the Projects window, select the dll and right-click on it, selecting the View Source option. In the source for the dpr file, add the Exports clause:
{$R *.res}
Exports
  CalculatePV, CalculateFV, CalculateIRR, CalculatePmt;
Then, in the Unit1 for the executable, make the changes needed to use the new dll functions:
implementation

{$R *.dfm}
function CalculatePV(FutureValue, InterestRate : Double;NumPeriods : Integer) :
  Double; stdcall; external 'FinCalcDll.dll';

function CalculateFV(PresentValue, InterestRate : Double;NumPeriods : Integer) :
  Double; stdcall; external 'FinCalcDll.dll';

function CalculateIRR(PresentValue, Payment: Double;NumPeriods : Integer) :
  Double; stdcall; external 'FinCalcDll.dll';

function CalculatePmt(PresentValue, InterestRate : Double;NumPeriods : Integer) :
  Double; stdcall; external 'FinCalcDll.dll';

procedure TForm1.PaymentChange(Sender: TObject);
begin
  try
    var PresentValue := StrToFloat(PvPayment.Text);
    var InterestRate := StrToFloat(IRPayment.Text) / 100.0;
    var NumPayments := StrToInt(NpPayment.Text);
    var Payment := CalculatePmt(PresentValue,InterestRate, NumPayments);
    PmtPayment.Text := FormatFloat('0.00', Payment);
  except
    On EConvertError do
      PmtPayment.Text := '';
  end;
end;

procedure TForm1.PresentValueChange(Sender: TObject);
begin
  try
    var FutureValue := StrToFloat(FvPresentValue.Text);
    var InterestRate := StrToFloat(IrPresentValue.Text) / 100.0;
    var NumPeriods := StrToInt(NpPresentValue.Text);
    var PresentValue := CalculatePV(FutureValue, InterestRate, NumPeriods);
    if IsNan(PresentValue) then
      PvPresentValue.Text := ''
    else
      PvPresentValue.Text := FormatFloat('0.00', PresentValue);
  except
    On EConvertError do
      PvPresentValue.Text := '';
  end;
end;

procedure TForm1.IRRChange(Sender: TObject);
begin
  try
    var NumPayments := StrToInt(NpIRR.Text);
    var PresentValue := StrToFloat(PvIRR.Text);
    var Payment := StrToFloat(PmtIRR.Text);
    var Rate := CalculateIRR(PresentValue, Payment, NumPayments);
    if Rate < 0 then begin
      IRIRR.Text := 'Rate Less than 0';
      exit;
    end;
    if IsNan(Rate) then begin
      IRIRR.Text := 'Error calculating rate';
      exit;
    end;
    IRIRR.Text := FormatFloat('0.00', Rate * 100.0);
  except
    On EConvertError do
      IRIRR.Text := '';
  end;
end;

procedure TForm1.FutureValueChange(Sender: TObject);
begin
  try
    var PresentValue := StrToFloat(PvFutureValue.Text);
    var InterestRate := StrToFloat(IrFutureValue.Text) / 100.0;
    var NumPeriods := StrToInt(NpFutureValue.Text);
    var FutureValue := CalculateFV(PresentValue,InterestRate, NumPeriods);
    if IsNan(FutureValue) then
      FvFutureValue.Text := ''
    else
      FvFutureValue.Text := FormatFloat('0.00', FutureValue);
  except
    On EConvertError do
      FvFutureValue.Text := '';
  end;
end;
We declare the functions and use them in the OnChange handlers of the textboxes. When you build and run the program, you will see something like this:
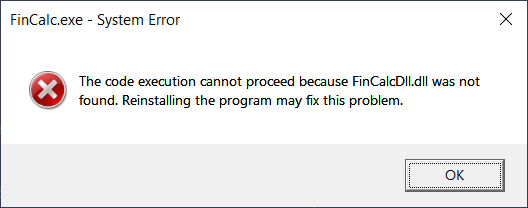
That's because the dll is not where it should be, in the same folder of the executable. For that, you must take some steps:
- Build the dll before the executable. If you don't do that, the executable will be built and will use an outdated dll
- Copy the dll after building the executable
For the first step, you need to go to the Projects window, select the dll, right click and select the "Build Sooner" option. That will move the dll up in the project list and will make it to be built before the executable.
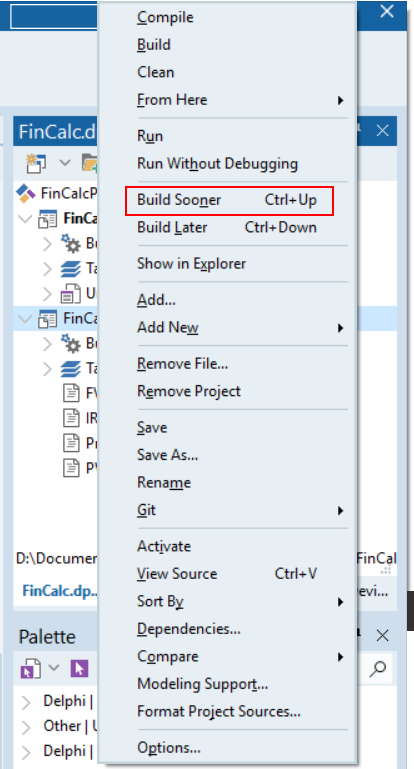
For the second step, you need to add a post-build step for the executable and copy the dll to the output dir. For that, you need to select the Project Options and go to Build Events:
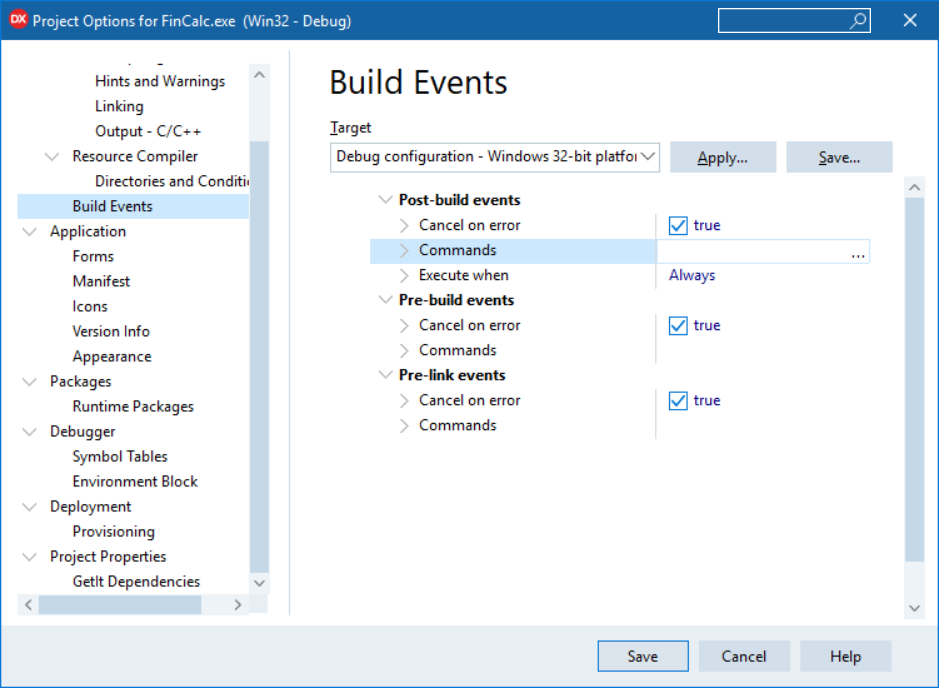
There, in the Post-build events, you should add a command to copy the dll to the executable output dir:
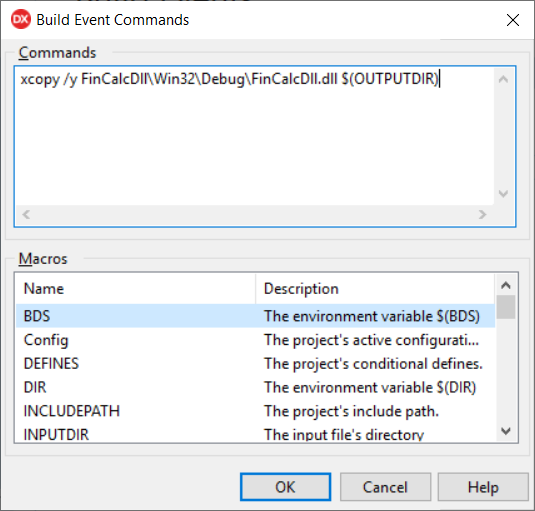
One thing must be noted here: you must build the dll and the executable for the same platform. If you build the dll for x64, it won't run on a x86 executable. Once you've done the two steps, you can build all projects and run the executable, it will run the same way as before. Now, we've refactored all the business rules into a dll and we can reuse it in other languages. To show that, we will create a WPF project in C# that will use this dll.
Creating a WPF project that uses the DLL
Go to Visual Studio and create a new WPF project, and name it FinCalcWPF. Then go to solution explorer and add the dll file to the project. When adding the dll, select Add as Link, to avoid to make a physical copy of the dll in the source directory. This way, you are just adding a link to the dll and when it's rebuilt, the new version will be used. In the properties window, select Build Action to None and Copy to Output Directory to Copy if newer.
One thing must be noted here: the dll is for Win32, so the executable should also be for Win32. When you build the WPF app with the default setting (Any CPU), you can't be sure it if will run as a Win32 process:
- For a Win32 operating system, it will run as a Win32 process, so that's ok
- For a Win64 operating system, it may run as a Win32 or Win64 process, depending on your settings. If you go to Project/Options/Build and check the "Prefer 32-bit", it will run as a Win32 process, else it will run as a Win64 process
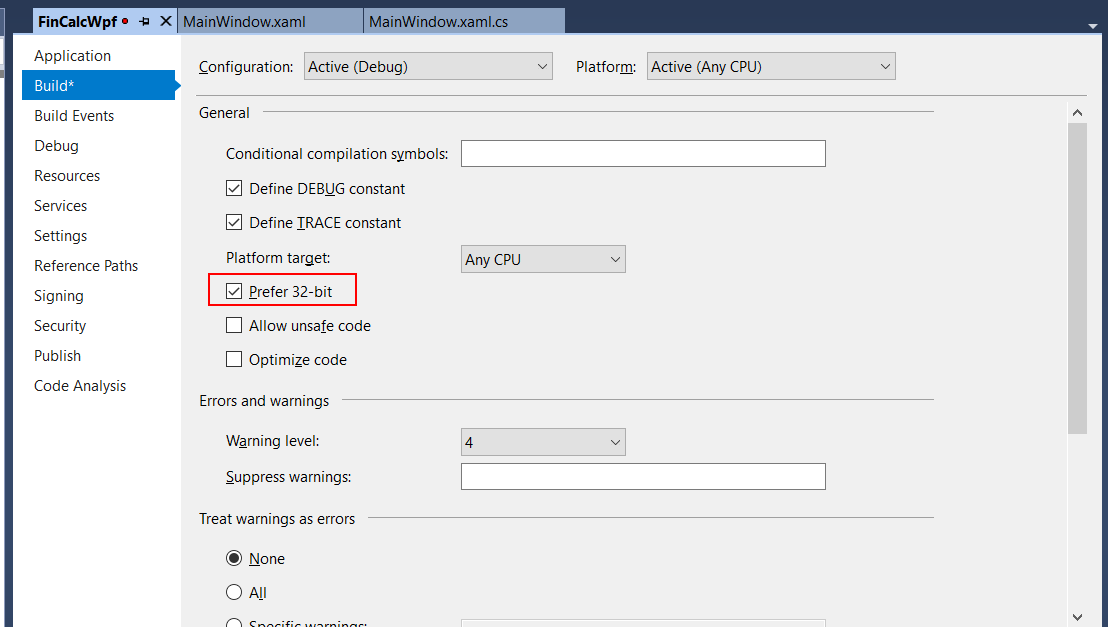
So, if you don't want any surprises, just change the build from Any CPU to x86 and you will be sure that the program will run with the dll.
Then, in MainWindow.xaml, add this code:
<Window x:Class="FinCalcWpf.MainWindow"
        xmlns="http://schemas.microsoft.com/winfx/2006/xaml/presentation"
        xmlns:x="http://schemas.microsoft.com/winfx/2006/xaml"
        xmlns:d="http://schemas.microsoft.com/expression/blend/2008"
        xmlns:mc="http://schemas.openxmlformats.org/markup-compatibility/2006"
        mc:Ignorable="d"
        Title="Financial Calulator WPF" Height="293.774" Width="419.623">
    <Grid>
        <TabControl>
            <TabItem Header="Present Value">
                <Grid>
                    <Grid.RowDefinitions>
                        <RowDefinition Height="40"/>
                        <RowDefinition Height="40"/>
                        <RowDefinition Height="40"/>
                        <RowDefinition Height="40"/>
                        <RowDefinition Height="40"/>
                    </Grid.RowDefinitions>
                    <Grid.ColumnDefinitions>
                        <ColumnDefinition Width="*"/>
                        <ColumnDefinition Width="2*"/>
                    </Grid.ColumnDefinitions>
                    <TextBlock Grid.Row="0" Grid.Column="0" VerticalAlignment="Center"
                             Margin="5" Text="Future Value"/>
                    <TextBlock Grid.Row="1" Grid.Column="0" VerticalAlignment="Center" Margin="5"
                            Text="Interest Rate"/>
                    <TextBlock Grid.Row="2" Grid.Column="0" VerticalAlignment="Center" Margin="5"
                            Text="Num.Periods"/>
                    <TextBlock Grid.Row="3" Grid.Column="0" VerticalAlignment="Center" Margin="5"
                            Text="Present Value"/>
                    <TextBox Grid.Row="0" Grid.Column="1" Margin="5" VerticalContentAlignment="Center"
                            x:Name="PvFvBox" TextChanged="PvOnTextChanged"/>
                    <TextBox Grid.Row="1" Grid.Column="1" Margin="5" VerticalContentAlignment="Center"
                             x:Name="PvIrBox" TextChanged="PvOnTextChanged"/>
                    <TextBox Grid.Row="2" Grid.Column="1" Margin="5" VerticalContentAlignment="Center"
                             x:Name="PvNpBox" TextChanged="PvOnTextChanged"/>
                    <TextBox Grid.Row="3" Grid.Column="1" Margin="5" VerticalContentAlignment="Center"
                             x:Name="PvPvBox" IsReadOnly="True"/>
                </Grid>
            </TabItem>
            <TabItem Header="Future Value">
                <Grid>
                    <Grid.RowDefinitions>
                        <RowDefinition Height="40"/>
                        <RowDefinition Height="40"/>
                        <RowDefinition Height="40"/>
                        <RowDefinition Height="40"/>
                        <RowDefinition Height="40"/>
                    </Grid.RowDefinitions>
                    <Grid.ColumnDefinitions>
                        <ColumnDefinition Width="*"/>
                        <ColumnDefinition Width="2*"/>
                    </Grid.ColumnDefinitions>
                    <TextBlock Grid.Row="0" Grid.Column="0" VerticalAlignment="Center"
                               Margin="5" Text="Present Value"/>
                    <TextBlock Grid.Row="1" Grid.Column="0" VerticalAlignment="Center" Margin="5"
                               Text="Interest Rate"/>
                    <TextBlock Grid.Row="2" Grid.Column="0" VerticalAlignment="Center" Margin="5"
                               Text="Num.Periods"/>
                    <TextBlock Grid.Row="3" Grid.Column="0" VerticalAlignment="Center" Margin="5"
                               Text="Future Value"/>
                    <TextBox Grid.Row="0" Grid.Column="1" Margin="5" VerticalContentAlignment="Center"
                             x:Name="FvPvBox" TextChanged="FvOnTextChanged"/>
                    <TextBox Grid.Row="1" Grid.Column="1" Margin="5" VerticalContentAlignment="Center"
                             x:Name="FvIrBox" TextChanged="FvOnTextChanged"/>
                    <TextBox Grid.Row="2" Grid.Column="1" Margin="5" VerticalContentAlignment="Center"
                             x:Name="FvNpBox" TextChanged="FvOnTextChanged"/>
                    <TextBox Grid.Row="3" Grid.Column="1" Margin="5" VerticalContentAlignment="Center"
                             x:Name="FvFvBox" IsReadOnly="True"/>
                </Grid>
            </TabItem>
            <TabItem Header="Payment">
                <Grid>
                    <Grid.RowDefinitions>
                        <RowDefinition Height="40"/>
                        <RowDefinition Height="40"/>
                        <RowDefinition Height="40"/>
                        <RowDefinition Height="40"/>
                        <RowDefinition Height="40"/>
                    </Grid.RowDefinitions>
                    <Grid.ColumnDefinitions>
                        <ColumnDefinition Width="*"/>
                        <ColumnDefinition Width="2*"/>
                    </Grid.ColumnDefinitions>
                    <TextBlock Grid.Row="0" Grid.Column="0" VerticalAlignment="Center"
                               Margin="5" Text="Present Value"/>
                    <TextBlock Grid.Row="1" Grid.Column="0" VerticalAlignment="Center" Margin="5"
                               Text="Interest Rate"/>
                    <TextBlock Grid.Row="2" Grid.Column="0" VerticalAlignment="Center" Margin="5"
                               Text="Num.Periods"/>
                    <TextBlock Grid.Row="3" Grid.Column="0" VerticalAlignment="Center" Margin="5"
                               Text="Payment"/>
                    <TextBox Grid.Row="0" Grid.Column="1" Margin="5" VerticalContentAlignment="Center"
                             x:Name="PmtPvBox" TextChanged="PmtOnTextChanged"/>
                    <TextBox Grid.Row="1" Grid.Column="1" Margin="5" VerticalContentAlignment="Center"
                             x:Name="PmtIrBox" TextChanged="PmtOnTextChanged"/>
                    <TextBox Grid.Row="2" Grid.Column="1" Margin="5" VerticalContentAlignment="Center"
                             x:Name="PmtNpBox" TextChanged="PmtOnTextChanged"/>
                    <TextBox Grid.Row="3" Grid.Column="1" Margin="5" VerticalContentAlignment="Center"
                             x:Name="PmtPmtBox" IsReadOnly="True"/>
                </Grid>
            </TabItem>
            <TabItem Header="Return Rate">
                <Grid>
                    <Grid.RowDefinitions>
                        <RowDefinition Height="40"/>
                        <RowDefinition Height="40"/>
                        <RowDefinition Height="40"/>
                        <RowDefinition Height="40"/>
                        <RowDefinition Height="40"/>
                    </Grid.RowDefinitions>
                    <Grid.ColumnDefinitions>
                        <ColumnDefinition Width="*"/>
                        <ColumnDefinition Width="2*"/>
                    </Grid.ColumnDefinitions>
                    <TextBlock Grid.Row="0" Grid.Column="0" VerticalAlignment="Center"
                               Margin="5" Text="Present Value"/>
                    <TextBlock Grid.Row="1" Grid.Column="0" VerticalAlignment="Center" Margin="5"
                               Text="Payment"/>
                    <TextBlock Grid.Row="2" Grid.Column="0" VerticalAlignment="Center" Margin="5"
                               Text="Num.Periods"/>
                    <TextBlock Grid.Row="3" Grid.Column="0" VerticalAlignment="Center" Margin="5"
                               Text="Return Rate"/>
                    <TextBox Grid.Row="0" Grid.Column="1" Margin="5" VerticalContentAlignment="Center"
                             x:Name="RrPvBox" TextChanged="RrOnTextChanged"/>
                    <TextBox Grid.Row="1" Grid.Column="1" Margin="5" VerticalContentAlignment="Center"
                             x:Name="RrPmtBox" TextChanged="RrOnTextChanged"/>
                    <TextBox Grid.Row="2" Grid.Column="1" Margin="5" VerticalContentAlignment="Center"
                             x:Name="RrNpBox" TextChanged="RrOnTextChanged"/>
                    <TextBox Grid.Row="3" Grid.Column="1" Margin="5" VerticalContentAlignment="Center"
                             x:Name="RrRrBox" IsReadOnly="True"/>
                </Grid>
            </TabItem>
        </TabControl>
    </Grid>
</Window>
We are adding the four tabs with the boxes, the same way we've added in the Delphi app. The code behind for the window is:
using System.Runtime.InteropServices;
using System.Windows;
using System.Windows.Controls;

namespace FinCalcWpf
{
    /// <summary>
    /// Interaction logic for MainWindow.xaml
    /// </summary>
    public partial class MainWindow : Window
    {
        [DllImport("FinCalcDll.dll")]
        private static extern double CalculatePV(double futureValue, double interestRate, int numPeriods);

        [DllImport("FinCalcDll.dll")]
        private static extern double CalculateFV(double presentValue, double interestRate, int numPeriods);

        [DllImport("FinCalcDll.dll")]
        private static extern double CalculatePmt(double presentValue, double interestRate, int numPeriods);

        [DllImport("FinCalcDll.dll")]
        private static extern double CalculateIRR(double presentValue, double payment, int numPeriods);

        public MainWindow()
        {
            InitializeComponent();
        }

        private void PvOnTextChanged(object sender, TextChangedEventArgs e)
        {
            if (double.TryParse(PvFvBox.Text, out double futureValue) &&
                double.TryParse(PvIrBox.Text, out double interestRate) &&
                int.TryParse(PvNpBox.Text, out int numPeriods))
              PvPvBox.Text = CalculatePV(futureValue, interestRate / 100.0, numPeriods).ToString("N2");
        }

        private void FvOnTextChanged(object sender, TextChangedEventArgs e)
        {
            if (double.TryParse(FvPvBox.Text, out double presentValue) &&
                double.TryParse(FvIrBox.Text, out double interestRate) &&
                int.TryParse(FvNpBox.Text, out int numPeriods))
                FvFvBox.Text = CalculateFV(presentValue, interestRate / 100.0, numPeriods).ToString("N2");
        }

        private void PmtOnTextChanged(object sender, TextChangedEventArgs e)
        {
            if (double.TryParse(PmtPvBox.Text, out double presentValue) &&
                double.TryParse(PmtIrBox.Text, out double interestRate) &&
                int.TryParse(PmtNpBox.Text, out int numPeriods))
                PmtPmtBox.Text = CalculatePmt(presentValue, interestRate / 100.0, numPeriods).ToString("N2");
        }

        private void RrOnTextChanged(object sender, TextChangedEventArgs e)
        {
            if (double.TryParse(RrPvBox.Text, out double presentValue) &&
                double.TryParse(RrPmtBox.Text, out double payment) &&
                int.TryParse(RrNpBox.Text, out int numPeriods))
                RrRrBox.Text = (CalculateIRR(presentValue, payment, numPeriods)*100.0).ToString("N2");
        }
    }
}
We've declared the functions in the dll and the we used them in the TextChanged event handlers. That will fill the result boxes in the tabs when you fill the input boxes. When you run the program, you will have the same result in both apps:

As you can see, refactoring the code into a dll brings many advantages: the code is not dependent on the UI, it is reusable and, best of all, it is testable. Creating unit tests for the code is a great way to be sure that everything works fine and, if you are making a change, you haven't introduced a bug. Now, we'll add the tests for the dll functions.
Adding tests to the dll
To add tests to the dll we must create a new test project to the group. Right click on the Project group and select "Add new project". Then, select the DUnitX project, and set its settings:
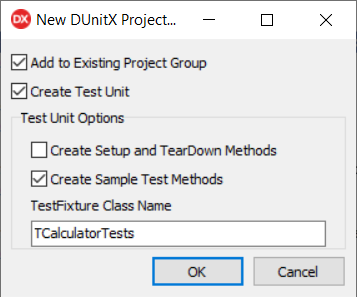
When you click the OK button, Delphi will create a new test project with an unit with sample tests. You need to add the four calculator units to your new project and then, we can create the first test:
unit PVCalculatorTests;

interface
uses
  DUnitX.TestFramework, PVCalculator, Math;

type

  [TestFixture]
  TPvCalculatorTests = class(TObject)
  public
    [Test]
    [TestCase('FutureValue','-1,0,0')]
    [TestCase('Rate','0,-1,0')]
    [TestCase('Periods','0,0,-1')]
    procedure NegativeInputParametersReturnNan(const FutureValue : Double;
      const Rate : Double; const Periods : Integer);
  end;

implementation

procedure TPvCalculatorTests.NegativeInputParametersReturnNan(const FutureValue,
  Rate: Double; const Periods: Integer);
begin
  var result := CalculatePv(FutureValue,Rate,Periods);
  Assert.IsTrue(IsNan(result));
end;

initialization
  TDUnitX.RegisterTestFixture(TPvCalculatorTests);
end.
We named the unit PvCalculatorTests. Then we add the PVCalculator and Math units to the Uses clause. Then, we set the [TextFixture] attribute to the test class, to tell the test framework that this is a class that will have tests. Then we create a method and decorate it with the [Test] attribute. As this will be a parametrized test, we add the cases with the TestCase attribute.
The test is simple. We will run the test with the parameters (there will always be a negative parameter) and the result must always be NaN, thus pointing an invalid entry. If you run the project you will see something like this:
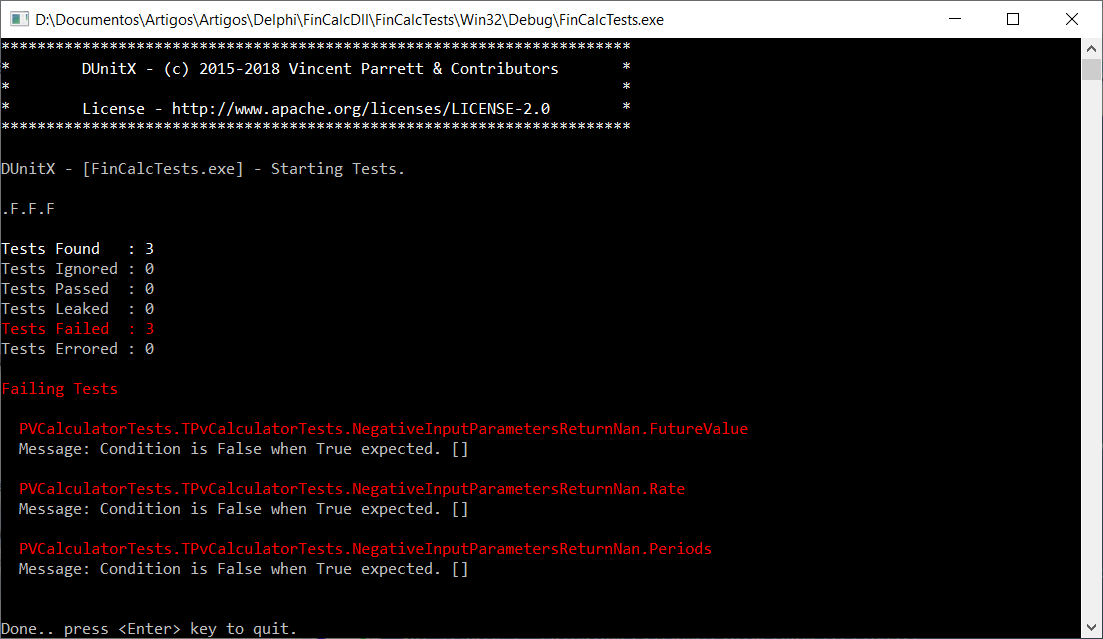
As you can see, the generated test project is a console app that runs the tests and shows the results. If you want a GUI app for the tests, you should install the TestInsight IDE plugin. As you can see from the image, all tests failed, because we have not checked the input parameters. We can change that in PVCalculator:
function CalculatePV(FutureValue, InterestRate: Double; NumPeriods : Integer):
  double;
begin
  if (FutureValue < 0) or (InterestRate < 0) or (NumPeriods < 0) then begin
    Result := NaN;
    exit;
  end;
  try
    Result := FutureValue / Power((1 + InterestRate), NumPeriods);
  except
    Result := NaN;
  end;
end;
Now, when you run the tests, all pass:
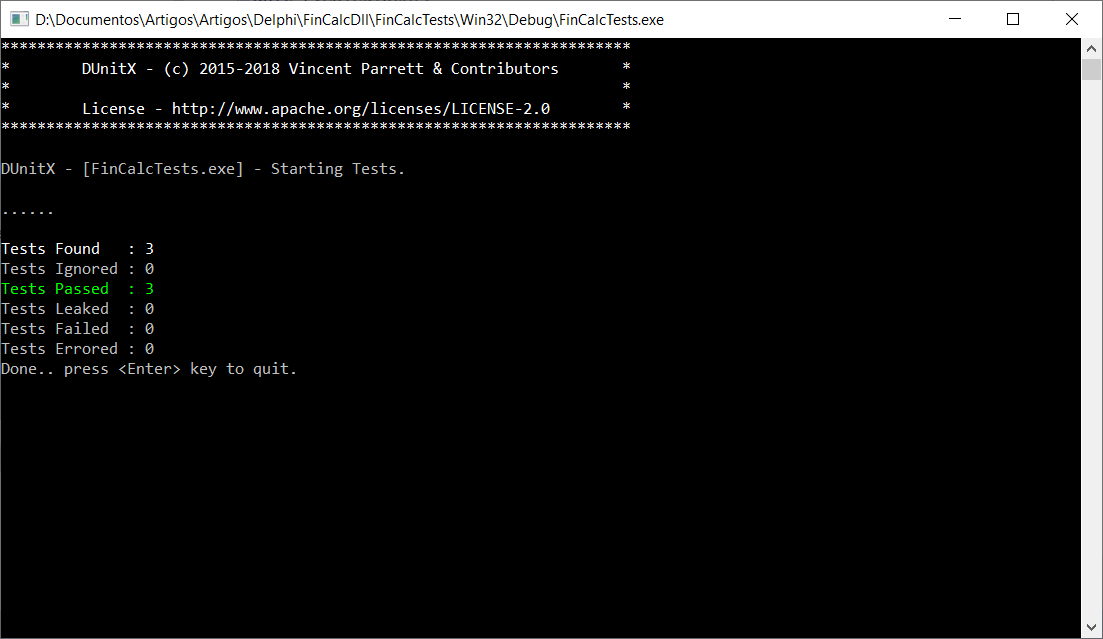
Now, we can create more tests for this calculator:
unit PVCalculatorTests;

interface
uses
  DUnitX.TestFramework, PVCalculator, Math;

type

  [TestFixture]
  TPvCalculatorTests = class(TObject)
  public
    [Test]
    [TestCase('FutureValue','-1,0,0')]
    [TestCase('Rate','0,-1,0')]
    [TestCase('Periods','0,0,-1')]
    procedure NegativeInputParametersReturnNan(const FutureValue : Double;
      const Rate : Double; const Periods : Integer);

    [Test]
    [TestCase('OnePeriod','100,1')]
    [TestCase('TenPeriods','100,10')]
    [TestCase('OneHundredPeriods','100,100')]
    procedure ZeroRatePresentValueEqualsFutureValue(const FutureValue : Double;
      const Periods : Integer);

    [Test]
    [TestCase('OnePeriodOnePercent','0.01,1')]
    [TestCase('OnePeriodTenPercent','0.10,1')]
    [TestCase('OnePeriodHundredPercent','1.00,1')]
    [TestCase('TenPeriodOnePercent','0.01,10')]
    [TestCase('TenPeriodTenPercent','0.10,10')]
    [TestCase('TenPeriodHundredPercent','1.00,10')]
    [TestCase('HundredPeriodOnePercent','0.01,100')]
    [TestCase('HundredPeriodTenPercent','0.10,100')]
    [TestCase('HundredPeriodHundredPercent','1.00,100')]
    procedure ZeroFutureValueEqualsZeroPresentValue(const Rate : Double;
      const Periods : Integer);

    [Test]
    [TestCase('OnePeriodOnePercent','100,0.01,1,99.01')]
    [TestCase('OnePeriodTenPercent','100,0.10,1,90.91')]
    [TestCase('OnePeriodHundredPercent','100,1.00,1,50')]
    [TestCase('TenPeriodOnePercent','100,0.01,10,90.53')]
    [TestCase('TenPeriodTenPercent','100,0.10,10,38.55')]
    [TestCase('TenPeriodHundredPercent','100,1.00,10,0.10')]
    [TestCase('HundredPeriodOnePercent','100,0.01,100,36.97')]
    [TestCase('HundredPeriodTenPercent','100,0.10,100,0.01')]
    [TestCase('HundredPeriodHundredPercent','100,1.00,100,0.00')]
    procedure VariablePeriodTests(const FutureValue : Double;
      const Rate : Double; const Periods : Integer; const Expected : Double);

  end;

implementation

procedure TPvCalculatorTests.NegativeInputParametersReturnNan(const FutureValue,
  Rate: Double; const Periods: Integer);
begin
  var result := CalculatePv(FutureValue,Rate,Periods);
  Assert.IsTrue(IsNan(result));
end;

procedure TPvCalculatorTests.VariablePeriodTests(const FutureValue, Rate: Double;
  const Periods: Integer; const Expected: Double);
begin
  var result := CalculatePv(FutureValue,Rate,Periods);
  Assert.AreEqual(Expected,Double(result));
end;

procedure TPvCalculatorTests.ZeroFutureValueEqualsZeroPresentValue(
  const Rate: Double; const Periods: Integer);
begin
  var result := CalculatePv(0,Rate,Periods);
  Assert.AreEqual(Double(0.0),Double(result));
end;

procedure TPvCalculatorTests.ZeroRatePresentValueEqualsFutureValue(
  const FutureValue Double; const Periods: Integer);
begin
  var result := CalculatePv(FutureValue,0,Periods);
  Assert.AreEqual(FutureValue,Double(result));
end;

initialization
  TDUnitX.RegisterTestFixture(TPvCalculatorTests);
end.
You should note one thing. When you run the tests, you will see that some of them fail:
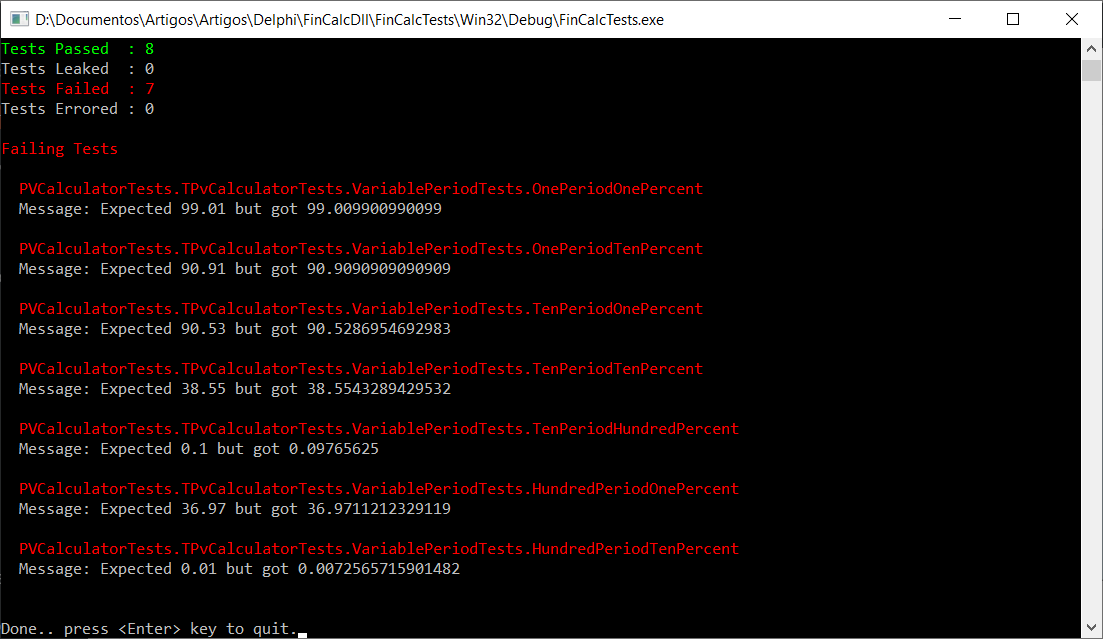
This is not a failure in our code, but a failure in the test. As we are comparing double values, there are many decimals to compare and that's not what you want. You can change your test to compare the difference to a maximum value. If the difference is greater than the maximum, the test fails:
procedure TPvCalculatorTests.VariablePeriodTests(const FutureValue, Rate: Double;
  const Periods: Integer; const Expected: Double);
begin
  var result := CalculatePv(FutureValue,Rate,Periods);
  Assert.AreEqual(Expected,Double(result), 0.01);
end;
Now, all tests pass. You can create tests for the other calculators the same way we did for this one. If you are using Delphi Rio and run the tests with debugging, you will see that some tests give a floating point error:
procedure TPmtCalculatorTests.ZeroPeriodsValueEqualsPresentValue(
  const PresentValue, Rate: Double);
begin
  var result := CalculatePmt(PresentValue,Rate, 0);
  Assert.AreEqual(Double(PresentValue),Double(result),0.01);
end;

procedure TPmtCalculatorTests.ZeroRatePmtEqualsPresentValueDivPeriods(
  const PresentValue: Double; const Periods: Integer);
begin
  var result := CalculatePmt(PresentValue,0,Periods);
  Assert.AreEqual(Double(PresentValue/Periods),Double(result),0.01);
end;
But the tests still pass. That's because there is a bug in Delphi Rio (QC#RSP-19882), where comparisons with NaN return true, while they should return false. This can be solved by changing the tests to:
procedure TPmtCalculatorTests.ZeroPeriodsValueEqualsPresentValue(
  const PresentValue, Rate: Double);
begin
  var result := CalculatePmt(PresentValue,Rate, 0);
  Assert.IsFalse(IsNan(Result));
  Assert.AreEqual(Double(PresentValue),Double(result),0.01);
end;

procedure TPmtCalculatorTests.ZeroRatePmtEqualsPresentValueDivPeriods(
  const PresentValue: Double; const Periods: Integer);
begin
  var result := CalculatePmt(PresentValue,0,Periods);
  Assert.IsFalse(IsNan(Result));
  Assert.AreEqual(Double(PresentValue/Periods),Double(result),0.01);
end;
When you run the tests again, you will see that they will fail. We must change the calculator to solve this:
function CalculatePmt(PresentValue, InterestRate: Double;NumPeriods : Integer):
  Double;
begin
  if (PresentValue < 0) or (InterestRate < 0) or (NumPeriods < 0) then begin
    Result := NaN;
    exit;
  end;
  try
    if InterestRate = 0 then
      Result := PresentValue/NumPeriods
    else if NumPeriods = 0 then
      Result := PresentValue
    else
      Result := (PresentValue * InterestRate) * Power((1 + InterestRate),
        NumPeriods) / (Power((1 + InterestRate), NumPeriods) - 1);
  except
    Result := Nan;
  end;
end;
After this, our dll and its tests are ready to use and can be used in any language that supports Win32 dlls.
Conclusions
We've come a long way from the calculator code mixed with the UI to a new dll with unit tests. This architecture is more robust, reusable and easier to maintain. If we need to make changes to the dll, we are covered by unit tests, that can assure we are not introducing new bugs. And if some bug is found in the functions, it's just a matter of writing a new test that fails, thus making sure of the bug, fix the code and rerun the test, making sure it's passed. Using the Red-Refactor-Green procedure, we have a safety net for changing our code.
The full code for this article is at https://github.com/bsonnino/FinCalcDll
