
Some time ago, I've written this post about loading XAML dynamically. You can use this in many different ways:
- store the views in a database
- load the views from a server
- change views depending on the user
- ...
Using that method, you can change the view, but there is a pitfall: all code must be loaded when the code is initialized. To change anything, you must recompile all the code. That way, the Views you are loading must have properties that match the ones with the ViewModels already in the code.
So, I started to think a way to load the XAML files and its corresponding ViewModel dynamically. Fortunately, C# provides us a mechanism to compile C# code at runtime and execute it. That's great for our needs.
Compiling C# code at runtime
Compiling code at runtime is not new, you can compile code using the CSharpCodeProvider class with some code like this one:
        static void Main(string[] args)
        {
            CSharpCodeProvider provider = new CSharpCodeProvider();
            CompilerParameters parameters = new CompilerParameters {GenerateInMemory = true};
            parameters.ReferencedAssemblies.Add("System.dll");
            var code =
@"
using System;
namespace DynamicCompile
{
    public class DynamicCode
    {
        public void Execute()
        {
            Console.WriteLine(""Hello World"");
        }
    }
}";
            CompilerResults results = provider.CompileAssemblyFromSource(
                parameters, code);
            if (!results.Errors.HasErrors)
            {
                var type = results.CompiledAssembly.GetType("DynamicCompile.DynamicCode");
                var method = type.GetMethod("Execute", BindingFlags.Public | BindingFlags.Instance);
                var cls = Activator.CreateInstance(type);
                method?.Invoke(cls, null);
            }
            else
            {
                foreach (CompilerError error in results.Errors)
                {
                    Console.WriteLine(error.ErrorText);
                }
            }
        }
If you execute this code, you will see "Hello World" written in the console. To use it, you must add the namespaces System.CodeDom.Compiler and System. CSharp. This code will use the legacy compiler and will compile code before C#6. If you want to compile C#6 code or newer, you will have to use the Roslyn compiler. To do that, you must add the Microsoft.CodeDom.Providers.DotNetCompilerPlatform NuGet package and add the Microsoft.CodeDom.Providers.DotNetCompilerPlatform namespace. That way, the same code will be able to compile C#6 or later:
        static void Main(string[] args)
        {
            CSharpCodeProvider provider = new CSharpCodeProvider();
            CompilerParameters parameters = new CompilerParameters {GenerateInMemory = true};
            parameters.ReferencedAssemblies.Add("System.dll");
            var code =
@"
using System;
namespace DynamicCompile
{
    public class DynamicCode
    {
        const string str = ""World"";
        public void Execute()
        {
            Console.WriteLine($""Hello {str}"");
        }
    }
}";
            CompilerResults results = provider.CompileAssemblyFromSource(
                parameters, code);
            if (!results.Errors.HasErrors)
            {
                var type = results.CompiledAssembly.GetType("DynamicCompile.DynamicCode");
                var method = type.GetMethod("Execute", BindingFlags.Public | BindingFlags.Instance);
                var cls = Activator.CreateInstance(type);
                method?.Invoke(cls, null);
            }
            else
            {
                foreach (CompilerError error in results.Errors)
                {
                    Console.WriteLine(error.ErrorText);
                }
            }
        }
As you can see, the code above gives the same result, but uses the string interpolation, available in C#6. With this knowledge, we can work on loading the ViewModel code at runtime.
Loading and Running the ViewModel code at runtime
We've seen how to compile and run some code at runtime. With this knowledge, we can create a loose file with the ViewModel corresponding to the loaded XAML, load it and compile it at runtime. One extra bonus is that the View doesn't know where do the data comes from, so we can load the ViewModel, compile it, instantiate an instance of the compiled class and assign this instance as the DataContext for the View.
As a sample, we will create a simple WPF project that will load a XAML file and its ViewModel into the main screen. Create a new blank WPF project and call it DynamicXAMLAndVM. In the XAML for MainPage.xaml, add this code:
<Grid>
   <ContentControl x:Name="WndContent"/>
</Grid>
In the code behind for MainPage.xaml.cs, add this code:
public MainWindow()
{
    InitializeComponent();
    using (FileStream fs = new FileStream("CustView.xaml", FileMode.Open))
    {
        WndContent.Content= XamlReader.Load(fs) as FrameworkElement;
        var vmType = LoadViewModel("CustViewModel");
        if (vmType == null)
            MessageBox.Show(_errors, "Errors in compile");
        else
            DataContext = Activator.CreateInstance(vmType);
    }

}

private string _errors;
public Type LoadViewModel(string viewModelName)
{
    CSharpCodeProvider provider = new CSharpCodeProvider();
    CompilerParameters parameters = new CompilerParameters {GenerateInMemory = true};
    parameters.ReferencedAssemblies.Add("System.dll");
    parameters.ReferencedAssemblies.Add(Assembly.GetEntryAssembly().Location);
    var code = File.ReadAllText(viewModelName + ".cs");
    CompilerResults results = provider.CompileAssemblyFromSource(parameters, code);
    if (results.Errors.HasErrors)
    {
        _errors = "";
        foreach (CompilerError error in results.Errors)
        {
            _errors += $"Error #{error.ErrorNumber}: {error.ErrorText}\n";
        }

        return null;
    }
    else
    {
        Assembly assembly = results.CompiledAssembly;
        return assembly.GetType($"DynamicXamlAndVM.{viewModelName}");
    }
}
In the constructor, we load the XAML file and assign it to the Content property of the ContentControl. Then we call LoadViewModel, that will load the ViewModel and return its type. If the type is not null, we create an instance of the class with Activator.CreateInstance and assign it to the DataContext of the View. That's all that's needed to load the XAML and the ViewModel.
LoadViewModel will create a CSharpCodeProvider and will compile the code. If there are no errors in the code, it will return the parsed type. There is something that should be noticed here: we are referencing two assemblies for the compilation: System.dll and the current assembly. I'm doing that because the compiled class will be located in a separate assembly and won't have access to the code in the current one.
I am not using any MVVM framework. Instead, I have created a new class, RelayCommand, based on Josh Smith's code found here.
public class RelayCommand : ICommand
{
    private readonly Predicate<object> _canExecute;
    private readonly Action<object> _execute;

    public RelayCommand(Action<object> execute, Predicate<object> canExecute)
    {
        _canExecute = canExecute;
        _execute = execute;
    }

    public event EventHandler CanExecuteChanged
    {
        add => CommandManager.RequerySuggested += value;
        remove => CommandManager.RequerySuggested -= value;
    }

    public bool CanExecute(object parameter)
    {
        return _canExecute(parameter);
    }

    public void Execute(object parameter)
    {
        _execute(parameter);
    }
}
To access this code in the main assembly, you must add it to the Referenced Assemblies. If you are using a third party MVVM framework, you must add all its assemblies to the referenced assemblies.
The next step is to create the View and the ViewModel. Create a new file and name it CustView.xaml. In the properties page, set its BuildAction to Noneand the Copy to output directory to Copy if newer. Then, add this code:
<Grid xmlns="http://schemas.microsoft.com/winfx/2006/xaml/presentation">
    <Grid.RowDefinitions>
        <RowDefinition Height="40"/>
        <RowDefinition Height="40"/>
        <RowDefinition Height="40"/>
        <RowDefinition Height="40"/>
        <RowDefinition Height="*"/>
    </Grid.RowDefinitions>
    <Grid.ColumnDefinitions>
        <ColumnDefinition Width="*"/>
        <ColumnDefinition Width="2*"/>
    </Grid.ColumnDefinitions>
    <TextBlock Grid.Column="0" Grid.Row="0" Text="ID" Margin="5"/>
    <TextBlock Grid.Column="0" Grid.Row="1" Text="Name" Margin="5"/>
    <TextBlock Grid.Column="0" Grid.Row="2" Text="Address" Margin="5"/>
    <TextBlock Grid.Column="0" Grid.Row="3" Text="City" Margin="5"/>
    <TextBox Grid.Column="1" Grid.Row="0" Text="{Binding ID}" Margin="5"/>
    <TextBox Grid.Column="1" Grid.Row="1" Text="{Binding Name}" Margin="5"/>
    <TextBox Grid.Column="1" Grid.Row="2" Text="{Binding Address}" Margin="5"/>
    <TextBox Grid.Column="1" Grid.Row="3" Text="{Binding City}" Margin="5"/>
    <Button Grid.Column="1" Grid.Row="4" Command="{Binding ClearCommand}" Margin="5"
            HorizontalAlignment="Right" VerticalAlignment="Bottom" Content="Clear Data"
            Width="65" Height="35" />
</Grid>
As you can see, it's a simple grid with some TextBoxes and a Button. The Text property of the TextBoxes are bound to properties in the DataContext. Thanks to the data binding, the View does not know from where the data comes from. We just need to assign a class that has the properties ID, Name, Address, City and a command named ClearCommand. The ViewModel is also a loose cs file. Create a new file and name it CustViewModel.cs, setting its BuildAction to Noneand the Copy to output directory to Copy if newer. Then, add this code:
class CustViewModel : INotifyPropertyChanged
{
    private string _id;
    private string _name;
    private string _address;
    private string _city;
    public event PropertyChangedEventHandler PropertyChanged;

    protected virtual void OnPropertyChanged([CallerMemberName] string propertyName = nul
    {
        PropertyChanged?.Invoke(this, new PropertyChangedEventArgs(propertyName));
    }

    public CustViewModel()
    {
        ID = "007";
        Name = "James Bond";
        Address = "MI6";
        City = "London";

    }
    public string ID
    {
        get => _id;
        set
        {
            _id = value;
            OnPropertyChanged();
        }
    }

    public string Name
    {
        get => _name;
        set
        {
            _name = value;
            OnPropertyChanged();
        }
    }

    public string Address
    {
        get => _address;
        set
        {
            _address = value;
            OnPropertyChanged();
        }
    }

    public string City
    {
        get => _city;
        set
        {
            _city = value;
            OnPropertyChanged();
        }
    }

    public ICommand ClearCommand => new RelayCommand(
        o =>
        {
            ID = "";
            Name = "";
            Address = "";
            City = "";
        },
        o => true);
}
This is a simple ViewModel, which has the properties needed for the View and a command that will clear all bound properties when it's executed. That's all that is needed to load a View with its ViewModel and add it to the main screen. When you run the app, you will see something like this:
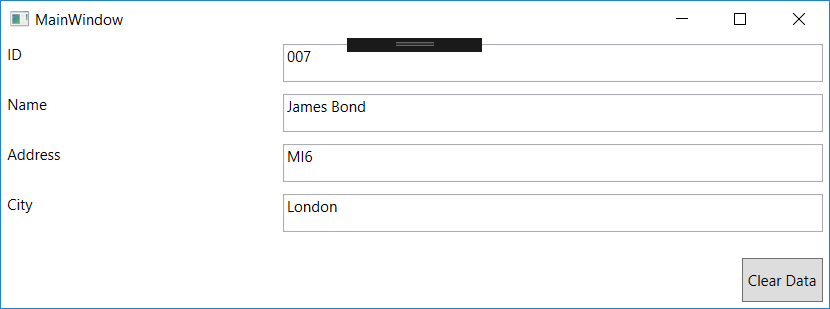
As you can see, all the data is loaded into the TextBoxes and, when you click on the button, the data is cleared. Nice, no? This code is tied to the files in the project. Now, we can streamline this process, refactoring the code and allowing it to call any file added in the project. For that, we will use some rules:
- All the views will be in he Views folder
- All the viewmodels will be in the ViewModels folder and will have the same name of the View
- The namespace for all viewmodels will be DynamicVM
Refactoring the code
In the project, create a new folder and name it Views and move the CustView.xaml file to it. Rename the file to Cust.xaml. Then, create a new folder and name it ViewModels and move the CustViewModel.cs file to it. Rename it to Cust.cs. In the file, rename the class to Cust and rename the namespace to DynamicVM.
Create a new class named DynamicContentLoader and add this code:
using System;
using System.CodeDom.Compiler;
using System.IO;
using System.Reflection;
using System.Windows;
using System.Windows.Markup;
using Microsoft.CodeDom.Providers.DotNetCompilerPlatform;

namespace DynamicXamlAndVMRefactored
{
    public class DynamicContentLoader
    {
        public static string Errors => _errors;
        public static FrameworkElement Load(string viewName)
        {
            var viewPath = $"Views\\{viewName}.xaml";
            if (!File.Exists(viewPath))
                return null;
            try
            {
                using (FileStream fs = new FileStream(viewPath, FileMode.Open))
                {
                    var result = XamlReader.Load(fs) as FrameworkElement;
                    if (result == null)
                        return null;
                    var viewModelPath = $"ViewModels\\{viewName}.cs";
                    if (File.Exists(viewModelPath))
                    {
                        var vmType = LoadViewModel(viewModelPath, viewName);
                        if (vmType != null)
                        {
                            result.DataContext = Activator.CreateInstance(vmType);
                        }
                    }

                    return result;
                }
            }
            catch (Exception e)
            {
                _errors = e.Message;
                return null;
            }

        }

        private static string _errors;
        private static Type LoadViewModel(string viewModelName, string viewName)
        {
            CSharpCodeProvider provider = new CSharpCodeProvider();
            CompilerParameters parameters = new CompilerParameters { GenerateInMemory = true };
            parameters.ReferencedAssemblies.Add("System.dll");
            parameters.ReferencedAssemblies.Add(Assembly.GetEntryAssembly().Location);
            var code = File.ReadAllText(viewModelName);
            CompilerResults results = provider.CompileAssemblyFromSource(parameters, code);
            if (results.Errors.HasErrors)
            {
                _errors = "";
                foreach (CompilerError error in results.Errors)
                {
                    _errors += $"Error #{error.ErrorNumber}: {error.ErrorText}\n";
                }

                return null;
            }
            else
            {
                Assembly assembly = results.CompiledAssembly;
                return assembly.GetType($"DynamicVM.{viewName}");
            }
        }
    }
}
This code is very similar to the previous one, we've created a class with a static method Load, that loads a XAML file and, if there is a corresponding ViewModel, loads it and assigns it as the DataContext for the view. That way, the code in MainWindow.xaml.cs is simplified:
public MainWindow()
{
    InitializeComponent();
    var content = DynamicContentLoader.Load("Cust");
    if (DynamicContentLoader.Errors != null)
        MessageBox.Show(DynamicContentLoader.Errors, "Errors in compile");
    WndContent.Content = content;
}
Running the program, you will have the same result as the previous run.
Conclusions
As you've seen, if you want to have dynamic views, you are not limited to use codeless windows. You can also add code for it, compile it on the fly and use it tied to the view, thanks to the magic of data binding. That way, you can create applications fully dynamic, that can be easily updated whenever you want, with no need of recompilation and redeploy.
All the source code for this article is at https://github.com/bsonnino/DynamicXamlAndVM