
Not long ago, Microsoft release its new device, the Surface Studio, a powerhorse with a 28” touch screen, with characteristics that make it a go in the wish list for every geek (https://www.microsoft.com/en-us/surface/devices/surface-studio/overview).
With it, Microsoft released the Surface Dial, a rotary wheel that redefines the way you work when you are doing some creative design (https://www.microsoft.com/en-us/surface/accessories/surface-dial). Although it was created to interact directly with the Surface Studio (you can put it on the screen and it will open new ways to work, you can also use it even if you don’t have the Surface Studio.
In fact, you can use it with any device that has bluetooth connection and Windows 10 Anniversary edition. This article will show you how to use the Surface Dial in a UWP application and enhance the ways your user can interact with your app.
Working with the Surface Dial
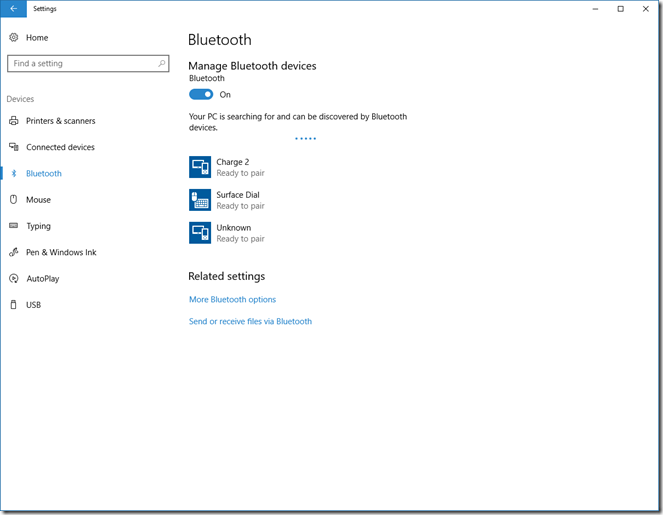
Work with the Surface Dial is very easy. Just open the “Manage Bluetooth Devices” window and, in the Surface Dial, open the bottom cover to show the batteries and press the button there until the led starts blinking. The Surface Dial will appear in the window:
Just click on it and select “Connect”. Voilà, you are ready to go. And what can you do, now? Just out of the box, many things:
- Go to a browser window and turn the wheel, and you’ll start scrolling the page content
- Click on the dial and a menu opens:
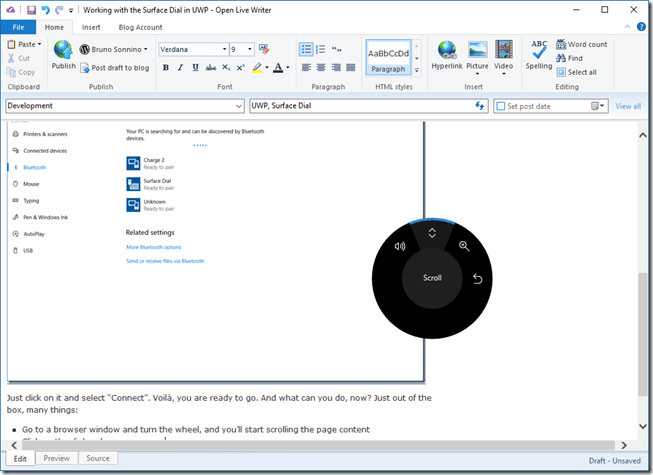
If you turn the wheel, you can change the function the wheel does:
- Volume, to increase or decrease the sound volume of you machine
- Scroll, to scroll up and down the content (the default setting)
- Zoom, to zoom in and out
- Undo, to undo or redo the last thing
The best thing here is that it works in the program you are in, no matter if it’s a Windows 10 program or no (for example, you can use it for Undo/Redo in Word or to scroll in the Chrome browser). All of this comes for free, you don’t have to do anything.
If you want to give an extra usability for your Surface Dial, you can go to Windows Settings/Devices/Wheel and set new tools for your apps. For example, if you have a data entry form and you want to move between the text boxes, you can create a Custom Tool like this:
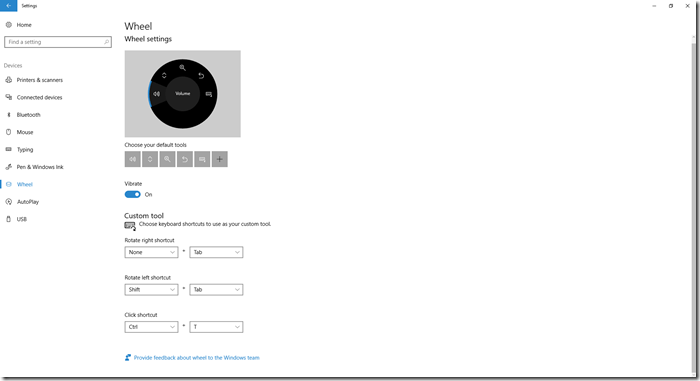
That way, the user will be able to move between the boxes using the Surface Dial. Nice, no?
But what if you want to create a special experience for your user? We’ll do that now, creating a UWP program that will be able to change properties of a rectangle: change its size, position, angle or color, with just one tool: the Surface Dial.
Creating a UWP program for the Surface Dial
Initially, let’s create a UWP program in Visual Studio. You must target the Anniversary Edition. If you don’t have it, you must install Visual Studio Update 3 on your system.
Then, add the rectangle to MainPage.xaml:
<Grid Background="{ThemeResource ApplicationPageBackgroundThemeBrush}">
    <Rectangle Width="100" Height="100" Fill =" Red" x:Name="Rectangle" RenderTransformOrigin="0.5,0.5">
        <Rectangle.RenderTransform>
            <TransformGroup>
                <ScaleTransform x:Name="Scale" ScaleX="1"/>
                <RotateTransform x:Name="Rotate" Angle="0"/>
                <TranslateTransform x:Name="Translate" X="0" Y="0"/>
            </TransformGroup>
        </Rectangle.RenderTransform>
    </Rectangle>
</Grid>
We have added a RenderTransform to the rectangle, so we can scale, rotate or translate it later with the Surface Dial.
The next step is add some png files for the Surface Dial icons. Get some Pngs that represent Rotate, Resize, Move in X Axis, Move in Y Axis and Change Colors (I’ve got mine from https://www.materialui.co) and add them to the Assets folder in the project.
In MainPage.xaml.cs, get the Dial controller, initialize the Surface Dial menu and set its RotationChanged event handler:
public enum CurrentTool
{
    Resize,
    Rotate,
    MoveX,
    MoveY,
    Color
}

private CurrentTool _currentTool;
private readonly List<SolidColorBrush> _namedBrushes;
private int _selBrush;

public MainPage()
{
    this.InitializeComponent();
    // Create a reference to the RadialController.
    var controller = RadialController.CreateForCurrentView();

    // Create the icons for the dial menu
    var iconResize = RandomAccessStreamReference.CreateFromUri(new Uri("ms-appx:///Assets/Resize.png"));
    var iconRotate = RandomAccessStreamReference.CreateFromUri(new Uri("ms-appx:///Assets/Rotate.png"));
    var iconMoveX= RandomAccessStreamReference.CreateFromUri(new Uri("ms-appx:///Assets/MoveX.png"));
    var iconMoveY = RandomAccessStreamReference.CreateFromUri(new Uri("ms-appx:///Assets/MoveY.png"));
    var iconColor = RandomAccessStreamReference.CreateFromUri(new Uri("ms-appx:///Assets/Color.png"));

    // Create the items for the menu
    var itemResize = RadialControllerMenuItem.CreateFromIcon("Resize", iconResize);
    var itemRotate = RadialControllerMenuItem.CreateFromIcon("Rotate", iconRotate);
    var itemMoveX = RadialControllerMenuItem.CreateFromIcon("MoveX", iconMoveX);
    var itemMoveY = RadialControllerMenuItem.CreateFromIcon("MoveY", iconMoveY);
    var itemColor = RadialControllerMenuItem.CreateFromIcon("Color", iconColor);

    // Add the items to the menu
    controller.Menu.Items.Add(itemResize);
    controller.Menu.Items.Add(itemRotate);
    controller.Menu.Items.Add(itemMoveX);
    controller.Menu.Items.Add(itemMoveY);
    controller.Menu.Items.Add(itemColor);

    // Select the correct tool when the item is selected
    itemResize.Invoked += (s,e) =>_currentTool = CurrentTool.Resize;
    itemRotate.Invoked += (s,e) =>_currentTool = CurrentTool.Rotate;
    itemMoveX.Invoked += (s,e) =>_currentTool = CurrentTool.MoveX;
    itemMoveY.Invoked += (s,e) =>_currentTool = CurrentTool.MoveY;
    itemColor.Invoked += (s,e) =>_currentTool = CurrentTool.Color;

    // Get all named colors and create brushes from them
    _namedBrushes = typeof(Colors).GetRuntimeProperties().Select(c => new SolidColorBrush((Color)c.GetValue(null))).ToList();

    controller.RotationChanged += ControllerRotationChanged;

    // Leave only the Volume default item - Zoom and Undo won't be used
    RadialControllerConfiguration config = RadialControllerConfiguration.GetForCurrentView();
    config.SetDefaultMenuItems(new[] { RadialControllerSystemMenuItemKind.Volume });

}
The first step is to get the current controller with RadialController.CreateForCurrentView(). Then, create the icons, initialize the items and add them to the menu. For each item, there will be an Invoked event that will be called when the menu item is invoked. At that time, we select the tool we want. The last steps are to set up the RotationChanged event handler and to remove the default menu items we don’t want.
The RotationChanged event handler is
private void ControllerRotationChanged(RadialController sender, RadialControllerRotationChangedEventArgs args)
{
    switch (_currentTool)
    {
        case CurrentTool.Resize:
            Scale.ScaleX += args.RotationDeltaInDegrees / 10;
            Scale.ScaleY += args.RotationDeltaInDegrees / 10;
            break;
        case CurrentTool.Rotate:
            Rotate.Angle += args.RotationDeltaInDegrees;
            break;
        case CurrentTool.MoveX:
            Translate.X += args.RotationDeltaInDegrees;
            break;
        case CurrentTool.MoveY:
            Translate.Y += args.RotationDeltaInDegrees;
            break;
        case CurrentTool.Color:
            _selBrush += (int)(args.RotationDeltaInDegrees / 10);
            if (_selBrush >= _namedBrushes.Count)
                _selBrush = 0;
            if (_selBrush < 0)
                _selBrush = _namedBrushes.Count-1;
            Rectangle.Fill = _namedBrushes[(int)_selBrush];
            break;
        default:
            break;
    }

}
Depending on the tool we have, we work with the desired transform. For changing colors, I’ve used an array of brushes, created from the named colors in the system. When the user rotates the dial, I select a new color in the array.
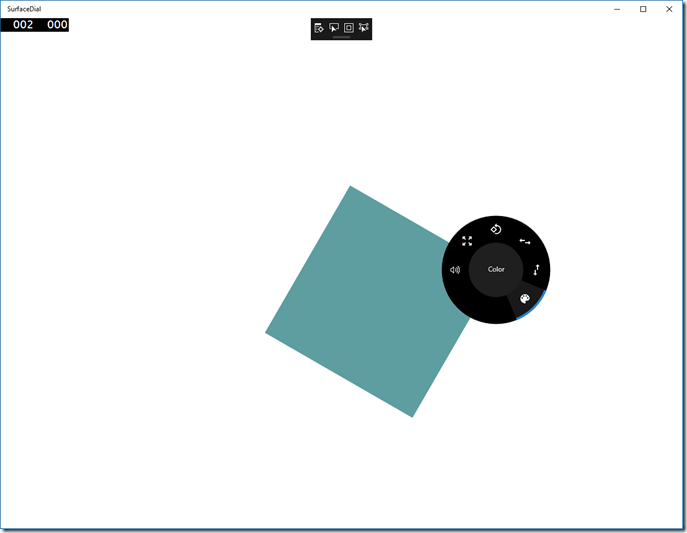
Now, when you run the program, you have something like this:
Conclusions
As you can see, we’ve created a completely new interaction for the user. Now, he can change size, angle, position or even color with the dial, without having to select things with the mouse. That’s really a completely new experience and that can be achieved just with a few lines of code. With the Surface Dial you can give to your users a different experience, even if they are not using the Surface Studio.
The full source code for the project is at https://github.com/bsonnino/SurfaceDial.
1 thought on “Working with the Surface Dial in UWP”